
Subscribe to Our Youtube Channel
Related Manuals for Grundig GEBD12401BMPH


Summary of Contents for Grundig GEBD12401BMPH
- Page 1 Built-in Oven User Manual GEBD12401BMPH 385444208_3/ EN/ R.AA/ 25/01/2024 12:18 7757787759...
- Page 2 Welcome! Dear Customer, Thank you for choosing the Grundig product. We want your product, manufactured with high quality and technology, to offer you the best efficiency. Therefore, carefully read this manual and any other documentation provided before using the product.
-
Page 3: Table Of Contents
Using the Meat Probe ....30 Table of Contents 6 General Information About Bak- 1 Safety Instructions......ing ........... Intended Use........General Warnings About Baking Child, Vulnerable Person and Pet in the Oven........Safety ..........6.1.1 Pastries and oven food....33 Electrical Safety...... -
Page 4: Safety Instructions
1 Safety Instructions • This section includes the Intended Use safety instructions necessary • This product is designed to be to prevent the risk of personal used at home. It is not suitable injury or material damage. for commercial use. •... -
Page 5: Electrical Safety
supervised or trained about the • When the door is open, do not safe use and hazards of the put any heavy objects on it or product. allow children to sit on it. You • Children should not play with may cause the oven to tip over the product. - Page 6 which the product is connec- Otherwise, cable insulation ted, in compliance with the may melt and cause fire as a electrical regulations and sep- result of short circuit. arating all poles from the net- • Use original cable only. Do not work.
-
Page 7: Transportation Safety
of electric shock. Unplug the • Do not place items on the ap- product or turn off the fuse pliance. Carry the appliance from the fuse box. vertically. • The product must not be trans- If your product has a power ported when there is water in cable and plug: the it. -
Page 8: Safety Of Use
• Avoid using any heat-insulating • If you will not use the product materials to cover the interior for a long time, unplug it or of the furniture that will be in- turn off the power from the stalled. fuse box. •... -
Page 9: Temperature Warnings
Temperature Warn- • Close the oven door after pushing the accessories com- ings pletely into the cooking space, • CAUTION: When the product otherwise they may hit the is in use, the product and its door glass and damage it. accessible parts will be hot. -
Page 10: Steam System
Be mindful of the following pre- liquids dripping onto the tray cautions when using greasy can cause smoking or even ig- parchment paper or similar ma- nite flames. terials: • An air flow is generated when • Place the greaseproof paper in the product lid is opened. -
Page 11: Maintenance And Cleaning Safety
oven dry after cooking. Do not • Do not use harsh abrasive store wet food items in the cleaners, metal scrapers, wire oven for a long time. wool or bleach materials to • When removing the food after clean the oven front door steam assisted cooking, hot li- glass. -
Page 12: Environmental Instructions
side the oven with soapy cloth. cleaning), you do not need to Remove all accessories and remove these accessories cooking utensils from the from the oven. oven. If your product has a • If there is a hob over your oven, pyro proof accessory (resist- do not operate the hob during ant to high temperature self-... -
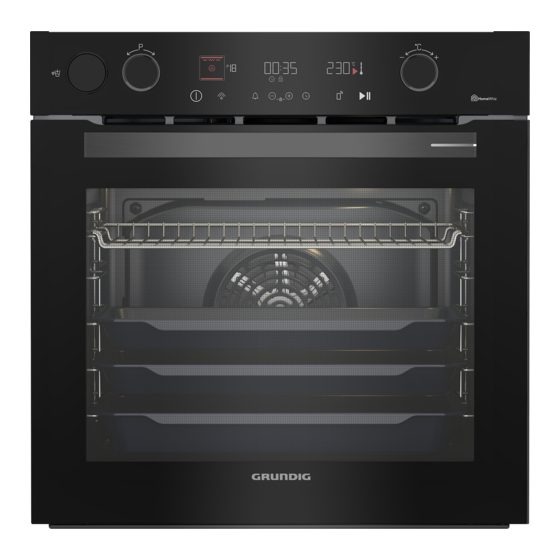
Page 13: Your Product
3 Your product 3.1 Product Introduction 1 Control panel 2 Lamp 3 Wire shelves 4 Fan motor (behind the steel plate) 5 Door 6 Handle 7 Lower heater (under the steel plate) 8 Shelf positions 9 Steam exit hole 10 Upper heater 11 Ventilation holes 12 Water tank 3.2 Product Control Panel Introduc-... -
Page 14: Control Panel
3.2.1 Control Panel 1 Water tank 2 Function selection knob 3 Control unit 4 Temperature knob If there are knob(s) controlling your Temperature knob product, in some models this/these knob(s) You can select the temperature you want to may be so that they come out when pushed cook with the temperature knob. -
Page 15: Oven Operating Functions
: Time and settings key : Defrosting symbol : Remove control key : Keep warm symbol : Baking start/stop key : Remove control symbol Indicator areas : : Wifi symbol : Temperature indicator area : Low level steam symbol * 10 : Timer/duration indicator area : High level steam symbol * 11 : Function display... -
Page 16: Product Accessories
Upper heating, lower heating and fan heating functions oper- "3D" function 40-280 ate. Each side of the product to be cooked is cooked equally and quickly. Cooking is done with a single tray. The small grill on the oven ceiling works. It is suitable for Low grill 40-280 grilling smaller amounts. -
Page 17: Use Of Product Accessories
On models with wire shelves : Placing the wire grill on the cooking shelves On models with wire shelves : It is crucial to place the wire grill on the wire side shelves properly. While placing the wire grill on the desired shelf, the open section must be on the front. - Page 18 On models without wire shelves : It is also crucial to place the trays on the side shelves properly. The tray has one dir- ection when placing it on the shelf. While placing the tray on the desired shelf, its side designed for holding must be on the front.
-
Page 19: Technical Specifications
3.6 Technical Specifications General specifications Product external dimensions (height/width/depth) (mm) 595 /594 /567 Oven installation dimensions (height / width / depth) 590-600 /560 /min. 550 (mm) Voltage/Frequency 220-240 V ~; 50 Hz Cable type and section used/suitable for use in the min. -
Page 20: First Use
4 First Use Before you start using your product, it is re- 6. Touch the keys to set the minute. commended to do the following stated in Confirm the setting by touching the the following sections respectively. key. 4.1 First Timer Setting Always set the time of day before using your oven. - Page 21 NOTICE: Some detergents or cleaning NOTICE: During the first use, smoke and agents may cause damage to the surface. odour may come up for several hours. This Do not use abrasive detergents, cleaning is normal and you just need good ventila- powders, cleaning creams or sharp objects tion to remove it.
-
Page 22: Using The Oven
5 Using the Oven 5.1 General Information on Using the If there is key on the control panel: In cases where the oven lamp is automatically Oven switched on or off, you can turn the lamp Cooling fan ( It varies depending on the on and off at any time by touching the product model. - Page 23 Keys : If no setting is made on this dis- : On/off key play, the oven turns off in approxim- ately 3 minutes and the time of day : Steam key is shown on the display. : Alarm key : Decrease and advance key Turning off the oven : Increase and advance key Turn off the oven by touching the...
- Page 24 If you change the operating func- tion after you change the pre-set temperature of the operating func- tion, the last temperature set is shown on the display. However, if the selected temperature is not ð Your oven starts operating immediately within the temperature range of the at the selected function and temperat- selected operating function, the...
-
Page 25: Steam Assisted Cooking
the set temperature, each stage of • Condensation formed on the oven door after steam assisted cooking may drip symbol will light up. When the baking time is completed, around when the oven door is opened. As soon as you open the oven door, wipe off “End”... - Page 26 4. Open the lid of the water reservoir and steam into the oven intermittently dur- fill in the amount specified in the baking ing baking. The oven does not switch table. off automatically since manual baking is done without setting the baking time. When the baking is completed touch key to end the baking or touch key to turn off the oven com-...
-
Page 27: Settings
• To continue steam assisted baking, re- While the key lock is activated, the move the water tank, fill it with enough keys of the control unit cannot be water and place it in its place. The oven used. The key lock will not be can- starts to provide steam support to itself celled in case of power failure. - Page 28 alarm time and baking time are set 3. Activate the brightness setting by touch- at the same time, the shorter time ing the key again. is shown on the display. 4. Set the desired brightness with the 3. After the alarm time is completed, the keys.
- Page 29 3. Touch the key to activate the timer You may complete the procedure to field. connect your oven to a wireless network and to activate the remote ð The timer field and the symbol control of the oven by following the flash on the display.
-
Page 30: Using The Meat Probe
CE declaration of conformity Arçelik A.Ş. declares that this product complies with the 2014/53/EU Directive. A detailed RED Declaration of Con- formity is available online in the support.grundig.com website within the additional documents in the product page for your product. - Page 31 • If you have set the oven timer for a spe- 1. Slide the slot cover (4) on the side wall cific baking period before using the meat of the oven upwards, and insert the probe, this period is cancelled automatic- meat probe connector (2) to the meat ally when the meat probe is installed.
-
Page 32: General Information About Baking
4. When the operating function where the probe is displayed, an animation meat probe is activated is selected, the with three lines appear beside that. symbol and the 75 °C as the recom- The meat probe sensor detects that the internal temperature of the mended temperature for meat probe and the current temperature of the meat meat reaches the set temperature... -
Page 33: Pastries And Oven Food
• Using the supplied accessories ensures • The values specified in the cooking you get the best cooking performance. tables are determined as a result of the Always observe the warnings and inform- tests carried out in our laboratories. Val- ation provided by the manufacturer for ues suitable for you may differ from the external cookware you will use. - Page 34 Cooking table for pastries and oven foods Suggestions for baking with a single tray Food Accessory to be Operating func- Shelf position Temperature (°C) Baking time used tion (min) (approx.) Top and bottom Cake on the tray Standard tray * 30 …...
-
Page 35: Meat, Fish And Poultry
Suggestions for cooking with two trays Food Accessory to be Operating func- Shelf position Temperature (°C) Baking time used tion (min) (approx.) 2-Standard tray * Small cakes Fan Heating 2 - 4 25 … 35 4-Pastry tray * 2-Standard tray * Cookie Fan Heating 2 - 4... -
Page 36: Grill
Cooking table for meat, fish and poultry Food Accessory to be Operating func- Shelf position Temperature (°C) Baking time used tion (min) (approx.) 15 mins. 250/ Steak (whole) / Fan assisted bot- Standard tray * max, after 180 … 60 … 80 Roast (1 kg) tom/top heating Lamb's shank... -
Page 37: Steam Assisted Cooking
• Depending on the thickness of the pieces tray to the lower shelf to collect the oils. to be grilled, the cooking times given in The oven tray you will slide should be the table may vary. sized to cover the entire grill area. This •... -
Page 38: Test Foods
Food Access- Shelf Operating Temper- Amount of Stea Water in- Baking Approx. ory to be posi- function ature (°C) water to be take time time (min) food (mins.)** used tion used (ml) level (approx.) weight (g) Lamb after pre- shanks Standard "3D"... - Page 39 Cooking table for test meals Suggestions for baking with a single tray Food Accessory to be Operating func- Shelf position Temperature (°C) Baking time used tion (min) (approx.) Shortbread (sweet Top and bottom Standard tray * 20 … 30 cookie) heating On models with wire shelves :3...
-
Page 40: Maintenance And Cleaning
Grill Food Accessory to be Shelf position Temperature (°C) Baking time (min) used (approx.) Meatball (veal) - 12 Wire grill 20 … 30 amount Toast bread Wire grill 1 … 3 It is recommended to preheat for 5 minutes for all grilled food. Turn pieces of food after 1/2 of the total grilling time. -
Page 41: Cleaning Accessories
Catalytic surfaces • Do not use hard metal scrapers and ab- rasive cleaners. They may damage the • The side walls in the cooking area can surfaces. only be covered with enamel or catalytic • Ensure that the joints of the components walls. -
Page 42: Steam Cleaning
1. Remove the front of the wire shelf by pulling it on the side wall in the opposite direction. 2. Pull the wire shelf towards you to re- move it completely. 3. Place the water reservoir in its slot. 4. Set the function knob to steam cleaning operating mode. -
Page 43: High Temperature Self-Cleaning
7.6 High temperature self-cleaning 2. Before starting the cleaning, clean the outer surfaces of the oven and the food The oven is equipped with a pyrolysis fea- residues inside the oven with soapy ture. The oven heats up to a temperature of cloth. -
Page 44: Removing The Inner Glass Of The Oven Door
Do not use harsh abrasive cleaners, metal scrapers, wire wool or bleach materials to clean the oven door and glass. Removing the oven door 1. Open the oven door. 2. Open the clips in the front door hinge socket on the right and left by pushing 8. -
Page 45: Cleaning The Oven Lamp
The first step of regrouping the door is to replace the second and third glasses (2, 3). As shown in the figure, place the bevelled edge of the glass to meet the bevelled edge of the plastic slot. While attaching the innermost glass (1), Innermost Second in- glass... -
Page 46: Troubleshooting
from Authorised Services or licensed 4. Refit the glass cover. technicians. This product contains a G If your oven has a square lamp, energy class lamp. 1. Disconnect the product from the electri- • The position of the lamp may differ from city. - Page 47 Metal sounds are heard while the product After cooking starts symbol flashes on is warming and cooling. the display and there is an audible warn- ing. • Metal parts may expand and make sounds when heated. >>> This is not an •...
- Page 48 Terms other than the language I specified show up at the "HomeWhiz" app. • In cases where the internet power is low, terms in different languages may appear in the homewhiz application other than the languages you defined in the applica- tion.
Need help?
Do you have a question about the GEBD12401BMPH and is the answer not in the manual?
Questions and answers