Table of Contents
Advertisement
Available languages
Available languages
Quick Links
Advertisement
Table of Contents

Subscribe to Our Youtube Channel
Related Manuals for Grandstream Networks GWN7831


Summary of Contents for Grandstream Networks GWN7831
- Page 1 Grandstream Networks, Inc. 126 Brookline Ave, 3rd Floor Boston, MA 02215. USA Tel : +1 (617) 566 - 9300 www.grandstream.com GWN7831 Layer 3 Aggregation Managed Switch Quick Installation Guide For Certification, Warranty and RMA information, please visit www.grandstream.com...
- Page 2 Content English................1 Chinese................7 Español................9 Français................15 Deutsch................21 Italiano.................27 Português..............33 Русскй.................39...
-
Page 3: Package Contents
(non-condensing) for operation and 10-90% RH (non-condensing) for storage. External power supply rubber plug • Do not power cycle your GWN7831 during system boot up or firmware upgrade. You may corrupt firmware images and cause the unit to malfunction. External RPS power cord anti-trip hole... -
Page 4: Installation
POWERING & CONNECTING Connect to SFP/SFP+ Port The installation process of the fiber module is as follows: Grounding the Switch 1. Grasp the fiber module from the side and insert it 1. Remove the ground screw from the back of smoothly along the switch SFP/SFP+ port slot until the SFP/SFP+ switch, and connect one end of the ground... - Page 5 Fans ACCESS & CONFIGURE Note: If no DHCP server is available, the GWN7831 default IP address is 192.168.0.254. Method 1: Login using the Web UI 1. A PC uses a network cable to correctly connect any RJ45 port of the switch.
- Page 6 - 请勿将本设备暴露在工作湿度10-90%RH(无冷凝)和储存湿度 10-90%RH(无冷凝) 系统LED指示灯 的环境中。 外置冗余电源橡胶塞 - 系统启动或固件升级期间,请勿断开电源。这可能会损坏设备固 件,并导致设备故障。 电源线防脱孔 包装清单 外置冗余电源插座 外置冗余电源线防脱孔 1x 25cm 100-240VAC 50-60Hz 电源插座 1x GWN7831 交换机 1x 快速安装手册 4x 橡胶脚垫 接地线 防雷接地柱 风扇 2x 风扇 注意 :外部RPS(冗余电源)单独售卖。 8x 螺丝(KM 3*6) 2x L型挂耳支架 1x 电源线防 脱扣...
-
Page 7: Contenido Del Paquete
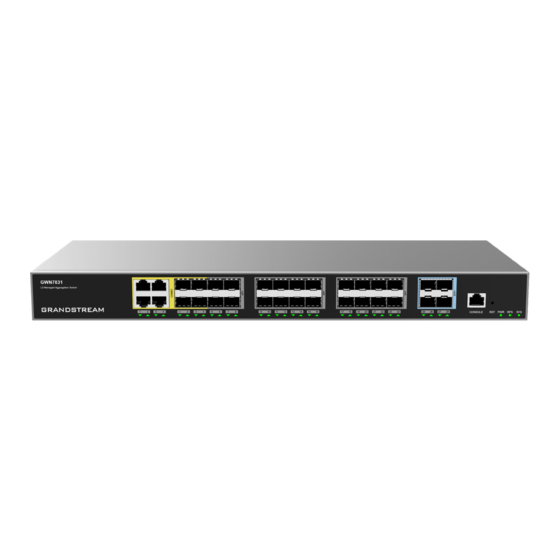
RESUMEN Puerto Y LED Descripción El GWN7831 es un switch administrable de agregación de capa 3 que permite a las medianas y Port 1-4 4x 10/100/1000Mbps puertos Ethernet grandes empresas construir redes empresariales escalables, seguras, de alto rendimiento e inteli- gentes que son totalmente administrables. -
Page 8: Instalación
ENERGIZANDO Y CONECTANDO Conectar al puerto SFP/SFP+ El proceso de instalación del módulo de fibra es el siguiente: Conectando a tierra el Switch 1. Sujete el módulo de fibra por un lado e insértelo suavemente a lo largo de la ranura del puerto SFP+ 1. - Page 9 Ventiladores ACCEDER Y CONFIGURAR Nota: Si no hay ningún servidor DHCP disponible, la dirección IP predeterminada del GWN7831 es 192.168.0.254. Método 1: Iniciar sesión con la interfaz de usuario web 1. Use una PC para conectar correctamente a un puerto RJ45 a cualquiera del Switch usando un cable de red.
-
Page 10: Contenu Du Pack
10-90 % RH (sans condensation) en opération et 10-90 % RH (sans condensation) en stockage. • Ne pas éteindre le GWN7831 pendant le démarrage du système ou la mise à jour du firmware. Cela Trou anti-trébuchement pour cordon d’alimentation RPS externe risque de rompre l’image du firmware et en conséquence rendre l’unité... - Page 11 ALIMENTATION ET CONNEXION Connectez-vous au port SFP/SFP+ Le processus d’installation du module fibre est le suivant : Mise à la terre du Switch 1. Saisissez le module fibre par le côté et insérez-le 1. Retirez la vis de terre à l’arrière du switch et doucement le long de l’emplacement du port SFP/ connectez une extrémité...
- Page 12 4. Entrez le nom d’utilisateur et le mot de passe par défaut pour vous connecter (le nom d’utilisateur par défaut de l’administrateur est “admin” et le mot de passe aléatoire par défaut se trouve sur l’autocollant du switch GWN7831). 4. Fixez le montage en rack en forme de L aux rainures de guidage aux deux extrémités du rack avec des...
- Page 13 ÜBERSICHT Port & LED Beschreibung Der GWN7831 ist ein verwalteter Layer 3-Aggregation-Managed-Switch für mittlere bis große Unterne- Port 1-4 4x Ethernet RJ45 (10/100/1000Mbps) hmen, die skalierbare, sichere, leistungsstarke und intelligente Unternehmensnetzwerke aufbauen und vollständig verwalten möchten. Er bietet vier Combo-Ports, 24 SFP-Ports und vier SFP+-Ports LED Indikatoren der Ethernet Ports mit einer maximalen Switching-Kapazität von 128 Gbit/s.
- Page 14 STROMVERSORGUNG & ANBINDUNG Anbindung am SFP/SFP+ Port Bitte folgen Sie diesen Installationsschritten: Erdung des Switches 1. Nehmen Sie das Glasfasermodul an der Seite und führen Sie es langsam entlang des SFP/SFP+ Port- 1. Lösen Sie die Schraube zur Befestigung des Steckplatzes des Switches ein bis das Modul engen Massekabels an der Switch-Rückseite und SFP/SFP+...
- Page 15 L-förmigen Gereätehalterungen und das Standardpasswort ein, um sich anzumelden. (Der standardmäßige Benutzername des Administrators Zubehör beiden lautet „admin“, und das zufällige Standardkennwort finden Sie auf dem Aufkleber auf den GWN7831-Switch). Seiten Switches Methode 3: Remote-Anmeldung via SSH/Telnet befestigen Sie diese mit den mitgelieferten Schrauben(M3x6).
- Page 16 PANORAMICA Port & LED Description GWN7831 è costituito da uno switch di rete gestito con aggregazione Layer 3 che consente alle medie Port 1-4 4x Cavi Ethernet RJ45 (10/100/1000 Mbps) e grandi imprese di creare reti aziendali completamente gestibili scalabili, sicure, ad alte prestazioni Indicatori LED delle porte Ethernet e intelligenti.
-
Page 17: Installazione
ALIMENTAZIONE E COLLEGAMENTO Collegarsi alla porta SFP/SFP+ Il processo di installazione del modulo in fibra è il seguente: Messa a terra dello switch 1. Afferrare il modulo in fibra dal lato e inserirlo senza 1. Rimuovere la vite di terra dal retro dello switch problemi lungo lo slot della porta SFP/SFP+ dello Porta SFP/ e collegare un’estremità... - Page 18 Ventole ACCESSO E CONFIGURAZIONE Nota: Se non è disponibile alcun server DHCP, l’indirizzo IP predefinito di GWN7831 è 192.168.0.254. Accesso tramite l’interfaccia web Metodo 1: 1. Un PC utilizza un cavo di rete per collegare correttamente qualsiasi porta RJ45 dello switch.
-
Page 19: Conteúdo Do Pacote
SFP+ 25-28 4x portas SFP+ de 10Gbps local do switch GWN7831 e CLI, a interface de linha de comando. E também com suporte do GWN Manager e do GWN.Cloud, as plataformas de gerenciamento de rede local e em nuvem da Grand-... - Page 20 ALIMENTAÇÃO E CONEXÃO Conexão à porta SFP+ O processo de instalação do módulo de fibra é o seguinte: Aterramento do Switch 1. Segure o módulo de fibra pela lateral e insira-o suavemente ao longo do slot da porta SFP+ do switch 1.
- Page 21 Ventoinhas ACESSO E CONFIGURAÇÃO Observação: Se não ha disponível um servidor DHCP, o endereço IP padrão do GWN7831 é 192.168.0.254. Método 1: faça login usando a interface do usuário da Web 1. Um PC usa um cabo de rede para conectar corretamente qualquer porta RJ45 do switch.
-
Page 22: Обзор Продукта
влажность 10%-90% (без конденсации) и 10%-90% Относит. влажность (без конденсации) при хранении. Светодиодный индикатор системы • Не включать-выключать устройство GWN7831 в процессе начального запуска системы или в процессе обновления прошивки. Вы можете тем самым повредить заводскую прошивку устройства и вывести его... - Page 23 Sciences et Développement économique Canada. EU Regulatory Information Hereby, [Grandstream Networks, Inc.] declares that the equipment type [GWN7831] is in compliance with Directive 2014/30/EU&2014/35/EU. The full text of the EU declaration of conformity is available at the following internet ad- dress: www.grandstream.com...
Need help?
Do you have a question about the GWN7831 and is the answer not in the manual?
Questions and answers