HILTI DD 150-U - Power Core Drills Manual
- Manual (534 pages) ,
- Original operating instructions (400 pages)
Advertisement
- 1 Information about the documentation
- 2 Safety
- 3 Description
- 4 Technical data
- 5 Using extension cords
-
6
Preparations at the workplace
- 6.1 Securing the drill stand with an anchor
- 6.2 Securing the drill stand by vacuum
- 6.3 Fastening the drill stand with the threaded spindle
- 6.4 Fitting the hand wheel on the drill stand
- 6.5 Adjusting the side handle
- 6.6 Setting the depth gage (accessory)
- 6.7 Securing the diamond core drilling machine in the drill stand
- 6.8 Detaching the diamond core drilling machine from the drill stand
- 6.9 Adjusting the play between the rail and carriage
- 6.10 Adjusting the drilling angle when using the drill stand with combination base plate
- 6.11 Connecting the vacuum removal system
- 6.12 Fitting the water supply connection
- 6.13 Install water collection system for drill stand (accessory)
- 6.14 Installing water collection system (accessory) for hand-guided mode
-
7
Operation
- 7.1 Fitting a diamond core bit in a BI+ chuck
- 7.2 Fitting the diamond core bit with an alternative type of chuck
- 7.3 Removing a diamond core bit from a BI+ chuck
- 7.4 Removing the diamond core bit with an alternative type of chuck
- 7.5 Selecting the speed
- 7.6 Activate/deactivate continuous running lock
- 7.7 Operating portable residual current device (PRCD)
- 7.8 Use of the two-part hole-starting aid
- 7.9 Dry drilling with vacuum cleaner via built-in power outlet for electric devices
- 7.10 Dry-drilling with using a vacuum extractor without power outlet for power tools
- 7.11 Dry drilling without dust removal
- 7.12 Hand-guided wet drilling without water collection system
- 7.13 Hand-guided wet-drilling with the water collection system
- 7.14 Wet-drilling with the drill stand
- 7.15 Using the Rota-Rail (column swivel)
- 8 Care and maintenance
- 9 Transport and storage
- 10 Troubleshooting
- 11 Documents / Resources
Information about the documentation
About this documentation
- Read this documentation before initial operation or use. This is a prerequisite for safe, trouble-free handling and use of the product.
- Observe the safety instructions and warnings in this documentation and on the product.
- Always keep the operating instructions with the product and make sure that the operating instructions are with the product when it is given to other persons.
Explanation of symbols used
Warnings
Warnings alert persons to hazards that occur when handling or using the product. The following signal words are used:

- Draws attention to imminent danger that will lead to serious personal injury or fatality.

- Draws attention to a potential threat of danger that can lead to serious injury or fatality.

- Draws attention to a potentially dangerous situation that could lead to personal injury or damage to the equipment or other property.
Symbols in the documentation
The following symbols are used in this document:
 | Read the operating instructions before use. |
 | Instructions for use and other useful information |
 | Dealing with recyclable materials |
 | Do not dispose of electric equipment and batteries as household waste |
Symbols in the illustrations
The following symbols are used in illustrations:
 | The numbering reflects the sequence of operations shown in the illustrations and may deviate from the steps described in the text |
 | Item reference numbers are used in the overview illustrations and refer to the numbers used in the product overview section |
 | This symbol is intended to draw special attention to certain points when handling the product. |
Product-dependent symbols
"Must do" symbols
The following "must do" symbols are used:
 | Wear eye protection |
 | Wear a hard hat |
 | Wear ear protection |
 | Wear protective gloves |
 | Wear protective footwear |
 | Wear light respiratory protection |
Symbols on the product
The following symbols are used on the product:

Information notices
On the drill stand, base plate and diamond core drilling machine
 | On the drill stand and on the vacuum base plate Upper half of the image: An additional means of securing the drill stand must be employed when the machine is used for horizontal drilling with the vacuum securing method. Lower half of the image: Use of the vacuum securing method without an additional means of securing is prohibited for drilling in an upward direction. |
 | On the diamond core drilling machine Use of the water collection system in combination with a wet-type industrial vacuum extractor is mandatory for upward wet drilling. |
 | On the diamond core drilling machine This product is equipped with Bluetooth (optional). |
Product information
Hilti products are designed for professional users and only trained, authorized personnel are permitted to operate, service and maintain the products. This personnel must be specifically informed about the possible hazards. The product and its ancillary equipment can present hazards if used incorrectly by untrained personnel or if used not in accordance with the intended use.
The type designation and serial number are printed on the rating plate.
- Write down the serial number in the table below. You will be required to state the product details when contacting Hilti Service or your local Hilti organization to inquire about the product.
Product informationType: DD 150-U
DD 150-U![]()
Generation: 03 Serial no.:

Safety
General power tool safety warnings
Read all safety warnings, instructions, illustrations and specifications provided with this power tool. Failure to follow all instructions listed below may result in electric shock, fire and/or serious injury.
Save all warnings and instructions for future reference.
The term "power tool" in the warnings refers to your mains-operated (corded) power tool or battery-operated (cordless) power tool.
Work area safety
- Keep work area clean and well lit. Cluttered or dark areas invite accidents.
- Do not operate power tools in explosive atmospheres, such as in the presence of flammable liquids, gases or dust. Power tools create sparks which may ignite the dust or fumes.
- Keep children and bystanders away while operating a power tool. Distractions can cause you to lose control.
Electrical safety
- Power tool plugs must match the outlet. Never modify the plug in any way. Do not use any adapter plugs with earthed (grounded) power tools. Unmodified plugs and matching outlets will reduce risk of electric shock.
- Avoid body contact with earthed or grounded surfaces, such as pipes, radiators, ranges and refrigerators. There is an increased risk of electric shock if your body is earthed or grounded.
- Do not expose power tools to rain or wet conditions. Water entering a power tool will increase the risk of electric shock.
- Do not abuse the cord. Never use the cord for carrying, pulling or unplugging the power tool. Keep cord away from heat, oil, sharp edges or moving parts. Damaged or entangled cords increase the risk of electric shock.
- When operating a power tool outdoors, use an extension cord suitable for outdoor use. Use of a cord suitable for outdoor use reduces the risk of electric shock.
- If operating a power tool in a damp location is unavoidable, use a residual current device (RCD) protected supply. Use of an RCD reduces the risk of electric shock.
Personal safety
- Stay alert, watch what you are doing and use common sense when operating a power tool. Do not use a power tool while you are tired or under the influence of drugs, alcohol or medication. A moment of inattention while operating power tools may result in serious personal injury.
- Use personal protective equipment. Always wear eye protection. Protective equipment such as a dust mask, non-skid safety shoes, hard hat or hearing protection used for appropriate conditions will reduce personal injuries.
- Prevent unintentional starting. Ensure the switch is in the off-position before connecting to power source and/or battery pack, picking up or carrying the tool. Carrying power tools with your finger on the switch or energising power tools that have the switch on invites accidents.
- Remove any adjusting key or wrench before turning the power tool on. A wrench or a key left attached to a rotating part of the power tool may result in personal injury.
- Do not overreach. Keep proper footing and balance at all times. This enables better control of the power tool in unexpected situations.
- Dress properly. Do not wear loose clothing or jewellery. Keep your hair and clothing away from moving parts. Loose clothes, jewellery or long hair can be caught in moving parts.
- If devices are provided for the connection of dust extraction and collection facilities, ensure these are connected and properly used. Use of dust collection can reduce dust-related hazards.
- Do not let familiarity gained from frequent use of tools allow you to become complacent and ignore tool safety principles. A careless action can cause severe injury within a fraction of a second.
Power tool use and care
- Do not force the power tool. Use the correct power tool for your application. The correct power tool will do the job better and safer at the rate for which it was designed.
- Do not use the power tool if the switch does not turn it on and off. Any power tool that cannot be controlled with the switch is dangerous and must be repaired.
- Disconnect the plug from the power source and/or remove the battery pack, if detachable, from the power tool before making any adjustments, changing accessories, or storing power tools. Such preventive safety measures reduce the risk of starting the power tool accidentally.
- Store idle power tools out of the reach of children and do not allow persons unfamiliar with the power tool or these instructions to operate the power tool. Power tools are dangerous in the hands of untrained users.
- Maintain power tools and accessories. Check for misalignment or binding of moving parts, breakage of parts and any other condition that may affect the power tool's operation. If damaged, have the power tool repaired before use. Many accidents are caused by poorly maintained power tools.
- Keep cutting tools sharp and clean. Properly maintained cutting tools with sharp cutting edges are less likely to bind and are easier to control.
- Use the power tool, accessories and tool bits etc. in accordance with these instructions, taking into account the working conditions and the work to be performed. Use of the power tool for operations different from those intended could result in a hazardous situation.
- Keep handles and grasping surfaces dry, clean and free from oil and grease. Slippery handles and grasping surfaces do not allow for safe handling and control of the tool in unexpected situations.
Service
- Have your power tool serviced by a qualified repair person using only identical replacement parts. This will ensure that the safety of the power tool is maintained.
Drill safety warnings
Safety instructions for all operations
- Use the auxiliary handle(s). Loss of control can cause personal injury.
- Hold the power tool by insulated gripping surfaces, when performing an operation where the cutting accessory may contact hidden wiring or its own cord. Cutting accessory contacting a "live" wire may make exposed metal parts of the power tool "live" and could give the operator an electric shock.
Safety instructions when using long drill bits
- Never operate at higher speed than the maximum speed rating of the drill bit. At higher speeds, the bit is likely to bend if allowed to rotate freely without contacting the workpiece, resulting in personal injury.
- Always start drilling at low speed and with the bit tip in contact with the workpiece. At higher speeds, the bit is likely to bend if allowed to rotate freely without contacting the workpiece, resulting in personal injury.
- Apply pressure only in direct line with the bit and do not apply excessive pressure. Bits can bend causing breakage or loss of control, resulting in personal injury.
Diamond drill safety warnings
- When performing drilling that requires the use of water, route the water away from the operator's work area or use a liquid collection device. Such precautionary measures keep the operator's work area dry and reduce the risk of electrical shock.
- Operate power tool by insulated grasping surfaces, when performing an operation where the cutting accessory may contact hidden wiring or its own cord. Cutting accessory contacting a "live" wire may make exposed metal parts of the power tool "live" and could give the operator an electric shock.
- Wear hearing protection when diamond drilling. Exposure to noise can cause hearing loss.
- When the bit is jammed, stop applying downward pressure and turn off the tool. Investigate and take corrective actions to eliminate the cause of the bit jamming.
- When restarting a diamond drill in the workpiece check that the bit rotates freely before starting. If the bit is jammed, it may not start, may overload the tool, or may cause the diamond drill to release from the workpiece.
- When securing the drill stand with anchors and fasteners to the workpiece, ensure that the anchoring used is capable of holding and restraining the machine during use. If the workpiece is weak or porous, the anchor may pull out causing the drill stand to release from the workpiece.
- When securing the drill stand with a vacuum pad to the workpiece, install the pad on a smooth, clean, non-porous surface. Do not secure to laminated surfaces such as tiles and composite coating. If the workpiece is not smooth, flat or well affixed, the pad may pull away from the workpiece.
- Ensure there is sufficient vacuum before and during drilling. If the vacuum is insufficient, the pad may release from the workpiece.
- Never perform drilling with the machine secured by the vacuum pad only, except when drilling downwards. If the vacuum is lost, the pad will release from the workpiece.
- When drilling through walls or ceilings, ensure to protect persons and the work area on the other side. The bit may extend through the hole or the core may fall out on the other side.
- When drilling overhead, always use the liquid collection device specified in the instructions. Do not allow water to flow into the tool. Water entering the power tool will increase the risk of electric shock.
Additional safety precautions
Personal safety
- Do not tamper with or attempt to make alterations to the product.
- The product is not intended for use by debilitated persons who have received no special training.
- Check that the side handle is fitted correctly and tightened securely. Always hold the tool with both hands on the grips provided. In accordance with the applications for which it is designed, the product produces a high torque. Grip the side handle as far to the outside as possible.
- Never use continuous running lock in handheld operation!
- Always support the power tool firmly in preparation for use. This power tool produces high torque. If the power tool is not securely supported at all times during operation loss of control can result and lead to injuries.
- Do not touch rotating parts. Switch the product on only after it is in position at the workpiece. Touching rotating parts, especially rotating accessory tools, can result in injury.
- Avoid skin contact with drilling slurry.
- Dust from materials such as lead-based paint, certain types of wood and concrete/masonry/stone containing quartz, minerals or metal can be harmful to health. Contact with or inhalation of the dust can cause allergic reactions and/or respiratory or other diseases among operators or bystanders. Certain kinds of dust such as oakwood and beechwood dust are classified as carcinogenic, especially in conjunction with additives for wood conditioning (chromate, wood preservative). Only specialists are permitted to handle material containing asbestos. Use a dust removal system that is as effective as possible. To achieve a high level of dust collection, use a suitable vacuum extractor of the type recommended by Hilti for wood dust and/or mineral dust and which is designed for use with this power tool. Make sure that the workplace is well ventilated. It is advisable to wear a respirator appropriate for the type of dust generated. Comply with national regulations applicable to the materials you will be working with.
- The diamond core drilling machine and the diamond core bit are heavy. There is a risk of crushing parts of the body. The user and any other persons in the vicinity must wear of the product while the power tool is suitable eye protection, a hard hat, ear protection, protective gloves and safety footwear while the machine is in use.
- Improve the blood circulation in your fingers by relaxing your hands and exercising your fingers during breaks between working.
- If work involves break-through, always secure the area on the side opposite where the work is carried out. Pieces of debris could drop out and/or fall down and injure other persons.
- Wear eye protection, protective gloves and, if you are not using a dust removal system, wear light respiratory protection. Flying fragments present a risk of injury to the body and eyes.
Power tool use and care
- Make sure that the product is correctly and securely mounted on the drill stand.
- Always make sure that an end stop is installed on the drill stand as otherwise the safety-relevant end-stop function is not implemented.
- Make sure that the accessory tools used have a mounting system suitable for use with the to the product and they are secured in the chuck correctly.
- The supply cord, the extension cord and the suction hose away to the rear of the product always. This helps to avoid tripping over the cord or hose while working.
- Do not use damaged supply cord or hoses.
- Set up the mount on a firm, smooth and horizontal surface. It will not be possible to guide the power tool smoothly and safely if the mount can slip or wobble.
- Check the nature of the surface. Rough surfaces may reduce holding power. Coatings or composite materials may pull away from the surface while you are working.
- Do not overload the device and do not use it as a substitute for a ladder or platform. Overloading the device or standing on it may shift its center of gravity to a higher position, causing it to tip over.
- When taking a break, lay the diamond core drilling machine down on a suitable surface where it will be safe. Wait until the diamond core drilling machine has come to a complete stop before you lay it down.
- Disconnect the diamond core drilling machine from the electric supply before removing the core or tools.
Electrical safety
- Avoid using extension cords with multiple power outlets and the simultaneous use of several products.
- The product may be operated only when connected to an adequately rated electric supply equipped with an earth (ground) conductor.
- Before beginning work, check the working area (e.g. using a metal detector) to ensure that no concealed electric cables or gas and water pipes are present. External metal parts of the product can become live, for example, when an electric cable is damaged accidentally. This constitutes a serious risk of electric shock.
- Make sure that the supply cord cannot be damaged as the carriage advances.
- Never operate the product without the supplied PRCD (for products without PRCD: Never operate the machine without an isolating transformer). Test the PRCD each time before use.
- Check the machine's supply cord at regular intervals and have it replaced by a qualified specialist if found to be damaged. If the machine's supply cord is damaged it must be replaced with a specially prepared and approved supply cord available from Hilti Customer Service. Check extension cords at regular intervals and replace them if found to be damaged. Do not touch the supply cord or extension cord if it is damaged while working. Disconnect the supply cord plug from the power outlet. Damaged supply cords or extension cords present a risk of electric shock.
- Never operate the product when it is dirty or wet. Dust (especially dust from conductive materials) or dampness adhering to the surface of the machine may, under unfavorable conditions, lead to electric shock. Dirty or dusty machines should thus be checked by Hilti Service at regular intervals, especially if used frequently for working on conductive materials.
- Tip the diamond core drilling machine in order to empty a filled core bit. Make sure that the water does not get onto the diamond core drilling machine.
Workplace
- Approval must be obtained from the site engineer or architect prior to beginning drilling work. Drilling work on buildings and other structures may influence the static equilibrium of the structure, especially when steel reinforcing bars or load-bearing components are cut through.
- If the drill stand is not properly fastened, always move the diamond core drilling machine mounted on the drill stand all the way down in order to prevent the stand from falling over.
- Keep the supply cord, extension cord, water hose and vacuum hose away from rotating parts of the machine.
- Use of the water collection system in conjunction with a wet-type industrial vacuum extractor is a mandatory requirement for wet drilling overhead.
- Use of the vacuum securing method without an additional means of fastening is prohibited for drilling in an upward direction.
- For horizontal drilling, the drill stand may not be used without being additionally secured.
- In the hand-guided mode, always hold the diamond core drilling machine securely with one hand on the on/off switch.
- Do not switch on the diamond core drilling machine until it is in the desired position.
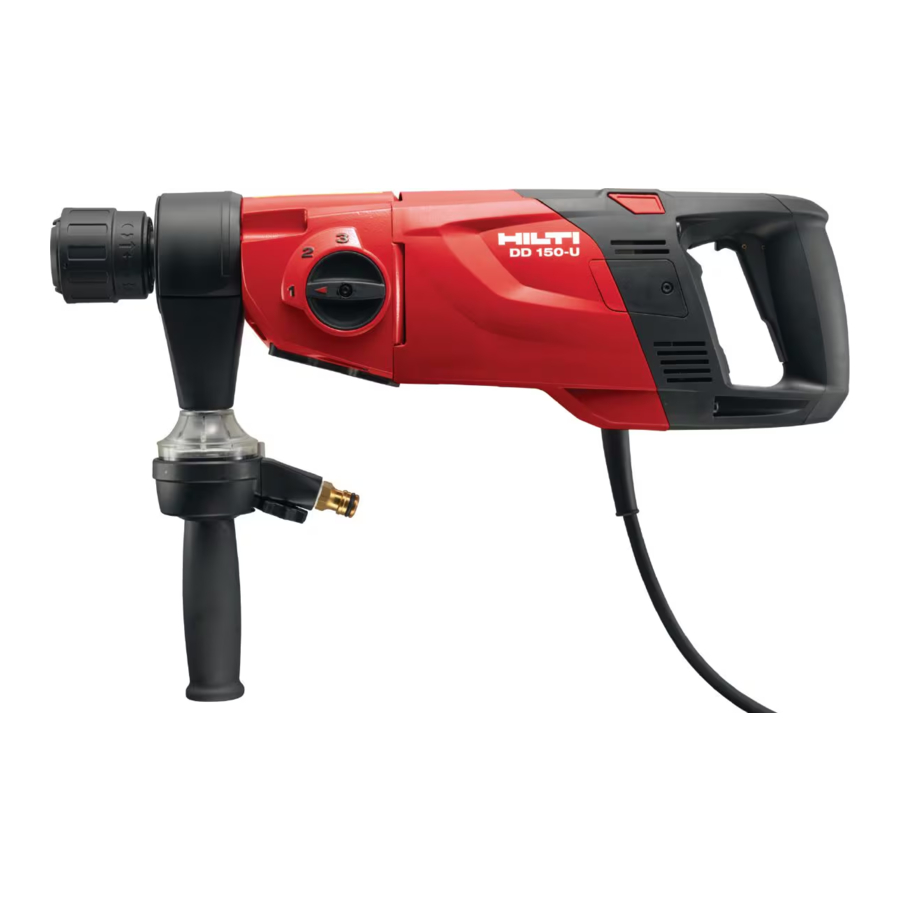
Description
Parts of the tool and operating controls
Diamond core drilling machine DD 150-U

- Chuck
- Gearing section
- Motor
- Continuous-running lock
- Multifunction display
- Grip
- Operating button
![]() (analysis data)
(analysis data) - Operating button
![]() (hole-starting mode)
(hole-starting mode) - Gear switch
- Side handle
- Water flow rate indicator
- Water swivel / suction head
- Carbon-brush cover
- On/off switch
- Supply cord with PRCD
- Type identification plate
- Interface plate
- Water flow regulator
- Water connection
- Suction hose connector
- Screw plug (rinsing/suction head)
 (analysis data)
 (hole-starting mode)
Drill stand DD-ST 150-U CTL

- Column
- Grip
- Supply cord holder
- Locking pin
- Depth gage
- Hole center indicator
- Vacuum hose connector
- Leveling indicator
- Pressure gage
- Vacuum relief valve
- Carriage
- Adapter interface for AF-CA
- End stop screw
- Adjusting screws for carriage play (2x)
- Carriage lock
- Leveling screws (4x)
- Vacuum seal
- Base plate
- Adjusting lever
Accessories (optional)

- Hand wheel
- Lever
- Wheel assembly
- Threaded spindle
- Column swivel
- Vacuum base plate
- Water collector holder
- Water collector
- Eccentric pin
- Machine mount
- Clamping screw
- Depth gage
- Drilling bush adapter
- Rubber ring
- Centering ring
Intended use
The product described is an electrically powered diamond core drilling machine. It is designed for hand-guided wet and dry drilling, for wet drilling with a drilling rig as through-holes and I or blind holes in (reinforced) mineral substrates.
- The tool may be operated only when connected to a power source providing a voltage and frequency in compliance with the information given on the type identification plate.
Bluetooth®
This product has Bluetooth.
Bluetooth is a wireless data transfer system by which the two Bluetooth-enabled products can communicate with each other over a short distance.
To ensure a stable Bluetooth connection there must be a clear line of sight between the connected devices.
Bluetooth functions of this product
Consult the operating instructions of the paired device for detailed descriptions of the Bluetooth functions.
- Service and status messages of the paired Hilti devices are shown on the display of the diamond core drilling machine.
- Connection with a mobile terminal device via the Hilti Connect app for service functions and for transmission of product-related analysis data.
Switching Bluetooth on/off
Hilti products are delivered with Bluetooth turned off. On first start up, Bluetooth is switched on automatically.
- To switch off, press and hold down the buttons
![]() and
and ![]() simultaneously for at least 10 seconds.
simultaneously for at least 10 seconds. - To switch on, press the buttons
![]() and
and ![]() simultaneously.
simultaneously.
 simultaneously for at least 10 seconds.
Connecting products
The pairing with a Bluetooth-compatible Hilti device is sustained until the diamond core drilling machine is paired to another Hilti device of the same type or Bluetooth is switched off. Pairing is also sustained even when the products are switched off and then on again; paired products always automatically re-establish their paired connection.
- To pair with a Bluetooth-compatible Hilti device or mobile device, with Bluetooth switched on simultaneously press the
![]() and
and ![]() buttons.
buttons.
The time window for pairing with a Bluetooth-compatible Hilti device is 2 minutes. When the 2 minutes have expired, the pairing process is canceled.
Display symbols and explanation of the multifunction display on the diamond core drilling machine
For the following information to be displayed, the diamond core drilling machine must be ready for operation (plugged in and PRCD switched on).
The displays may vary depending on the gear selection and the type of application.


Items supplied
Diamond core drilling machine, operating instructions, case.
Other system products approved for use with this product can be found at your local Hilti Store or at: www.hilti.group
Accessories and spare parts
Spare parts
| Item number | Designation |
| 51279 | Hose connector |
| 2006843 | Carbon brushes 220-240 V |
| 2212483 | Carbon brushes 100-127 V |
Technical data
Diamond core drilling machine
For rated voltage, rated current, frequency and/or input power, refer to the country-specific rating plate.
If the product is powered by a generator or transformer, the generator or transformer's power output must be at least twice the rated input power shown on the rating plate of the product. The operating voltage of the transformer or generator must always be within +5% and -15% of the rated voltage of the device.
| DD 150-U | |
| Weight according to EPTA Procedure-01 | 18.5 lb (8.4 kg) |
| Weight of the drill stand with combination base plate and carriage | 29.3 lb (13.3 kg) |
| Permissible water supply pressure | ≤ 90 psi (≤ 6 bar) |
| Ideal distance of the mark on the anchor base plate from the hole center | 10.5 in (267 mm) |
| Ideal distance of the mark on the vacuum base plate from the hole center | 11.5 in (292 mm) |
| Ideal distance of the mark on the combination base plate from the hole center | 11.5 in (292 mm) |
Bluetooth
| Frequency range | 2,400 MHz... 2,483 MHz |
| Maximum output power | 10 dBm |
Working with vacuum base plate
| Minimum vacuum | 9.4 psi (0.65 bar) |
| Max. core drilling tool diameter | 6.4 in (162 mm) |
Core bit diameter
| 1st gear | 2nd gear | 3rd gear | |
| Ø core bits (stand-guided drilling, wet) | 4.0 in... 6.4 in (102 mm... 162 mm) | 1.1 in... 3.4 in (28 mm... 87 mm) | 0.5 in... 1.0 in (12 mm... 25 mm) |
| Ø core bits (hand-guided) | 4.8 in... 6.4 in (121 mm... 162 mm) | 1.6 in... 4.4 in (41 mm... 112 mm) | 0.3 in... 1.5 in (8 mm... 37 mm) |
| Ø core bits (hand-guided dry core bits with PCD) | 2.0 in... 6.4 in (52 mm... 162 mm) | •/• | •/• |
Using extension cords
A damaged supply cord presents a hazard! Do not touch the supply cord or extension cord if damaged while working. Disconnect the supply cord plug from the power outlet.
- Check the appliance's supply cord at regular intervals and have it replaced by a qualified specialist if found to be damaged.
- Use only extension cords of a type approved for the application and with conductors of adequate gauge (cross section). The power tool may otherwise suffer a drop in performance and the extension cord may overheat.
- Check the extension cord for damage at regular intervals.
- Replace damaged extension cords.
- When working outdoors, use only extension cords that are approved and correspondingly marked for this application.
Recommended minimum conductor cross-sections and maximum power cord lengths with 120V supply voltage
| Cord | AWG 16 | AWG 14 | AWG 12 | AWG 10 |
| Conductor cross section | 1,31 mm² | 2,08 mm² | 3,31 mm² | 5,26 mm² |
| Conductor cross section | 2,58 kcmil | 4,11 kcmil | 6,53 kcmil | 10,4 kcmil |
| Cord length | 25 m | 30 m | 50 m | 100 m |
| Cord length | 75 ft | 100 ft | 150 ft | 250 ft |
Preparations at the workplace
Risk of injury! The drill stand can rotate or topple if not securely fastened.
- Before using the diamond core drilling machine, secure the drill stand to the work surface with anchors or with a vacuum base plate.
- Use only anchors suitable for the base material and comply with the anchor manufacturer's instructions.
- Use a vacuum base plate only when the work surface is suitable for securing the drill stand by the vacuum method.
Securing the drill stand with an anchor

- Use the anchor that is suitable for the corresponding base material (Hilti metal expansion anchors, M12 or M16).
→ Distance of base plate - Screw the clamping spindle into the anchor.
- Back off all leveling screws until the base plate is flush with the surface.
- Slip the drill stand over the clamping spindle and align the drill stand.
- Screw the clamping spindle nut on to the clamping spindle but do not tighten it.
- Level the base plate by turning the 4 leveling screws.
![information]() All leveling screws make be seated firmly on the surface.
All leveling screws make be seated firmly on the surface. - Tighten the clamping spindle nut with a suitable open-end wrench.
- Check that the drill stand is secure.
Distance of base plate
Select the distance to suit the base plate used.
| Ideal distance of the mark on the anchor base plate from the hole center | 10 1/2 in | ||||||
| Ideal distance of the mark on the combination base plate from the hole center | 11 1/2 in | ||||||
Securing the drill stand by vacuum

Risk of injury if the diamond core drilling machine falls!
- Fastening the drill stand to the ceiling only by means of the vacuum securing method is not permissible. A heavy structural support or a threaded spindle, for example, can serve as an additional means of fastening.
Risk of injury if pressure is not checked!
- Before and during drilling, check that the pressure gage pointer remains in the green zone.
In order to use the drill stand with anchor base plate, establish a secure, flat-on-flat connection between vacuum base plate and anchor base plate. Screw the anchor base plate securely to the vacuum base plate. Make sure that the core bit selected for use will not damage the vacuum base plate.
If you are going to drill horizontally, use additional means of securing the diamond core drilling machine (e.g. chain secured to anchor).
Before positioning the drill stand, check that you have sufficient space for assembly and operation.
- Turn all the leveling screws until they project approx. 5 mm underneath the vacuum base plate.
- Connect the vacuum connector on the vacuum base plate to the vacuum pump.
- Locate the center point of the hole to be drilled. Draw a line from the center of the hole to be drilled in the direction in which the machine is to be positioned.
- Make a mark on the line at the specified distance from the center of the hole to be drilled.
→ Distance of marking - Switch on the vacuum pump and press and hold the vacuum release valve.
- Line up the mark on the base plate with the line.
- When the drill stand has been positioned correctly, release the vacuum release valve and press the base plate against the base material.
- Use the leveling screws to level the base plate.
- Check that the drill stand is secure.
Distance of marking
Select the distance to suit the base plate used.
| Ideal distance of the mark on the vacuum base plate from the hole center | 11 1/2 in | |||
| Ideal distance of the mark on the combination base plate from the hole center | 11 1/2 in | |||
Fastening the drill stand with the threaded spindle

- Secure the threaded spindle at the top end of the column.
- Position the drill stand on the work surface.
- Use the leveling screws to level the base plate.
- Secure the drill stand with the threaded spindle and tighten the threaded spindle.
- Check that the drill stand is secure.
Fitting the hand wheel on the drill stand

The hand wheel may be fitted on the left-hand or on the right-hand side of the carriage.
- Pull the black ring back to fit the hand wheel.
- Fit the hand wheel onto the axle.
Adjusting the side handle

- Slacken the side handle by turning it counter-clockwise.
- Position the side handle.
- Secure the side handle by turning it clockwise.
- Check to ensure that the side handle is tightened securely.
Setting the depth gage (accessory)
- Turn the hand wheel until the core bit is in contact with the base material.
- Set the desired drilling depth by adjusting the distance between the depth gage and the carriage.
- Lock the depth gage in position.
Securing the diamond core drilling machine in the drill stand

Check the play between rail and carriage before starting operation.
- Lock the carriage with the carriage lock.
- Mount the hand wheel on the locking pin and pull the locking pin out.
- Engage the interface plate on to the hook on the drill stand.
- Push the locking pin in and use the hand wheel to tighten it securely (turn clockwise).
- Secure the supply cord in the cord guide of the carriage.
- Connect the water supply.
Detaching the diamond core drilling machine from the drill stand
- Lock the carriage with the carriage lock.
- Close the water valve in the side handle.
- Disconnect the water supply.
- Use the hand wheel to release the locking pin (turn counterclockwise).
- Pull out the locking pins.
- Pivot the machine away from the drill stand.
Adjusting the play between the rail and carriage
- Use a hexagon socket wrench to tighten the adjusting screws hand-tight.
→ Torque - Slacken the adjusting screws slightly by turning back a 1/4 turn.
- The carriage is correctly adjusted when it remains in position without a diamond core bit but moves down when a diamond core bit is fitted.
Torque
| Tightening torque | 5 Nm |
Adjusting the drilling angle when using the drill stand with combination base plate

There is a risk of crushing fingers in the joint area!
- Wear protective gloves.
- Set the knob to the "Reverse" position.
- At the foot of the drill stand, release the adjusting lever until the sliding nuts are disengaged.
- Adjust the column to the desired angle.
- Set the knob to the "Forward" position.
- Tighten the adjusting lever until the sliding nuts are fully engaged and the column is again secured in position.
Connecting the vacuum removal system

- Open the cover of the rinsing/suction head.
- Push the suction hose into the suction hose connector.
- Close the water valve in the side handle.
Fitting the water supply connection

 ATTENTION
Hazard due to incorrect use! Incorrect use can result in irreparable damage to the hose.
- Regularly check the hoses for damage and make sure that the maximum permissible water supply pressure of 6 bar is not exceeded.
- Make sure that the hose does not come into contact with rotating parts.
- Make sure that the hose is not damaged as the carriage advances.
- Maximum water temperature: 40°C.
- Check the water supply system to ensure there are no leaks.
To avoid damage to the components, use only fresh water containing no dirt particles.
- Close the cover on the water swivel / suction head.
- Connect the water flow regulator to the diamond core drilling machine.
- Connect the water supply (hose coupling).
Install water collection system for drill stand (accessory)

Danger of electric shock! There is a possibility of water flowing over the motor and cover if the vacuum removal system is faulty.
- Cease operations immediately if the vacuum removal system is not working.
The diamond core drilling machine must be at a 90° angle to the ceiling. The seal for the water collection system must be of the correct size for the diamond core bit diameter.
Use of the water collection system allows water to be led away under control, thus preventing the surrounding area from being heavily soiled.
- Remove the screw from the drill stand.
- Install the water collector holder on the drill stand with the screw.
- Position the water collector, with the water collector sealing disk installed, between the two movable arms of the holder.
- Press the water collector against the work surface by turning the two screws on the water collector holder.
- Connect a wet-type industrial vacuum extractor to the water collector or establish a hose connection through which the water can drain away.
Installing water collection system (accessory) for hand-guided mode
Danger of electric shock! There is a possibility of water flowing over the motor and cover if the vacuum removal system is faulty.
- Cease operations immediately if the vacuum removal system is not working.
The diamond core drilling machine must be at a 90° angle to the ceiling. The seal for the water collection system must be of the correct size for the diamond core bit diameter.
Use of the water collection system allows water to be led away under control, thus preventing the surrounding area from being heavily soiled.
- Remove the drilling bush from the holder.
- Screw the locking ring off the drilling bush and position the seal.
![information]() To avoid damaging the seal, the seal must be laid on with the notches on the positioning pins.
To avoid damaging the seal, the seal must be laid on with the notches on the positioning pins.
Small core bits must be installed with a corresponding drilling bush adapter. To avoid jamming during removal, the stabilization elements of the drilling bush adapter should not cover the water extraction socket. - Install the locking ring and insert the water collector into the holder.
- Adjust the eccentric shaft to the position
![]() .
. - Install the water collection system on the interface plate of the diamond core drilling machine.
- Set the eccentric shaft to the position
![]() .
. - The water collection system is fixed in place on the diamond core drilling machine.
- Install the core bit.
- Connect a wet-type industrial vacuum extractor to the water collector or establish a hose connection through which the water can drain away.
 .
. .
. Operation
Fitting a diamond core bit in a BI+ chuck

Risk of injury when changing the tool! The tool becomes hot as a result of use. It may have sharp edges.
- Always wear protective gloves when changing the tool.
Replace diamond core bits as soon as their cutting performance and/or rate of drilling progress drops significantly. This generally is the case when the diamond segments have worn down to a certain height (< 2 mm).
- In the stand mode, lock the carriage with the carriage lock. Check to ensure that it is securely fastened.
- Open the chuck by turning it in the direction of the symbol
![]() .
. - From below, push the diamond core bit into the chuck on the diamond core drilling machine, turning it until the teeth engage.
- Close the chuck by turning it in the direction of the symbol
![]() .
. - Check that the diamond core bit is seated securely in the chuck.
Fitting the diamond core bit with an alternative type of chuck
- Lock the drive spindle with a suitable open-end wrench.
- Tighten the core bit with a suitable open-end wrench.
Removing a diamond core bit from a BI+ chuck

- Lock the carriage with the carriage lock in the stand mode. Check to ensure that it is securely fastened.
- Open the chuck by turning it in the direction of the symbol
![]() .
. - Pull the sleeve on the chuck in the direction of the arrow towards the machine. This releases the core bit.
- Remove the core bit.
Removing the diamond core bit with an alternative type of chuck
- Lock the drive spindle with a suitable open-end wrench.
- Remove the core bit with a suitable open-end wrench.
Selecting the speed

Press the switch only when the tool is stationary.
- Set the selector switch to suit the diameter of the core bit used.
- Turn the gear selector while at the same time manually turning the core bit into the recommended position.
Activate/deactivate continuous running lock
Never use continuous running lock in handheld operation!
- Press and hold down the on/off switch.
- Press and hold down the continuous running lock.
- Release the on/off switch.
- Release the continuous running lock.
![information]() To deactivate the continuous running lock again, press the on/off switch until the continuous running lock jumps back to its initial position.
To deactivate the continuous running lock again, press the on/off switch until the continuous running lock jumps back to its initial position.
Operating portable residual current device (PRCD)
Risk of injury due to electric shock! Do not continue operating the diamond core drilling machine if the indicator on the ground fault circuit interrupter does not go out when the 0 or the TEST button is pressed.
- Have your diamond core drilling machine repaired by Hilti Service.
- Plug the diamond core drilling machine's mains plug into an earthed/grounded power outlet.
- Press the "I" or "RESET" button on the portable residual current device (PRCD).
- The indicator lights up.
- Press the "0" or "TEST" button on the portable residual current device (PRCD).
- The indicator goes out.
- Press the "I" or "RESET" button on the portable residual current device (PRCD).
- The indicator lights up.
Use of the two-part hole-starting aid
Risk of injury caused by incorrect use! Parts can come off the hole-starting aid if it is not pressed against the work surface.
- When a two-part hole-starting aid is used, do not run the diamond core drilling machine without the hole-starting aid pressed against the work surface.
A different hole-starting aid is required for each core bit diameter.
- Fit the hole-starting aid into the open end of the diamond core bit.
- When you start drilling apply only light pressure until the core bit has centered itself. Then apply more pressure. Drill a guide cut 1/8"-3/16" deep.
- Release the on/off switch to stop the machine. Wait until the core bit comes to a complete stop.
- Remove the hole-starting aid from the core bit.
- Position the core bit in the guide cut, press the on/off switch and resume drilling.
Dry drilling with vacuum cleaner via built-in power outlet for electric devices
Use slotted core bits only when working without a dust removal system.
- Secure the side handle in the desired position.
- Optional: Fit and use the two-part hole-starting aid.
- Plug the diamond core drilling machine's supply cord into the power outlet of the vacuum extractor.
- Plug the vacuum extractor's supply cord into the power outlet.
- When connected: Press the Reset switch or I button of the PRCD.
- Center the diamond core drilling machine where the hole is to be drilled.
- Press the on/off switch on the diamond core drilling machine.
![information]() The vacuum extractor will start after the power tool has started. When you switch off the power tool the vacuum extractor will run on for a short time before switching itself off.
The vacuum extractor will start after the power tool has started. When you switch off the power tool the vacuum extractor will run on for a short time before switching itself off.
Dry-drilling with using a vacuum extractor without power outlet for power tools
Use slotted core bits only when working without a dust removal system.
- Secure the side handle in the desired position.
- Optional: Fit and use the two-part hole-starting aid.
- Plug the vacuum cleaner's supply cord into the power outlet and switch the vacuum cleaner on.
- Plug the supply cord of the diamond core drilling machine into the power outlet and then press the Reset button or I button of the PRCD.
- Center the diamond core drilling machine where the hole is to be drilled.
- Press the on/off switch on the diamond core drilling machine.
- To ensure removal of residual dust, let the vacuum extractor run on for a few seconds after you switch off the machine.
Dry drilling without dust removal
If dry drilling without a dust removal system is carried out, use slotted core bits. Wear suitable breathing protection!
Do not drill upward when working without a dust removal system.
- Secure the side handle in the desired position.
- Optional: Fit and use the two-part hole-starting aid.
- Plug the supply cord into the power outlet and press the Reset button or I button of the PRCD.
- Center the diamond core drilling machine where the hole is to be drilled.
- Press the on/off switch on the diamond core drilling machine.
Hand-guided wet drilling without water collection system
Risk of personal injury and material damage! The diamond core drilling machine may become damaged and the risk of electric shock is increased.
- Use of the water collection system in conjunction with a wet-type industrial vacuum cleaner is a mandatory requirement for wet drilling overhead.
- Secure the side handle in the desired position.
- Optional: Fit and use the two-part hole-starting aid.
- Plug the supply cord into the power outlet and press the Reset button or I button of the PRCD.
- Center the diamond core drilling machine where the hole is to be drilled.
- Slowly open the water flow regulator until the water flows at the desired rate. The indicator on the side handle enables you to check the water flow.
- Press the on/off switch on the diamond core drilling machine.
Hand-guided wet-drilling with the water collection system
Danger of electric shock! There is a possibility of water flowing over the motor and cover if the vacuum removal system is faulty.
- Cease operations immediately if the vacuum removal system is not working.
Use of the water collection system in conjunction with a wet-type industrial vacuum extractor is a mandatory requirement for wet drilling overhead.
Before opening the water supply, switch on the wet vacuum cleaner manually. Connect the water supply before switching off the wet vacuum cleaner.
Do not use the power socket on the wet vacuum extractor.
- Install the water collection system for the hand-guided mode.
- Secure the side handle in the desired position.
- When using a vacuum extractor: Switch the vacuum cleaner on.
- Optional: Fit and use the two-part hole-starting aid.
- Plug the supply cord into the power outlet and then press the Reset button or I button of the PRCD.
- Center the diamond core drilling machine where the hole is to be drilled.
- Slowly open the water flow regulator until the water flows at the desired rate. The indicator on the side handle enables you to check the water flow.
- Press the on/off switch on the diamond core drilling machine.
Wet-drilling with the drill stand
Danger of electric shock! There is a possibility of water flowing over the motor and cover if the vacuum removal system is faulty.
- Cease operations immediately if the vacuum removal system is not working.
For drilling upward, the use of a wet vacuum cleaner in conjunction with a water collection system is a mandatory requirement!
- Slowly open the water flow regulator until the water flows at the desired rate.
- Switch the machine to continuous operation with the continuous running lock.
- Release the carriage lock.
- Turn the hand wheel until the diamond core bit is in contact with the work surface.
- When you start drilling apply only light pressure until the core bit has centered itself. Then apply more pressure.
- Watch the drilling performance indicator and adjust contact force accordingly.
Using the Rota-Rail (column swivel)
The Rota-Rail allows quick and easy access to the hole or core being drilled, with no need to partly or fully dismantle the system.
Risk of injury caused by incorrect use! The drill stand can be damaged or it can break.
- Never use the Rota-Rail as a column extension.
- Lock the carriage with the carriage lock. Check to ensure that it is securely fastened.
- Remove the end stop screw from the rear section of the column.
- Attach the Rota-Rail so that the toothed racks are facing the same direction.
- Tighten the screw on the Rota-Rail securely.
- Release the carriage lock and run the carriage along the rail on to the Rota-Rail.
- Slacken the securing screws of the Rota-Rail and turn the device to the left or right with the Rota-Rail. This will give you access to the drill hole.
- Remove the core or change the core bit.
- Turn the tool with the Rota-Rail back to its original position and tighten the securing screws of the Rota-Rail. Move the tool back to the column of the stand to resume work.
- After removing the Rota-Rail, refit the end stop screw on the rear section of the column.
Care and maintenance
Electric shock hazard! Attempting care and maintenance with the supply cord connected to a power outlet can lead to severe injury and burns.
- Always unplug the supply cord before carrying out care and maintenance tasks.
Care
- Carefully remove any dirt that may be adhering to parts.
- Clean the air vents carefully with a dry brush.
- Use only a slightly damp cloth to clean the casing. Do not use cleaning agents containing silicone as these may attack the plastic parts.
Maintenance
Danger of electric shock! Improper repairs to electrical components may lead to serious injuries including burns.
- Repairs to the electrical section of the tool or appliance may be carried out only by trained electrical specialists.
- Check all visible parts and controls for signs of damage at regular intervals and make sure that they all function correctly.
- Do not operate the product if signs of damage are found or if parts malfunction. Have it repaired immediately byHilti Service.
- After cleaning and maintenance, fit all guards or protective devices and check that they function correctly.
To help ensure safe and reliable operation, use only genuine Hilti spare parts and consumables. Spare parts, consumables and accessories approved by Hilti for use with the product can be found at your local Hilti Store or online at: www.hilti.group.
Care of diamond core drilling machine
- Do not use a spray, pressure jet washer or running water for cleaning.
- Prevent unnecessary exposure of the battery to dust or debris and never subject the battery to soaking moisture (e.g., submerged in water or left out in the rain).
- Clean the chuck and the clamping segments with a cloth at regular intervals and lubricate the parts with Hilti lubricant spray.
- Remove all particles of foreign matter from the chuck.
- Occasionally remove the filter from the water inlet in the side handle and flush the filter mesh with water in the direction opposite to the normal water flow.
- Remove and clean the water flow rate indicator as soon as it is dirty.
- Do not use abrasive cleaning agents or sharp objects to clean the sight glass.
Replacing the carbon brushes
Risk of injury due to electric shock!
- The machine may be operated, serviced and repaired only by trained, authorized personnel. This personnel must be specially informed of any possible hazards.
The service display appears in the display when the carbon brushes need to be replaced. Always change all the carbon brushes at the same time.
- Disconnect the diamond core drilling machine from the power supply.
- Open the carbon brush covers on the left-hand and right-hand sides of the motor.
- Take note of how the carbon brushes are installed and how the conductors are positioned.
- Remove the worn carbon brushes from the diamond core drilling machine.
- Fit the new carbon brushes, positioning them exactly the same as the old ones fitted previously.
- Take care to avoid damaging the insulation on the indicator lead as you insert the brushes.
- Screw on the carbon brush covers on the left- and right-hand side of the motor.
- Run in the carbon brushes by letting the machine run under no load for at least one minute without interruption.
![information]() After replacing the carbon brushes, the display Run-in after the carbon brushes have been replaced appears. The time bar shows the time remaining until the run-in process has been completed. If the minimum running-in time of one minute is not observed, the life of the carbon brushes will be greatly reduced.
After replacing the carbon brushes, the display Run-in after the carbon brushes have been replaced appears. The time bar shows the time remaining until the run-in process has been completed. If the minimum running-in time of one minute is not observed, the life of the carbon brushes will be greatly reduced.
Transport and storage
Transport
- Do not transport this product with an accessory tool installed.
- Make sure that the equipment is held securely throughout all transport operations.
- After transporting, always check all visible parts and controls for signs of damage and make sure that they all function correctly.
Storage
- Always store this product with the electric supply cable unplugged from the electricity supply.
- Store this product in a dry place, where it cannot be accessed by children or unauthorized persons.
- After a long period of storage, always check all visible parts and controls for signs of damage and make sure that they all function correctly.
Transport of the diamond core drilling machine
Risk of injury! Parts can work loose and drop off.
- Do not lift the diamond core drilling machine and/or the drill stand by crane.
- Transport the diamond core drilling machine, drill stand and core bit as separate units.
- Use the wheel assembly (accessory) as an aid when transporting the equipment.
- Open the water flow regulator before stowing away the diamond core drilling machine.
Troubleshooting
If the trouble you are experiencing is not listed in this table or you are unable to remedy the problem by yourself, please contact Hilti Service.
The diamond core drilling machine is not in working order
| Malfunction | Possible cause | Action to be taken | |
 The multifunction display is not showing anything. | The PRCD isn't switched on. |
| |
| Interruption in the electric supply. |
| ||
| Water in the motor. |
| ||
 Service required. | The carbon brushes are worn out. |
| |
| Water in the motor. |
| ||
Diamond core drilling machine is running
| Malfunction | Possible cause | Action to be taken | |
 Restart interlock | The motor has overheated. The cooling down process is complete. |
| |
| Supply network fault – the power supply has been interrupted. |
| ||
| Water in the motor. |
| ||
| Maximum running time with hole-starting mode activated exceeded. |
| ||
| The diamond core drilling machine has been overloaded |
| ||
 Overheating | The motor has overheated. The diamond core drilling machine is running in cooling mode. |
| |
 Remaining running time until the carbon brushes are changed. | The carbon brush wear limit has almost been reached. The diamond core drilling machine will continue to run for a few hours until it shuts down automatically. |
| |
 Running in after carbon brushes are changed. | The carbon brushes have been changed and must be run in. |
| |
 Unable to activate hole-starting mode | Diamond core drilling machine is drilling. |
| |
| The motor has overheated. The diamond core drilling machine is running in cooling mode. |
| ||
 Undervoltage - diamond core drilling machine does not develop full power. | Supply network fault – undervoltage occurred. |
| |
 Multifunction display indicates "0" at the gear display and the diamond core bit doesn't rotate. | The gear selector isn't engaged. |
| |
 Connection has been interrupted | Existing Bluetooth connection has been separated. |
| |
 Bluetooth off | Bluetooth is deactivated. |
| |
| A different diamond core drilling machine is connected automatically via Bluetooth with the used accessory (e. g. water management system). | Several diamond core drilling machines are connected to the same accessory. The accessory always connects automatically to the diamond core drilling machine that enables the connection to be established fastest. |
| |
| The diamond core bit doesn't rotate. | The diamond core bit has become jammed in the hole. |
| |
| The rate of drilling progress decreases. | Maximum drilling depth has been reached. |
| |
| The core is stuck in the core bit. |
| ||
| Wrong core bit specification for the base material. |
| ||
| The rate of drilling progress decreases. | High steel content (indicated by clear water containing metal cuttings). |
| |
| The diamond core bit is defective. |
| ||
| Wrong gear selected. |
| ||
| Contact pressure is too low. |
| ||
| The machine has too little power. |
| ||
| The diamond core bit is polished. |
| ||
| The water flow rate is too high. |
| ||
| The water flow rate is too low. |
| ||
| The carriage lock is engaged. |
| ||
| Dust is hindering drilling progress. |
| ||
| The hand wheel can be turned without resistance. | The shear pin is broken. |
| |
| The diamond core bit cannot be fitted into the chuck. | The core bit connection end or chuck is dirty or damaged. |
| |
| Water escapes at the water swivel or gear housing. | The water pressure is too high. |
| |
| The rotary shaft seal is worn out. |
| ||
| Water escapes at the chuck during operation. | The diamond core bit isn't securely tightened in the chuck. |
| |
| The core bit connection end / chuck is dirty. |
| ||
| The seal at the chuck or at the connection end is defective. |
| ||
| No water is flowing. | The filter or water flow indicator is blocked. |
| |
| The drilling system has too much play. | The diamond core bit isn't securely tightened in the chuck. |
| |
| The core bit connection end / chuck is defective. |
| ||
| The carriage has too much play. |
| ||
| The drilling system has too much play. | Screws / bolts on the drill stand are loose. |
| |
| The drill stand is inadequately fastened. |
| ||
| The connection between the diamond core drilling machine and the carriage or spacers is loose. |
| ||
| Imbalance in the system (e.g. heavy rattling) | Dust has collected in the core bit. |
| |
Documents / Resources
References
Download manual
Here you can download full pdf version of manual, it may contain additional safety instructions, warranty information, FCC rules, etc.
Advertisement


Need help?
Do you have a question about the DD 150-U and is the answer not in the manual?
Questions and answers