
Related Manuals for HMS Networks Ixxat CANbridge NT 200


Summary of Contents for HMS Networks Ixxat CANbridge NT 200
- Page 1 ENGLISH CANbridge NT 200 and 420 USER MANUAL 4.01.0331.20000 Version 2.0 Publication date 2023-11-27...
- Page 2 The information in this document shall therefore not be construed as a commitment on the part of HMS Networks and is subject to change without notice. HMS Networks makes no commitment to update or keep current the information in this document.
-
Page 3: Table Of Contents
CANbridge NT 200 and 420 Table of Contents 1. User Guide ..........................1 1.1. Target Audience ....................... 1 1.2. Related Documents ......................1 1.3. Document History ......................1 1.4. Trademark Information ...................... 1 1.5. Conventions ........................1 2. Safety Instructions ........................3 3. - Page 4 This page is intentionally left blank.
-
Page 5: User Guide
User Guide CANbridge NT 200 and 420 1. User Guide Please read the manual carefully. Make sure you fully understand the manual before using the product. 1.1. Target Audience This manual addresses trained personnel who are familiar with CAN, CAN FD, and the applicable national standards. - Page 6 CANbridge NT 200 and 420 Conventions • item 1 • item 2 Code This font is used to represent program code and other types of data input and output such as configuration scripts. Code User Interaction Elements User interaction elements (buttons etc.) are indicated with bold text. Cross-References and Links Cross-reference within this document: Document Conventions...
-
Page 7: Safety Instructions
Safety Instructions CANbridge NT 200 and 420 2. Safety Instructions IMPORTANT Risk of interference to radio and television if used in office or home environment! Use exclusively included accessories. Use exclusively shielded cables. Make sure, that the shield of the interface is connected with the device plug and the plug on the other side. -
Page 8: Scope Of Delivery
CANbridge NT 200 and 420 Scope of Delivery 3. Scope of Delivery Included in scope of delivery: • CANbridge NT • 1 x power connector • 2 x CAN connector (with CANbridge NT 200) 4 x CAN connector (with CANbridge NT 420) •... -
Page 9: Product Description
Product Description CANbridge NT 200 and 420 4. Product Description To use all features the latest version of the CAN-Gateway Configurator as well as the latest firmware of the CANbridge NT must be installed. For documentation of firmware versions below V6 contact Ixxat support. -
Page 10: Bridge
CANbridge NT 200 and 420 Add-Ons for Customer Specific Expansions • Expert mode • Communication Error Severity • Action Rules 4.3.2. Bridge The Bridge mode allows free configuration of the transmission of CAN messages. With the CANbridge NT 420 NT bridging between Classic CAN and CAN FD is possible. -
Page 11: Installation
Installation CANbridge NT 200 and 420 5. Installation 5.1. Installing the Software To create a configuration for the CANbridge NT, the CAN-Gateway Configurator running on a Windows system and the Ixxat VCI driver are needed. NOTICE The VCI driver is constantly improved and expanded! Check if a newer version is available on www.ixxat.com/driver-windows. -
Page 12: Installing The Hardware
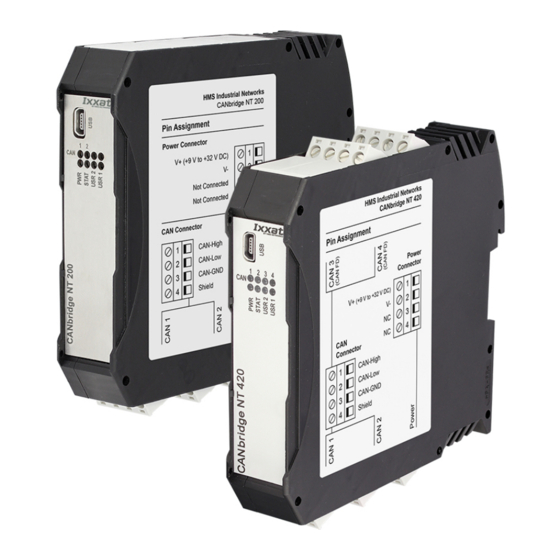
CANbridge NT 200 and 420 Installing the Hardware 5.2. Installing the Hardware Figure 1. Connectors CAN 1 CAN 2 Power connector CAN 3 (only with CANbridge NT 420) CAN 4 (only with CANbridge NT 420) Make sure that the cross-sectional area of the cable is larger than or equal to 0.14 mm resp. -
Page 13: Can And Can Fd Connectors
Checking and Updating the Firmware CANbridge NT 200 and 420 5.2.2. CAN and CAN FD Connectors Table 2. Pin Allocation of Terminal Adapters Pin no. Signal Connector CAN high CAN low CAN GND Shield If a D-Sub 9 connector is used, observe the following pin allocation of the D-Sub 9 connector. Table 3. - Page 14 CANbridge NT 200 and 420 Checking and Updating the Firmware • See update package on the product support pages on www.ixxat.com/support-bridges-gateways information about updating to V5 or contact Ixxat support. If the current firmware of the device in use is V5 or V6: Check if newer firmware is available on the product support pages on www.ixxat.com/support-bridges-gateways.
-
Page 15: Configuration
Configuration CANbridge NT 200 and 420 6. Configuration IMPORTANT The security settings set via the CAN-Gateway Configurator define if a password is needed to change to configuration. The default password is IXXAT. For more information see user manual CAN-Gateway Configurator. 6.1. -
Page 16: Configuring The Device Name
CANbridge NT 200 and 420 Configuring the Device Name Information about target device (STS reflects Power LED of device) Drop-down list Select device type Drop-down list Select device version Drop-down list Select operational mode Button New Button Open Button Save Button Save as Button Verify Button Scan... -
Page 17: Repeater/Star Coupler Configuration
Repeater/Star Coupler Configuration CANbridge NT 200 and 420 Open menu Target and select Change device name. • Window Device Name Configuration is opened. Figure 3. Window Device Name Configuration Enter desired device name in field Device Name and click button Save. •... -
Page 18: Bridge Configuration
CANbridge NT 200 and 420 Bridge Configuration With CANbridge NT 420 make sure that operational mode Star Coupler (1) is selected. • In Repeater/Star Coupler mode the mapping table is deactivated. • All messages are transmitted unchanged. In the configuration tree (6) select General. If checkbox Only for specified device (4) is enabled, enter the serial number of the device to which the configuration can be written. -
Page 19: Downloading The Configuration With Linux
Downloading the Configuration with Linux CANbridge NT 200 and 420 If checkbox Only for specified device (4) is enabled, enter the serial number of the device to which the configuration can be written. If checkbox Expert Mode (5) is enabled, select the desired settings (for more information see User Manual CAN-Gateway Configurator). -
Page 20: Reset
CANbridge NT 200 and 420 Reset 6.6. Reset Figure 6. Menu Reset to factory settings Reset Target With Reset target (1) it is possible to restart the device without reset the configuration • Open menu Target and select Reset target. •... -
Page 21: Read And Erase Log File
Read and erase LOG File CANbridge NT 200 and 420 6.7. Read and erase LOG File In case of an error the device writes the error in a log file. The log file can be read from the device, saved as a txt file and send to the Ixxat support if needed. -
Page 22: Operation
CANbridge NT 200 and 420 Operation 7. Operation Figure 7. Ports and LEDs Status LED Power LED Mini USB port CAN LEDs 1 to 4 User LED 7.1. Mini USB Port Provided to connect the device for configuration. 7.2. Indicators 7.2.1. -
Page 23: User Led
Indicators CANbridge NT 200 and 420 LED state Description Comments Device not ready No firmware, application firmware not started Green flashing (1 Hz) Application firmware started Device in Operational state Red/green flashing Configuration file error Rewriting of configuration to device necessary Green/orange Device in Configuring state In Configuring state the device read the configuration from the... -
Page 24: Technical Data
CANbridge NT 200 and 420 Technical Data 8. Technical Data Dimensions 114.5 x 99 x 22.5 mm Weight Approx. 150 g Operating temperature -40 °C to +85 °C Storage temperature -40 °C to +85 °C Power supply 9 V to 36 V DC with overvoltage and polarity protection Current consumption Typically 110 mA at 24 V input voltage, typically 220 mA at 12 V input voltage... -
Page 25: Support/Return Hardware
Support/Return Hardware CANbridge NT 200 and 420 9. Support/Return Hardware Support To contact support, go to www.ixxat.com/technical-support/contact-technical-support. Scroll down and click button mysupport.hms.se to register a support case. Return Hardware www.ixxat.com/support/product-returns click button Portal to access the support portal. In the support portal select Submit Product Return (RMA). Read the information and click Create RMA Case. -
Page 26: Regulatory Compliance
CANbridge NT 200 and 420 Regulatory Compliance 10. Regulatory Compliance 10.1. EMC Compliance (CE) The product is in compliance with the Electromagnetic Compatibility Directive. More information and the Declaration of Conformity is found at www.ixxat.com. 10.2. EMC Compliance (UKCA) The product is in compliance with the Electromagnetic Compatibility Regulations 2016. The Declaration of Conformity is available at www.ixxat.com. -
Page 27: Disposal And Recycling
Disposal and Recycling CANbridge NT 200 and 420 IMPORTANT This equipment has been tested and found to comply with the limits for a Class B digital device, pursuant to Part 15 of the FCC rules. These limits are designed to provide reasonable protection against harmful interference in a residential installation. - Page 28 CANbridge NT 200 and 420 UL Ordinary Locations (Ord.Loc.) Intended Use The components are used to connect computer systems to CAN and CAN FD networks and to connect the networks with each other. They are intended for installation on standard DIN rail. IMPORTANT Risk of interference to radio and television if used in office or home environment! Use exclusively included accessories.
Need help?
Do you have a question about the Ixxat CANbridge NT 200 and is the answer not in the manual?
Questions and answers