Advertisement
72-6770-250
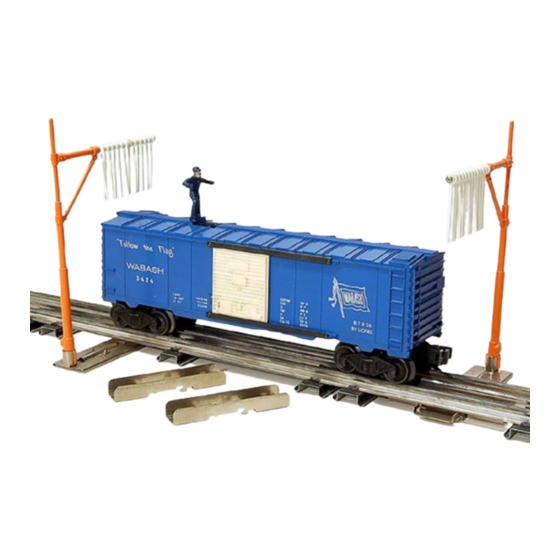
Lionel Brakeman Car
C
ongratulations on your purchase of the Lionel Brakeman Car! Watch the careful brakeman
figure lay down on the roof when he passes under the tell-tales, which are pieces of simu-
lated rope that hang over the track to warn of low clearance ahead. This classic car is perfect for
any O-27 or O gauge three-rail layout.
Setting up the Tell-Tales and Brakeman triggers
C
hoose a section of straight track on your layout for the tell-tales. Keep in mind
that the brakeman will either fall or rise each time he passes over the trigger
blades. You can place a set of tell-tales before and after a tunnel or bridge—just like
the real thing!
1. Determine the proper trigger blades to use based on your track
gauge.
If you have O-27 track, use the trigger blades that are marked "O27" GAUGE. If
you have O gauge track, use the trigger blades that are marked "O" GAUGE.
2. Attach each set of trigger blades to the base plates.
Insert the four tabs on the bottom of the trigger blades into the slots in the base
plates. Turn the base plates over and twist the two largest tabs on the trigger pieces
so that they will not fit back through the slots, locking the two parts together. Use
a pair of pliers to twist the tabs. The trigger blades and base plate will be perpen-
dicular to each other when they are locked into position. Refer to Figure 1 for base
plate and trigger blades assembly.
3. Mount the base plate to the track.
Place the base plate under the track so that the center rail runs between the trig-
ger blades. Push the bottom edge of the outside rail into the spring-loaded lip
until the other outside rail clears the two tabs on the base plate. Push the track
flat against the base plate, and the spring-loaded lip will hold the base plate to the
track. Figure 1 illustrates the installation of the base plate below the track.
4. Assemble the tell-tales.
Firmly press the knurled end of the extension rod into the hole in the horizontal
brace of the tell-tale pole. Slide the 12 tell-tales onto the extension rod, then press
the end cap onto the extension rod to keep the tell-tales from slipping off. Refer to
Figure 2.
5. Push the tell-tale pole into the base.
6. Attach the brakeman figure to the boxcar.
Simply push the tab on the roof panel into the slot at the base of the figure. When
the tab is in the horizontal position, the figure should be standing up. The brake-
man figure should face away from the brake wheel end of the car.
Base plate
Figure 1. Base plate assembly and placement
Figure 2. Assembling the tell-tales
10/02
Tell-tales
Trigger
blades
Locking the
trigger piece
and base plate
together
Advertisement
Table of Contents

Summary of Contents for Lionel Brakeman Car
- Page 1 10/02 Lionel Brakeman Car ongratulations on your purchase of the Lionel Brakeman Car! Watch the careful brakeman figure lay down on the roof when he passes under the tell-tales, which are pieces of simu- lated rope that hang over the track to warn of low clearance ahead. This classic car is perfect for any O-27 or O gauge three-rail layout.
- Page 2 You may choose to place one set of tell-tales before or after these other Hit the deck! Place the Brakeman Car on the track, and couple it to your triggers to get the brakeman to stand up again. This will restore the proper train or locomotive.


Need help?
Do you have a question about the Brakeman Car and is the answer not in the manual?
Questions and answers