Advertisement
Table of Contents
Contents
- 1 Product Overview
- 2 System Requirement
- 3 Connect with PC
- 4 Connect with PS3
- 5 Connect with PS4
- 6 Connect with XBOX ONE
- 7 Connect with SWITCH
- 8 Connect with Android
- 9 The Button for Switching Between D-Pad and Joystick
- 10 LED Light Switch Button
- 11 MACRO Function
- 12 To replace action buttons
- 13 Button Layout
- 14 Audio Communication Function
- 15 Troubleshooting
- 16 Product Specification
- 17 Attentions
- 18 Documents / Resources
PXN X9 - Game Controller Manual
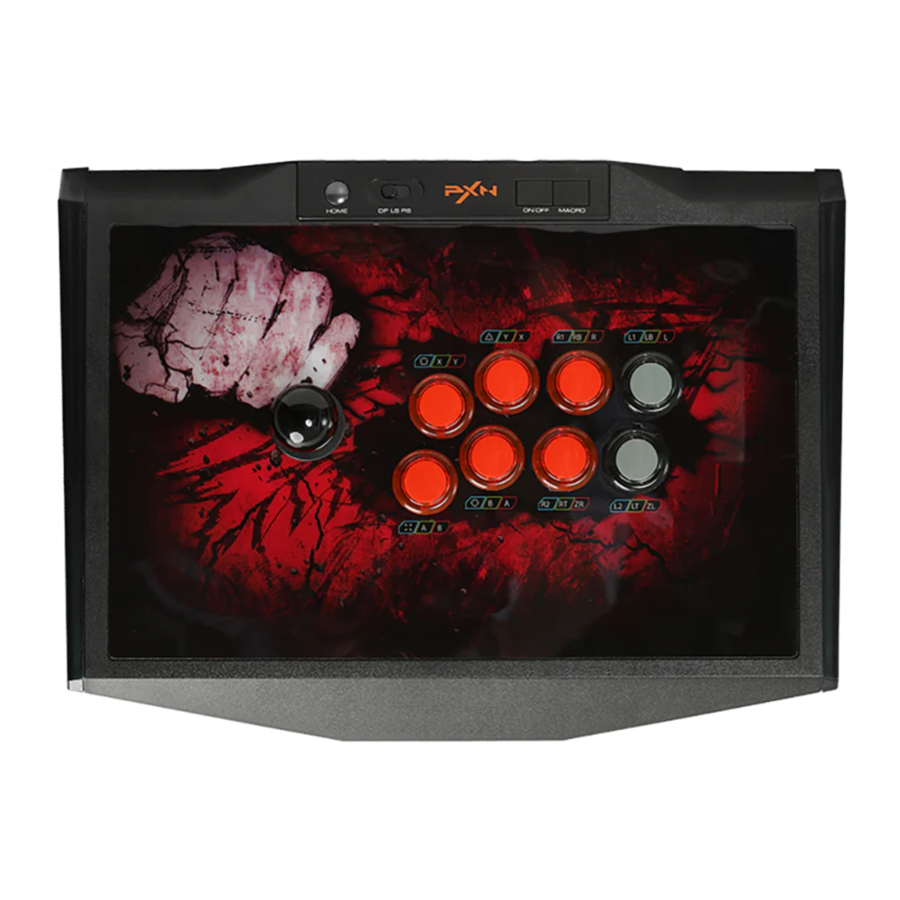
Product Overview
Please read the manual carefully before using.

System Requirement
Compatible Platforms: PC, PS3, PS4, XBOX ONE, SWITCH, Android
Note: Need the original gamepad for guidance when play on PS4 and XBOX ONE console.
Connect with PC

- Plug the arcade stick into the computer.
- At the first connection, the computer will be prompted to find new hardware, and the driver will be installed automatically.
- The arcade stick function is available to test on PC. The specific steps show below: XP system: Open control panel
![]() game controller, click attribute testing. WIN7 and above systems: Open control panel
game controller, click attribute testing. WIN7 and above systems: Open control panel ![]() device and printer
device and printer ![]() 5a right mouse click controller icon game controller set, click attribute testing.
5a right mouse click controller icon game controller set, click attribute testing. - Open the test interface as below, you can test the axes and buttons.
 game controller, click attribute testing. WIN7 and above systems: Open control panel
 Connect with PS3
- Plug the arcade stick into PS3, and power on the PS3 console.
- When the connection is successful, you can launch the game to play or conduct settings in game or console.
Connect with PS4

- Connect the original PS4 controller to the arcade stick with USB cable.(The PS4 controller should be power-off before connection).
- Plug the arcade stick into PS4, and power on the PS4 console.
- After around 15 seconds, the LED indicator of PS4 controller keeps ON, then press the HOME button on arcade stick to play game. The connection is done.
Connect with XBOX ONE

- Connect the original XBOX ONE controller to the arcade stick with USB cable.(The XBOX ONE controller should be power-off before connection).
- Plug the arcade stick into XBOX ONE, and power on the XBOX ONE console.
- After around 15 seconds, the LED indicator of XBOX ONE controller keeps ON, then press the HOME button on arcade stick to play game. The connection is done.
Connect with SWITCH
Connect with SWITCH Console
- Plug the TYPE-C OTG into the USB interface of arcade stick.
- Plug the OTG adapter to the Switch console, power on the SWITCH console.

- When the connection is successful, you can launch the game to play or conduct settings in game or console.

Connect With Switch dock
- Place the Switch console into Switch dock and ensure successful connection.
- Plug the arcade stick into Switch dock and power on the Switch console.


Note : Press "+" and at the same time to take a screenshot.
Connect with Android
Connect with Android cellphone

- Plug the OTG adapter into the USB interface of arcade stick.
- Plug the OTG adapter into cellphone. (Micro OTG or Type-C).
Note : Some of cellphones need to turn on the OTG function in the phone setting.
Connect with Android TV box or TV
- Plug the arcade stick into Android TV box or TV.
- After the connection is successful, you can launch the game to play.
The Button for Switching Between D-Pad and Joystick

 | D-pad: Set the switch to "DP" and the joystick function same as the "D-pad" of the controller. |
 | Left Stick: Set the switch to "LS" and the joystick function same as the "Left Stick" of the controller. |
 | Right Stick: Set the switch to "RS" and the joystick function same as the "Right Stick" of the controller. |
LED Light Switch Button
After connected with device, the 8 buttons led light of arcade stick keep ON. You can switch the ON/OFF button to control the light.
MACRO Function
- Buttons for setting MACRO function: "LI/LB/L", "L2/LT/ZL". The button original function will be covered after set MACRO function.
- MACRO available buttons include:
![]() /A/B,
/A/B, ![]() /B/A,
/B/A, ![]() /X/Y,
/X/Y, ![]() /Y/X, RI/RB/R, R2/RT/ZR, LI/LB/L, L2/LT/ZL, joystick UP, joystick DOWN, joystick LEFT, joystick RIGHT.
/Y/X, RI/RB/R, R2/RT/ZR, LI/LB/L, L2/LT/ZL, joystick UP, joystick DOWN, joystick LEFT, joystick RIGHT. - How to set MACRO?
- Press the MACRO button, the indicator keep ON in green. Press "LI/LB/L" or "L2/LT/ZL", the indicator flash in green.
- Press the button combination you want to set, press MACRO button to finish the setting, and indicator OFF.
- Press the well-set MACRO button to release the function, indicator flash in green to prompt.
 /A/B,
/A/B,  /B/A,
/B/A,  /X/Y,
/X/Y,  /Y/X, RI/RB/R, R2/RT/ZR, LI/LB/L, L2/LT/ZL, joystick UP, joystick DOWN, joystick LEFT, joystick RIGHT.
- Clear Button MACRO Function
- Press the MACRO button, the indicator keep ON in green. Press the well-set MACRO button("L1/LB/L" or "L2/LT/ZL"), the indicator flash in green.
- Press the MACRO button again, green indicator OFF. MACRO function is cleared
- Maximum action button up to 15 times per MACRO setting, the simultaneous pressing of multiple buttons is counted once, and it automatically saves and exits the setting after 15 times. The "SHARE" and "OPTIONS" keys are used as separators in MACRO settings to separate two same actions or delay.
To replace action buttons

Button Layout
| PS3® | PS4® | Xbox OneTM | PC (X-INPUT)/ Android | SWITCHTM | |
| Action Buttons |  |  |  | ||
 |  |  | |||
 |  |  | |||
 |  |  | |||
 |  |  | |||
 |  |  | |||
 |  |  | |||
 |  |  | |||
| Joystick | UP/Y+ | UP/Y+ | UP/Y+ | UP/Y+ | UP/Y+ |
| DOWN/Y- | DOWN/Y- | DOWN/Y- | DOWN/Y- | DOWN/Y- | |
| LEFT/X+ | LEFT/X+ | LEFT/X+ | LEFT/X+ | LEFT/X+ | |
| RIGHT/X- | RIGHT/X- | RIGHT/X- | RIGHT/X- | RIGHT/X- | |
| Functions | SELECT | SHARE | View | BACK | - |
| START | OPTIONS | Menu | START | + | |
| PS | PS | X-Guide | X-Guide | HOME | |
Audio Communication Function
The arcade stick has an audio communication function on the XBOX ONE/PS4 platform.

Troubleshooting
- If the backlight is on but the Arcade Stick is not working when it is connected to the console, re-plug it or check that the controller is working properly.
- If the Arcade Stick is not working and the console screen freezes, the console may have crashed unexpectedly. Please restart the console and connect the Arcade Stick.
- If the Arcade Stick is not operating properly in the game, unplug and reconnect the Arcade Stick.
- When connecting the original controller, a high-quality USB cable is required.
Product Specification
| Product Model | PXN-X9 |
| Connection | USB Cable |
| Input | 5V  80mA 80mA |
| Packing Size | About 460*335*152mm |
| Product Size | About 403*296*123mm |
| Product Weight | About 3320g |
| Application Temperature | 0-40ºC |
| Application Humidity | 20-80% |
Attentions
- Avoid strong vibration, do not disassemble, modify or repair by yourself.
- Prevent water or other liquids from entering the arcade stick to avoid damage.
- Avoid storing in humid, high temperature, oily smoke and other places.
- Please handle gently when connect or remove the arcade stick.
- Children should be under adult's supervision at all times when using this product.
Documents / ResourcesDownload manual
Here you can download full pdf version of manual, it may contain additional safety instructions, warranty information, FCC rules, etc.
Advertisement


Need help?
Do you have a question about the X9 and is the answer not in the manual?
Questions and answers