
Related Manuals for Chefman Barista Pro Plus


Summary of Contents for Chefman Barista Pro Plus
- Page 1 Barista Pro Plus ESPRESSO MAchine USER GUIDE • Safety Instructions • Features • Operating Instructions • Troubleshooting • Cleaning and Maintenance • Terms and Conditions • Warranty Registration RJ54-BP-BLACK...
- Page 2 ® happy to be in the kitchen with you. With your new Barista Pro Plus Espresso Machine, you can save time and money while learning to be your own barista. Whether you're...
-
Page 3: Table Of Contents
CONTENTS Safety Instructions Features Operating Instructions Troubleshooting Cleaning and Maintenance Terms and Conditions Warranty Registration... -
Page 4: Safety Instructions
6. Do not operate any appliance with a damaged cord or plug, or after the appliance malfunctions or has been damaged in any manner. In such cases, contact Chefman ®... - Page 5 SAFETY INSTRUCTIONS IMPORTANT SAFEGUARDS The use of an accessory not evaluated for use with this appliance may cause injuries. 8. Do not use outdoors. 9. Do not let the cord hang over the edge of a table or counter or touch hot surfaces. 10.
- Page 6 SAFETY INSTRUCTIONS IMPORTANT SAFEGUARDS WARNING: This appliance has a polarized plug (one blade is wider than the other). This plug is intended to fit into a polarized outlet only one way. If the plug does not fit fully into the outlet, reverse the plug. If it still does not fit, contact a qualified electrician. Do not attempt to modify the plug in any way or force it into the outlet.
- Page 7 To insert the plug, grasp it firmly and guide it into the outlet. To disconnect the appliance, grasp the plug and remove it from the outlet. Never use the product if the power cord shows signs of abrasion or excessive wear. Contact Chefman Customer Support for additional guidance and support. ®...
-
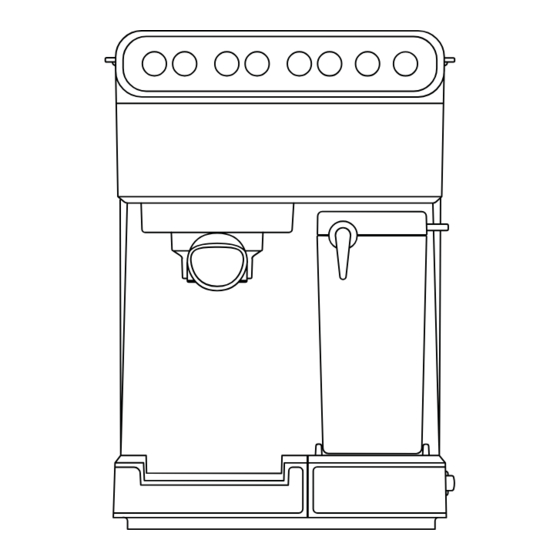
Page 8: Features
FEATURES Water Reservoir Cover Removable Drip Tray Removable Water Reservoir Portafilter Control Panel Portafilter Basket Retention Clip Group/Brew Head Portafilter Handle Power Switch (on side) Portafilter Double-Shot Basket Froth Strength Control Portafilter Single-Shot Basket Milk Reservoir Lid Coffee Measuring Scoop Froth Dispensing Tube Lever and Tamper Removable Milk Reservoir... - Page 9 FEATURES CONTROL PANEL • When the power is switched on, the unit will beep three times and PREHEATING will light up briefly then turn off as unit is in standby mode. The unit will automatically begin preheating and all available functions on the display will light. (NOTE: If the milk reservoir is not on the unit, only the SINGLE and DOUBLE ESPRESSO buttons will display.) •...
-
Page 10: Operating Instructions
OPERATING INSTRUCTIONS BEFORE FIRST USE Remove all packaging materials and check to ensure that all parts and accessories are accounted for. Read all stickers and remove ones that are not permanent. Remove and hand wash the water reservoir, milk reservoir, portafilter, portafilter baskets, capsule holder and lid, measuring scoop, drip tray, and removable coaster with a mild detergent and water. - Page 11 CHOOSE THE RIGHT CUP SIZE With 20 bars of pressure, the Barista Pro Plus allows for a wide variety of coffee drinks from a tiny espresso to a large latte. See the graph above to choose the right size cup. Be aware that the actual amount will vary depending on such variables as the coffee grind and froth amount.
- Page 12 OPERATING INSTRUCTIONS HOW TO FILL THE WATER RESERVOIR To fill the water reservoir, you may either use a pitcher to fill it with water while on the unit or remove it from the unit to fill it up at the sink. Open the lid and fill the reservoir with the desired amount of cold water between the MIN and MAX markings on the tank.
- Page 13 OPERATING INSTRUCTIONS HOW TO FILL THE PORTAFILTER WITH COFFEE Select your basket size and drop it into the portafilter. Choose the shallower basket for a single shot of espresso. Use the deeper basket for either making a larger size drink or to have a double dose of espresso in a smaller size drink.
- Page 14 OPERATING INSTRUCTIONS 2. Press down firmly on the capsule to puncture the bottom and lock it into place. Twist on the capsule holder lid, making sure it is tightly closed. 3. To insert the capsule holder into the portafilter, simply drop it in lid side down. HOW TO PLACE THE PORTAFILTER ON THE BREW HEAD Position the portafilter underneath the brew head with its handle facing to the left.
- Page 15 OPERATING INSTRUCTIONS CAUTION: To avoid possible burns from hot steam and water or damages to the unit, never remove the water reservoir or the portafilter while brewing or frothing. If you intend to make a second cup, be sure the unit is in standby mode—all buttons will be lit and solid—before removing or inserting the portafilter.
- Page 16 OPERATING INSTRUCTIONS 9. To discard a spent capsule, remove the portafilter and let it cool. Remove the capsule holder, then dispose of the capsule properly. HOW TO MAKE A CAPPUCCINO A cappuccino is a delicious beverage made with equal parts espresso, steamed milk, and froth. When using the cappuccino presets, there is no need to manually froth the milk;...
- Page 17 OPERATING INSTRUCTIONS 11. To discard spent grounds, remove the portafilter and let it cool. Hold the portafilter basket in place by flipping up the portafilter basket retention clip to partially cover the lip of the basket and portafilter. Press on the clip with your thumb to hold the basket in place as you empty the grounds.
- Page 18 HOW TO ADD MORE FROTH OR FROTH MILK SEPARATELY The Barista Pro Plus also allows you to add more frothed milk to your coffee drink and to prepare frothed milk on its own to use to make a macchiato or to add to hot chocolate.
-
Page 19: Troubleshooting
TROUBLESHOOTING PROBLEM POSSIBLE CAUSES SOLUTIONS Coffee does not Appliance not turned on or plugged in Plug in unit and turn it on come out No water in reservoir Add water Coffee grind is too fine Grind less fine 4. Too much coffee added Add less coffee Grinds have been tamped down too Refill filter and tamp less... -
Page 20: Cleaning And Maintenance
CLEANING AND MAINTENANCE HOW TO CLEAN THE PORTAFILTER AND BREW HEAD NOTE: This method of cleaning is useful if you make espresso only. If you make cappuccino or latte or use the milk frothing tube separately, you can clean both the brew head, portafilter, and frothing tube all at the same time following the directions on p. - Page 21 CLEANING AND MAINTENANCE HOW TO CLEAN THE MILK RESERVOIR AND FROTHING TUBE Remove the milk reservoir from the unit (tilt it up before pulling it out). Transfer any remaining milk to another container and refrigerate. 2. Wash the milk reservoir and its lid thoroughly with warm, soapy water. Rinse well. Do not use abrasive cleansers and scouring pads, as they will scratch the finish.
- Page 22 CLEANING AND MAINTENANCE HOW TO CLEAN THE WATER RESERVOIR Empty the water reservoir between uses. Discard the remaining water by removing the reservoir and emptying it into the sink. Wash the water reservoir as needed with soapy water, rinse it well and wipe it dry. The water reservoir is not dishwasher safe. HOW TO CLEAN THE HOUSING AND STORE THE UNIT Wipe the housing with a soft wet cloth.
- Page 23 CLEANING AND MAINTENANCE TO DECALCIFY INTERNAL PARTS: Be sure unit is cool, off, and unplugged. 2. Fill the water reservoir with white vinegar to between the MIN and MAX markings on the tank. Fill the milk reservoir with water and slide it into the unit. 3.
-
Page 24: Terms And Conditions
Chefman . Any changes to the Terms and Conditions ® of this Warranty must be in writing, signed by a representative of Chefman . No other party ® has the right or ability to alter or change the Terms and Conditions of this Warranty. - Page 25 ® and workmanship, under normal household use, for a period of 1 year from the date of purchase when used in accordance with the directions listed in the Chefman User ® Guide. If your product does not work as it should, please contact Customer Support at support@chefman.com so that we may assist you.
- Page 26 AC ONLY/ AC SEULEMENT NOTE: Label depicted here is an example. How do I register my product? All you need to do is fill out a simple Chefman registration form. You can easily ® access the form in one of the two ways listed below: Visit Chefman.com/register.
- Page 27 CHEFMAN WARRANTY REGISTRATION ® For product information, please visit us at Chefman.com. EXCEPT WHERE SUCH LIABILITY IS REQUIRED BY LAW, THIS WARRANTY DOES NOT COVER, AND CHEFMAN SHALL NOT BE LIABLE FOR, ® INCIDENTAL, INDIRECT, SPECIAL, OR CONSEQUENTIAL DAMAGES, INCLUDING WITHOUT LIMITATION, DAMAGE TO, OR LOSS OF USE OF THE PRODUCT, OR LOST SALES OR PROFITS OR DELAY OR FAILURE TO PERFORM THIS WARRANTY OBLIGATION.
- Page 28 ©CHEFMAN 2023 RJ54-BP-BLACK-UG_FINAL_OTP_031523...
Need help?
Do you have a question about the Barista Pro Plus and is the answer not in the manual?
Questions and answers