
Related Manuals for Chefman RJ54


Summary of Contents for Chefman RJ54
- Page 1 ® ESPRESSO MAKER This is your one-stop guide to using your product. From the below links, you can jump ahead to a specific document if desired. QUICK LINKS • Quick Start Guide • User Guide RJ54...
- Page 2 QUICK START GUIDE BEFORE FIRST USE 1. Remove all packaging materials and check to ensure that all parts and accessories are accounted for. Read all stickers and remove ones that are not permanent. 2. Remove and hand wash the water reservoir, the milk reservoir, the portafilter, filter baskets, measuring scoop, and removable coaster with a mild detergent and water.
- Page 3 IMPORTANT – PRIME THE UNIT BEFORE FIRST USE Fill the water reservoir to between the “Min” and “Max” markings on the tank. Remove the milk reservoir. Fill the milk reservoir with water (not milk) to between the “Min” and “Max” markings on the tank and return it to unit. Place a large heatproof cup or mug on the metal coaster set over the drip tray.
-
Page 6: Table Of Contents
COOKING FORWARD™ Safety Instructions Features Welcome! Operating Instructions Whether this is your first Chefman appliance or you’re already part of our family, ® we’re happy to be in the kitchen with you. With your new Espresso Maker, you can Troubleshooting save time money while learning to be your own barista. Whether you're craving an espresso, cappuccino, or latte—the Espresso Maker has you covered with one-... -
Page 7: Safety Instructions
6. Do not operate any appliance with a damaged cord or plug or after the appliance malfunctions, or has been damaged in any manner. In such cases, contract Chefman Customer Support. - Page 8 Before each use, inspect the power cord for cuts and/or abrasion marks. If any are found, this indicates that the appliance should be serviced, and A short power supply cord is provided to reduce the hazards of entanglement or tripping the power cord replaced. Please contact Chefman ® Support for assistance.
-
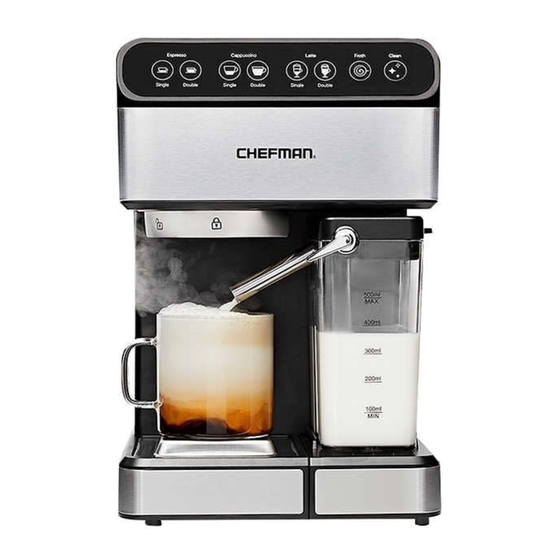
Page 9: Features
FEATURES FEATURES Water Reservoir Cover Removable Reversible Metal Coaster Removable Water Reservoir Removable Drip Tray Control Panel CONTROL PANEL Portafilter Group/Brew Head Portafilter Basket Retention On/Off Switch (On Side) Clip Froth Strength Control Portafilter Handle Milk Reservoir Lid Portafilter Double Shot Basket Froth Dispensing Tube Lever Portafilter Single Shot Basket Removable Milk Reservoir... -
Page 10: Operating Instructions
OPERATING INSTRUCTIONS OPERATING INSTRUCTIONS BEFORE FIRST USE Press the DOUBLE CAPPUCCINO button. Remove all packaging materials and check to ensure that all parts and accessories are The button will blink as the unit preheats; do not press the button again or you will accounted for. - Page 11 OPERATING INSTRUCTIONS OPERATING INSTRUCTIONS CHOOSE THE RIGHT THE COFFEE AND GRIND HOW TO CHOOSE AND INSERT THE PORTAFILER BASKET For best results, use freshly ground espresso beans as pre-ground beans lose their flavor To insert the basket into the portafilter, simply drop the basket into it. fast.
- Page 12 OPERATING INSTRUCTIONS OPERATING INSTRUCTIONS HOW TO PLACE THE PORTAFILTER ON THE BREW HEAD HOW TO MAKE AN ESPRESSO Position the portafilter underneath the brew head with its handle facing to the left. Espresso is a unique method of coffee brewing in which hot water is forced through finely ground coffee beans for a richer and more full-bodied brew than regular drip.
- Page 13 OPERATING INSTRUCTIONS OPERATING INSTRUCTIONS HOW TO MAKE A CAPPUCCINO 11. To discard spent grinds, remove the portafilter and let cool. Hold the portafilter basket in place by flipping up the portafilter basket retention clip to partially cover the lip of the A cappuccino is a delicious beverage made with equal parts espresso, steamed milk, and basket and portafilter.
-
Page 14: Troubleshooting
OPERATING INSTRUCTIONS TROUBLESHOOTING 10. When the brew cycle ends, the unit will go into standby mode and will be preheating in PROBLEM POSSIBLE CAUSES SOLUTIONS the background. If no button is pressed within 20 minutes, it will go in to sleep mode. Coffee does not Appliance not turned on or plugged in Plug in unit and turn it on... -
Page 15: Cleaning And Maintenance
CLEANING AND MAINTENANCE CLEANING AND MAINTENANCE HOW TO CLEAN THE PORTAFILTER AND BREW HEAD HOW TO CLEAN THE MILK RESERVOIR AND FROTHING TUBE NOTE: This method of cleaning is useful if you make espresso only. If you Remove the milk reservoir from the unit (tilt it up before pulling it out). Transfer any make cappuccino or latte or use the milk frothing tube separately, you can clean remaining milk to another container and refrigerate. - Page 16 CLEANING AND MAINTENANCE CLEANING AND MAINTENANCE HOW TO CLEAN THE HOUSING AND STORE THE UNIT TO DECALCIFY INTERNAL PARTS: Wipe the housing with a soft wet cloth. Do not use abrasive cleaners or scouring Be sure unit is cool, off, and unplugged. pads, as they can scratch the finish.
-
Page 17: Terms And Conditions
Limited Warranty THIS WARRANTY DOES NOT COVER Our products are backed by a limited 1-year warranty. To register, follow the instructions on the Chefman Warranty Registration page in this User Guide. ® • Misuse - Damage that occurs from neglectful or improper use of products; damage that occurs as a result of usage with incompatible voltage. - Page 18 AND FITNESS FOR A PARTICULAR PURPOSE, THE DURATION OF SUCH IMPOSED IMPLIED UNPLUG BEFORE CLEANING 0000000 PRÉAVIS: POUR ÉVITER LES CHOCS ÉLECTRIQUES, WARRANTY IS LIMITED TO ONE (1) YEAR. THIS WARRANTY DOES NOT COVER, AND CHEFMAN ® •Date code DÉBRANCHEZ L’APPAREIL AVANT DE L’UTILISER...
- Page 19 ®...
Need help?
Do you have a question about the RJ54 and is the answer not in the manual?
Questions and answers
Why does it start brewing as soon as I turn it on? And it won't stop
The Chefman RJ54 espresso machine may start brewing immediately upon turning it on and not stop due to a possible issue with the control panel or internal components. Potential causes include a stuck or malfunctioning brew button, a faulty sensor, or an electrical issue preventing the machine from properly regulating the brewing cycle. Checking the control panel and resetting the machine may help resolve the issue. If the problem persists, the machine may require further troubleshooting or professional repair.
This answer is automatically generated