Advertisement
Advertisement
Table of Contents

Related Manuals for Chefman Crema Supreme RJ54-G-SS


Summary of Contents for Chefman Crema Supreme RJ54-G-SS
- Page 1 Crema Supreme Espresso Machine VER DRAWING RJ54-G-SS...
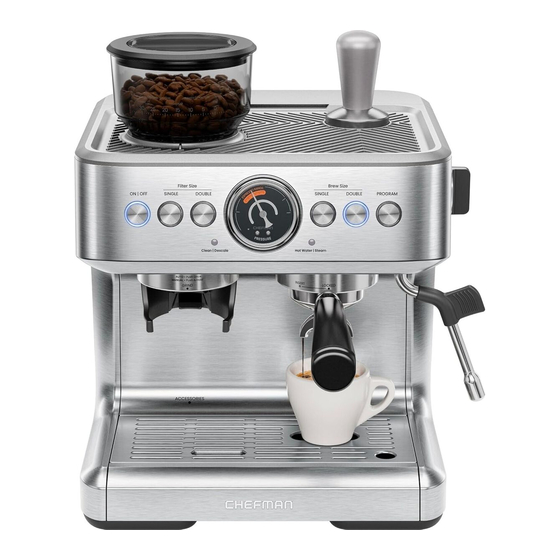
- Page 2 Get to Know Your Espresso Machine Control panel Integrated conical burr grinder Coffee bean hopper Cup warming tray (with tamper storage groove) Removable water tank Steam/Hot Water knob Swiveling steam wand Tamper Milk pitcher Cleaning brush Portafilter pipe cleaner Cleaning pin Brew head Removable drip tray Accessory storage space (below drip tray)
- Page 3 Get to Know Your Espresso Machine FEATURES DRAWING...
-
Page 4: Control Panel
Control Panel ON/OFF button SINGLE Filter Size button (for grinding) DOUBLE Filter Size button (for grinding) CONTROL PANEL Clean/Descale indicator light Brewing pressure gauge Hot Water/Steam indicator light SINGLE Brew Size button DOUBLE Brew Size button PROGRAM button Scan here for a quick video tour of all the features and accessories on your Crema Supreme... - Page 5 If this should occur, contact Chefman Customer Service. The use of accessory attachments not recommended by Chefman may result in fire, electric shock, or injury to persons. Do not use outdoors.
- Page 6 SAFETY INSTRUCTIONS & IMPORTANT SAFEGUARDS SAVE THESE INSTRUCTIONS FOR HOUSEHOLD USE ONLY WARNING: Improper use of the grounding plug can result in electric shock. Grounding Instructions This appliance must be grounded. In the event of an electrical short circuit, grounding reduces the risk of electric shock by providing an escape wire for the electric current.
- Page 7 To disconnect the appliance, grasp the plug and remove it from the outlet. Never use the product if the power cord shows signs of abrasion or excessive wear. Contact Chefman® Customer Support for additional guidance and support. Never wrap the cord tightly around the appliance, as this could place undue stress on the cord where it enters the appliance and cause it to fray and break.
- Page 8 How to Use the Espresso Machine Before First Use Remove all packaging materials and check to ensure that all parts and accessories are accounted for. Read and remove all stickers, except for the rating label, which should remain on the unit. Remove and hand wash the water tank, portafilter, portafilter baskets, tamper, drip tray, and milk pitcher with a mild detergent and water.
- Page 9 How to Use the Espresso Machine Prime & Flush the Espresso Maker Place a large heatproof cup on the drip tray below the brew head. Press the DOUBLE Brew Size button and “brew” a cup of plain water to clean any debris from the water lines. We also recommend doing this as a first step to warm the brew head and internal parts when the unit has been unused for several hours.
-
Page 10: Quick Start
Quick Start How to Grind & Tamp Coffee Ensure that the water tank is filled Slide the portafilter under the and installed, and the hopper grinder outlet, with the lip of is filled with fresh coffee beans. the basket just above the Plug in the unit and press the grinder arms. - Page 11 Quick Start Press SINGLE or DOUBLE Filter Size button. The unit will automatically grind the correct amount of coffee for the size you’ve chosen, but you can customize to adjust the amount if you wish (see p. 17). When the grinder stops, remove the portafilter. Remove the grinding funnel, if used, and rest the portafilter’s rubber base on a flat surface.
- Page 12 Quick Start It may take some practice to tamp the coffee with just the right amount of pressure. Be sure to apply even pressure across the whole surface of ground coffee. As a rule of thumb, the top of the tamper “cap” should end up aligned with the top edge of the portafilter basket.
- Page 13 Quick Start Turn the handle to the right After a few seconds, espresso to lock it into place. When the will begin flowing from the brew portafilter is fully locked, the head. The unit will stop after the EP 2 handle will point straight forward.
- Page 14 Quick Start How to Steam & Froth Milk When making steamed-milk drinks such as cappuccinos and lattes, we recommend steaming the milk first, then pulling the espresso shot so that the espresso is as fresh and hot as possible. To maintain high quality and temperature standards, the unit only allows one function at a time—...
- Page 15 Quick Start When the milk reaches 140-150°F (the pitcher will be hot to the touch), return the Steam/Hot Water knob to the OFF position and remove the wand from the milk. Tap the pitcher on the counter to pop any big bubbles, then swirl it to even the texture of the milk.
- Page 16 Perfecting Your Espresso The key to a delicious cup of espresso is getting the extraction pressure right. Watch the gauge while your espresso is brewing and make sure it is in the “Espresso Range. ” If you’re not achieving the ideal extraction, you should start by adjusting the grind size used, and adjusting the compression pressure as you tamp the grounds in the basket.
- Page 17 Perfecting Your Espresso How to Adjust Grind Time The unit’s default grind time is about 9 seconds for a single shot (but can be adjusted from 5 to 13 seconds) and 13 seconds for a double shot, (but can be adjusted from 10 to 18 seconds).
- Page 18 Perfecting Your Espresso How to Adjust Brewing Temperature The brewing temperature is not the final temperature of your drink; there are many factors that affect the actual drink temperature, including grind size, weight of the dose, and tamping pressure. Note, too, that making this adjustment does not only change the temperature of your finished drink, but can also affect the extraction of your espresso.
- Page 19 Perfecting Your Espresso How to Reset Standby Time Default standby time (the time the unit will wait in standby mode before it turns off) is 15 minutes. To adjust this time: Press and hold PROGRAM, DOUBLE Filter Size, and DOUBLE Brew Size buttons for 3 seconds.
- Page 20 Guide to Espresso Drinks Espresso An intense, small dose (single or double shot) of coffee, served in a small demitasse cup. Ristretto A very short and intensely flavored shot of espresso—about half the volume (15 ml) of a typical shot. To make a ristretto in this unit, press the brew size button halfway through brewing to cut cycle short.
- Page 21 Guide to Espresso Drinks Cappuccino Named for capuchin monks and their signature brown robes, this drink consists of one third espresso, one third steamed milk, and one third foamed milk, often dusted with cinnamon and cocoa. Latte A single or double espresso in a large cup of steamed milk, capped with a thin layer of foam.
-
Page 22: Keep It Clean
Keep It Clean How to Clean After Each Use Perform a few simple steps each time you use the espresso machine to keep it in top condition: Rinse the portafilter and baskets in hot water immediately after use. If there are coffee grounds stuck in the holes of the basket, use the pin end of the cleaning tool to remove them. - Page 23 Keep It Clean Cleaning the Grinder Periodically you’ll need to clean the grinder’s upper and lower burrs to remove the oils and fine particles of coffee, which can interfere with the grinder’s performance. WARNING: The burrs are extremely sharp. Use caution when handling and cleaning them.
- Page 24 Keep It Clean Descaling the Unit Over time, deposits from dissolved calcium and other minerals will build up in the unit and affect the operation. Descaling removes these deposits to return it to peak function. The frequency of descaling depends on the hardness of your water.
-
Page 25: Having Trouble
Allow to cool for about 30–60 minutes. If the problem persists, contact Chefman Customer Support. No or little ground Not enough coffee beans in the Fill the hopper with fresh coffee coffee coming hopper. -
Page 26: Terms And Conditions
Chefman®. Any changes to the Terms and Conditions of this Warranty must be in writing, signed by a representative of Chefman®. No other party has the right or ability to alter or change the Terms and Conditions of this Warranty. - Page 27 1 year from the date of purchase when used in accordance with the directions listed in the Chefman® User Guide. If your product does not work as it should, please contact Customer Support at support@chefman.com so that we may assist you.
- Page 28 For product information, please visit us at Chefman.com. EXCEPT WHERE SUCH LIABILITY IS REQUIRED BY LAW, THIS WARRANTY DOES NOT COVER, AND CHEFMAN® SHALL NOT BE LIABLE FOR, INCIDENTAL, INDIRECT, SPECIAL, OR CONSEQUENTIAL DAMAGES, INCLUDING WITHOUT LIMITATION, DAMAGE TO, OR LOSS OF USE OF THE PRODUCT, OR LOST SALES OR PROFITS OR DELAY OR FAILURE TO PERFORM THIS WARRANTY OBLIGATION.
-
Page 29: Warranty Registration
Please see label on your product for actual model/date code/access code. How do I register my product? All you need to do is fill out a simple Chefman® registration form. You can easily access the form in one of the two ways listed below: •... - Page 30 Crema Supreme Espresso Machine Chefman® is a registered trademark of RJ Brands, LLC. Crema Supreme is a trademark of RJ Brands, LLC.
Need help?
Do you have a question about the Crema Supreme RJ54-G-SS and is the answer not in the manual?
Questions and answers
What size portifilter comes with the Chefman Crema Suprema?
The Chefman Crema Supreme RJ54-G-SS comes with a portafilter that includes single- and double-shot baskets.
This answer is automatically generated
@Mr. Anderson yes but what size is the portifilter. As in Millimeters?
Descale light won’t go off - I have descaled twice & run 2 tanks of clean water through after
I’ve been through the descaling process 4 times now following every single step! Water/stem is not coming from my brew head. I can not get my machine to descale my machine is fairly new this is the first time descaling light has come on