Table of Contents
Advertisement
Quick Links
Advertisement
Table of Contents

Related Manuals for EK-Quantum Magnitude D-RGB-AM5


Summary of Contents for EK-Quantum Magnitude D-RGB-AM5
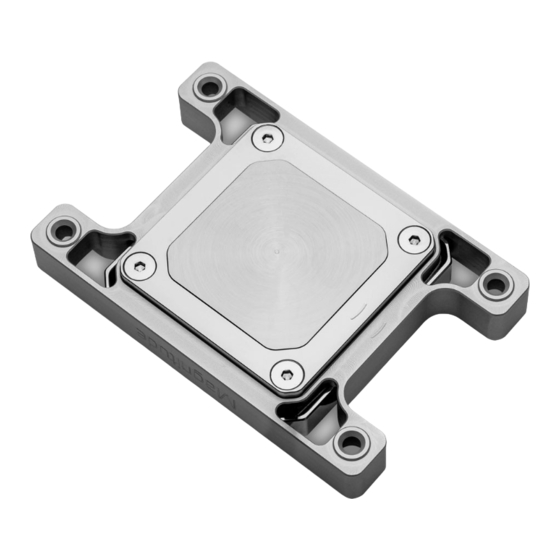
- Page 1 EK-Quantum Magnitude D-RGB - AM5 CPU WATER BLOCK USER GUIDE...
- Page 2 GPU or any printed circuit boards (PCB’s). EK-Quantum Torque fittings require only a small amount of force to screw them firmly in place since the liquid seal is ensured by compression of the rubber O-ring gaskets and not the thread itself.
-
Page 3: Table Of Contents
TABLE OF CONTENT WATER BLOCK DIMENSIONS PARTS AND TERMINOLOGY COMPATIBILITY WHAT IS ENCLOSED FLOW DIRECTION REVERSING THE FLOW DIRECTION CHANGING THE ACCENT PREPARING THE AM5 MOTHERBOARD INSTALLING THE WATER BLOCK CONNECTING THE D-RGB LED STRIP TESTING THE LOOP WARRANTY SUPPORT AND SERVICE SOCIAL MEDIA - 3 -... -
Page 4: Water Block Dimensions
WATER BLOCK DIMENSIONS 19 mm 68 mm 13 mm 54 mm 12.5 mm 29 mm - 4 -... -
Page 5: Parts And Terminology
LED Strip when adding the D-RGB Accent. Note that the LED Strip connector does not fit through the hole in the Frame! COMPATIBILITY EK-Quantum Magnitude AM5 CPU Water Block is compatible with two (2) sockets: • AMD AM4 •... - Page 6 - EK Badge EK BADGE - Top - Accent - LED Strip TOP PLATE - Frame • Frame - 75x75 (115X) • Frame - 80x80 (20XX) ACCENT • Frame - 54x90 (AM4, AM5) • Frame 78x78 (1700) - O-Ring D-RGB LED STRIP - Inlet O-Ring - Insert •...
-
Page 7: Flow Direction
FLOW DIRECTION The prescribed flow direction is applicable for AM4 and AM5 versions. INLET OUTLET REVERSING THE FLOW DIRECTION For AM4/AM5 versions it is not recommended to rotate the Insert relative to the CPU socket due to its asymmetrical design. To prevent any possible incorrect assemblies the Screw hole pattern is not square. -
Page 8: Changing The Accent
CHANGING THE ACCENT It is possible to exchange the Accent on any Magnitude CPU Water Block for an Accent with a different color or material finish. A M4x14 DIN7991 translucent D-RGB Accent can also be used to add lighting to any SCREW version of Magnitude with an opaque Top. - Page 9 STEP 3 (WITHOUT LED STRIP) If applicable refit the O-Ring between the Top and Accent. This is O-RING not required for the operation of the block but ensures the Accent is tightly fitted without an LED Strip. STEP 3 STEP 3 (WITH LED STRIP) First insert the LED Strip through the desired corner of the Frame and then fit the LED Strip between the Top and Accent.
- Page 10 STEP 4 Position the Frame on the Top paying attention to the orientation, failure to do so will prevent the installation of the Screws. The curvature marking should be in line with the Jet Plate opening as illustrated. Ensure that the Jet Plate is still aligned in the Insert and the O-Rings remain in position.
-
Page 11: Preparing The Am5 Motherboard
PREPARING THE AM5 MOTHERBOARD STEP 1 Using a Philips-head screwdriver remove the four UNC 6-32 screws UNC 6-32 SCREW securing the original plastic hold-down clamps around the socket as shown in the illustration. Remove the hold-down clamps and store them away. HOLD-DOWN CLAMPS STEP 1... - Page 12 STEP 3 Applying thermal compound: Apply the enclosed thermal grease (thermal compound) on the CPU heat spreader – IHS – as shown in the image. The layer of the thermal compound must be thin and even in thickness over the entire surface of the IHS. The excessive or uneven application of thermal grease may lead to poor performance! For this step, you will need:...
-
Page 13: Installing The Water Block
INSTALLING THE WATER BLOCK STEP 1 AM5 MOUNTING Loosely install all four (4) provided AM5 Mounting Standoffs before STANDOFF proceeding to tighten them completely. Using pliers or similar tools is not recommended. STEP 1 STEP 2 Position the CPU Water Block onto the AM5 Mounting standoffs. Make sure to align the holes (as shown in the picture). - Page 14 STEP 3 Insert all four (4) saved Springs inside the Frame. MOUNTING SPRING STEP 3 STEP 4 Loosely insert all four (4) saved Screws before proceeding to tighten them (using Allen Key 2.5 mm) two revolutions at once in a cross pattern. Stop MOUNTING when every Screw is flush with its hole inside the Frame! SCREW...
-
Page 15: Connecting The D-Rgb Led Strip
CONNECTING THE D-RGB LED STRIP STEP 1 Plug the 3-pin connector from the water block’s D-RGB LED light to the DRGB HEADER on the motherboard. The LED will work if the pin layout on the header is as follows: +5V, Digital, empty, Ground. Please ensure that the arrow indicated on the connector is D-RGB HEADER plugged into the +5V line as indicated on your motherboard. -
Page 16: Warranty
WARRANTY Our products are warranted against defects of materials and quality for a period of 24 months, starting with the date of delivery to the end-user. During this period, products will be repaired or have parts replaced at our discretion, provided that 1) the product is returned to the agent from whom it was purchased;... -
Page 17: Support And Service
SUPPORT AND SERVICE In case you need assistance or wish to order spare parts or a new mounting mechanism, please contact: https://www.ekwb.com/customer-support/ EKWB d.o.o. Pod lipami 18 1218 Komenda Slovenia - EU SOCIAL MEDIA EKWaterBlocks @EKWaterBlocks ekwaterblocks EKWBofficial ekwaterblocks...
Need help?
Do you have a question about the Magnitude D-RGB-AM5 and is the answer not in the manual?
Questions and answers