Advertisement
Quick Links
Advertisement

Subscribe to Our Youtube Channel
Related Manuals for Kogan MX15 PRO


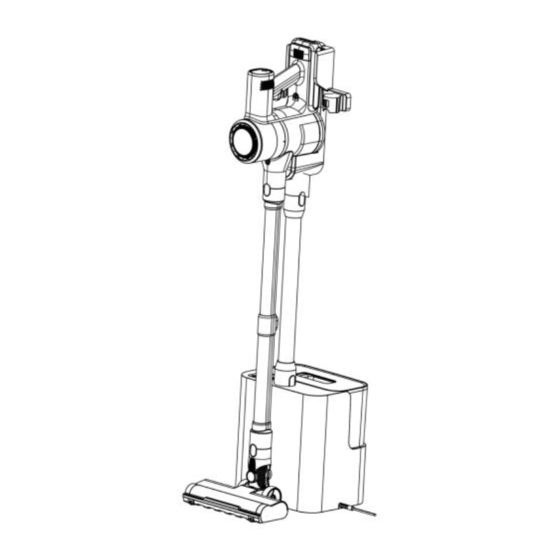
Summary of Contents for Kogan MX15 PRO
- Page 1 MX15 PRO CORDLESS STICK VACUUM CLEANER WITH AUTO-EMPTY DOCK KAVACSTM15D...
-
Page 2: Table Of Contents
Safety & Warnings Accessories Overview Assembly Operation Cleaning & Care Troubleshooting... -
Page 3: Safety & Warnings
• Ensure the battery is charged and discharged at least every three months if the vacuum cleaner is not being used. • Only use the original battery supplied by Kogan.com. Do not use third party batteries. • Safely recycle batteries in accordance with the guidelines set out by your local environmental authority. - Page 4 • This vacuum cleaner is not suitable for cleaning water or other liquids. Do not vacuum water or wet debris. • Do not pour or spill water or other liquids onto the vacuum cleaner. • Keep this appliance away from hot surfaces or sources of heat. •...
- Page 5 Battery • Do not dis • Do not expose the battery to strong impact. • Do not throw the battery into fire or expose it to sources of heat. • Before disposing of this product ensure the battery is removed and disposed of in accordance with your local environmental authority.
-
Page 6: Accessories
ACCESSORIES 2-in-1 Brush Long Crevice tool OVERVIEW Battery release button Battery Switch button Control panel Dust cup release button Extension tube release button Extension tube Brush release button Electric floor brush... - Page 7 Auto-Empty Dock Charging contacts Charging dock Charging dock release button Extension tube Dust bucket lid Base station release button Base station body Power plug Vacuum Control Panel Battery level Power indicator Over-heat Indicator Roller blockage Dust full Indicator Indicator Decrease suction Increase suction power power...
- Page 8 Base Station Control Panel Dust full High indicator mode speed speed inficator Power on for base station Power button Speed control Mode button button Floor Brush • The floor brush head can be used to clean hard floors, floor tiles, short pile carpets, etc. •...
-
Page 9: Assembly
ASSEMBLY Battery Assembly: Slide the battery pack into the Disassembly: Press the battery release slot. button and remove the battery pack. Notes: • Fully charge the battery before first use, when using a new battery or after long- term storage. •... - Page 10 Floor Brush Assembly: Insert the floor brush into the extension tube and push it in until it audibly clicks. Disassembly: Press the floor brush release button on the extension tube and pull the extension tube away from the floor brush. Charging Dock Assembly Assembly: Insert the extension tube into the charging dock and push it in until it audibly clicks.
-
Page 11: Operation
OPERATION Charging Place the machine on the base and start charging. Battery indicator When the battery level is below 10%, the battery indicator light will flash, indicating that the machine's battery level is low. When the battery level reaches 100%, it indicates that the machine is fully charged. - Page 12 Power On/Off • Press the switch button to turn the vacuum cleaner on. It will be in auto mode by default. • Press the switch button to turn the vacuum cleaner off. Control Panel AUTO Mode • Press the "AUTO" button to turn on Auto mode. •...
- Page 13 Fault Indicators • Roller Blockage: When the roller brush is blocked, the roller brush blockage indicator light will flash red and the floor brush will stop running. After removing dust or dirt, restart the machine to operate normally. • Air Duct Blockage: When the vacuum is blocked by dirt and cannot operate normally, the air duct blockage indicator light will flash red.
- Page 14 Dust Full Reminder When the dust compartment reaches full capacity, the dust warning indicator will flash red. It is important to promptly empty the dust compartment to maintain optimal performance. Emptying the Dust Cup Automatic Dust Collection With the dust collection base station powered on and the power switch is turned on. Place the vacuum on the charging dock.
- Page 15 Emptying the Base Station Dust Bag Grasp the handle of the dust bin lid with your palm and lift the dust bin lid. Hook the dust bag handle with your fingers and lift it upwards. Empty the contents of the dust bag into a bin. Note: Even if the dust full indicator is not on, ensure the dust bag is emptying ever 3-5 days.
-
Page 16: Cleaning & Care
CLEANING & CARE Removing the Dust Cup and Filter Turn off the vacuum and disconnect the extension tube, rotate the dust cup and separate the dust cup from the main body. Rotate clockwise to remove. Dust Cup Use a brush to remove dust or wipe with a dry cloth. - Page 17 Filter & HEPA Filter Assembly Rinse the metal filter with clean water. Do not use the vacuum cleaner without the filters installed. Allow the dust cup and filters to thoroughly air dry for 24 hours before reassembly. Note: It is recommended to clean the HEPA filter screen once a week to maintain optimal performance.
-
Page 18: Troubleshooting
TROUBLESHOOTING Problem Possible Cause Solution Use the vacuum cleaner after fully charging. 1. Low battery. Product stopped Clean the tube and 2. Extension tube blockage. running restart the vacuum 3. Dust bag not in place. cleaner. Check if the dust bag is pressed in place Use the vacuum cleaner after fully... - Page 19 Cleaning the extension Abnormal noise Blockage in extension tube. tube. Roller brush not running/Floor brush The rolling brush is entangled Clean the roller brush and light not on/Roller with dirt such as hair. restart the machine. brush blockage light Battery indicator Low battery level.
- Page 20 Need more information?
Need help?
Do you have a question about the MX15 PRO and is the answer not in the manual?
Questions and answers
The base will not turn on
The Kogan MX15 PRO base may not turn on due to the following reasons:
1. The power socket or charger is damaged.
2. The power transformer is not properly inserted into the socket or the charging port.
3. The original power charger is not being used.
4. The host is overheating and needs to cool down before charging.
Check and resolve these issues to restore power to the base.
This answer is automatically generated
@Quentin Sims How does the Battery charge
my vacuum head will not click into the tube as they are both the same size, Also you did not send me the tubes to the empty dock