
Related Manuals for Tsun G3 Series


Summary of Contents for Tsun G3 Series
- Page 1 G3 Microinverter TSOL-MS800-D TSOL-MS700-D TSOL-MS600-D TSOL-MS400-D TSOL-MS350-D TSOL-MS300-D V1.0 - 1 -...
-
Page 2: Trademarks And Permissions
G3 Microinverter Trademarks and Permissions TSUN and other TSUNESS trademarks are trademarks of TSUNESS Co., Ltd. All other trademarks and trade names mentioned in this document are the property of their respective holders. TSUNESS Co., Ltd makes no representations express or implied, concerning this... -
Page 3: Table Of Contents
Microinverter Installation ............................... - 10 - Pre-installation Check ....................................- 10 - Installation Steps ......................................- 11 - TSUN Monitoring System .............................. - 17 - Installer ........................................- 18 - End User ........................................- 19 - Remote Active Power Control ............................- 20 - Self-Test Function for Italy ............................. -
Page 4: Read This First
G3 Microinverter Read This First Dear customer, thank you for choosing the G3 series microinverter from TSUN. We hope you will find our products meet your needs for renewable energy. Meantime, we appreciate your feedback regarding our products. A solar microinverter, or simply microinverter, is a plug-and-play device used in photovoltaics, that converts direct current (DC) generated by a single solar module to alternating current (AC). - Page 5 G3 Microinverter · CAUTION indicates that the described operation must not be carried out. The reader should stop using and fully understand the operations explained before proceeding. The symbols on the microinverter are listed below and illustrated in detail. Symbol Description This device is directly connected to the public grid, thus all work to the inverter shall only be carried out by qualified personnel.
-
Page 6: System Introduction
TSOL- MS800/MS700/MS600-D TSOL- MS400/MS350/MS300-D The microinverter is integrated with the Wi-Fi module and connects to the home Wi-Fi router directly. Users can monitor the power generation of the system by TSUN monitoring App. V1.0 - 6 -... -
Page 7: Product Description
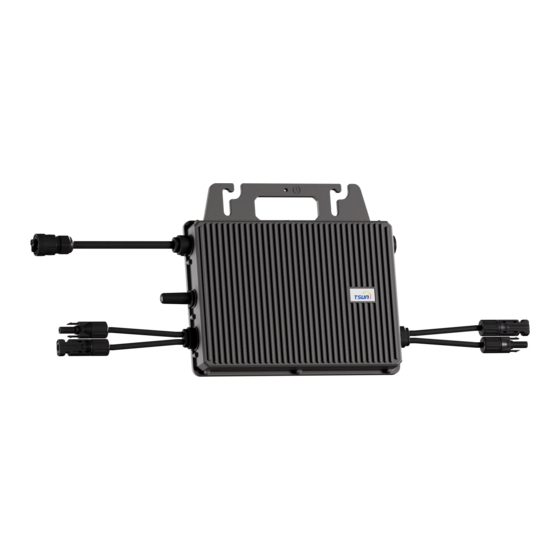
G3 Microinverter Product Description TSOL- MS800/MS700/MS600-D TSOL- MS400/MS350/MS300-D Mounting Hole AC Cable Grounding Hole Antenna DC Cables Status Light V1.0 - 7 -... -
Page 8: Datasheet
AC overvoltage protection Integrated Over-heat protection Integrated Mechanical Data Dimensions (W×H×D mm) 250 * 170 * 28 Weight [kg] General Data Display LED indicators; TSUN APP+WEB Communication built-in WiFi module Type of Isolation Galvanically Isolated HF Transformer V1.0 - 8 -... - Page 9 G3 Microinverter Type of Enclosure IP67 Cooling Natural convection Operating Ambient Temperature -40 ~ +65 (derating of over 50°C Ambient Temperature) Range Relative Humidity 100% Max. Operating Altitude Without 2000 Derating [m] ※ The AC voltage and frequency range may vary depending on specific country grid. Model TSOL-MS400-D TSOL-MS350-D...
-
Page 10: Microinverter Installation
Pre-installation Check Check the Package Although TSUN’s microinverters have surpassed stringent testing and are checked before they leave the factory, it is uncertain that the microinverters may suffer damage during transportation. Please check the package for any obvious signs of damage, and if such evidence is present, do not open the package and contact your dealer as soon as possible. -
Page 11: Installation Steps
G3 Microinverter ◆ Avoid electromagnetic interference that can compromise the correct operation of electronic equipment. ◆ It’s recommended to install microinverter on structures underneath the photovoltaic modules so that they work in the shade. ◆ Use a mobile phone to check the Wi-Fi signal strength at the installation position. If the Wi-Fi signal is bad, try to install the microinverter in another position or move the Wi-Fi router. - Page 12 G3 Microinverter Step 2. Connect the ground cable WARNING · Ensure that all the microinverters are well grounded. · Use ɸ6 screw for the ground port. Connect the ground cable to the enclosure of the microinverter. Step 3. Connect the AC cable of two microinverters WARNING ·...
- Page 13 G3 Microinverter TSOL-MS600-D TSOL-MS400-D TSOL-MS350-D TSOL-MS300-D Every micro-inverter could be connected to the other one by its AC cables. Plug the female AC connector of one microinverter into a male AC connector of another microinverter to form a continuous AC branch circuit. Use Nylon cable ties to fix the AC cables onto the frame.
- Page 14 G3 Microinverter CAUTION · The installation technician is responsible for selecting a kind of AC cable and connecting the micro-inverter system to the home distribution network correctly. · The AC connectors may be provided by different suppliers. The port definitions are subject to actual objects.
- Page 15 · Use MC4 compatible DC connectors in the inverter side of the DC extension cable, or get the DC connectors from TSUN. · Contact PV module manufacturers for the requirements of the DC connectors in the module side of DC extension cable.
- Page 16 G3 Microinverter Install the PV modules and connect the DC cable to the microinverter. Step 6. Make an installation map CAUTION · If there is more than one installation site, please make the installation map separately and give a clear description of the installation site. ·...
-
Page 17: Tsun Monitoring System
Status Indicates Flashing Green (0.2-0.8 ) Working normally Flashing Green (0.2-3.8) WiFi abnormally Flashing Red Working abnormally Solid Red Fault TSUN Monitoring System The G3 microinverter has an integrated monitoring module inside. The microinverter will directly V1.0 - 17 -... -
Page 18: Installer
G3 Microinverter connect to the router (Wi-Fi Version). Users can use the TSUN Smart APP or enter the TSUN website to monitor the microinverter. Installer Ask for an installer account from the distributor or TSUN. Visit pro.talent-monitoring.com to find the TSUN Monitoring and Management Portal platform. -
Page 19: End User
G3 Microinverter User Guidance of TSUN Monitoring System End User Visit “Google Play” or “Apple Store” and “TSUN SMART”. Download and install it in the mobile phone. TSUN Smart Register a new account in TSUN SMART. Visit https://www.tsun-ess.com/File/$random-2023-09-16-090024-_912he0N or Scan the QR code below to find the latest User Guidance of TSUN SMART. -
Page 20: Remote Active Power Control
(input port) to cease the output of active power or limit active power to a regulated level. This logic input can be the RS485 port, Ethernet port, and so on. TSUN microinverter provides an extra power control device that contains an RS485 port for this remote active power control. For more information, refer to the “User Manual of TSUN power control device”. -
Page 21: Fault Code And Troubleshooting
Check the voltage of the PV module and make sure that the PV1VoltOver_Fault voltage is below the maximum DC input voltage of the microinverter. If this fault appears continuously, please contact the TSUN PV2VoltOver_Fault service. This warning mostly appears in the morning or at dusk. It’s PV1VoltLow_Fault normal and will disappear automatically. -
Page 22: Maintenance Guide
G3 Microinverter Maintenance Guide Routine Maintenance ◆ Only authorized personnel are allowed to carry out the maintenance operations and are responsible for reporting any anomalies. ◆ Always use the personal protective equipment provided by the employer when carrying out maintenance. ◆... -
Page 23: Recycling And Disposal
G3 Microinverter Recycling and Disposal This device should not be disposed of as residential waste. A Microinverter that has reached the end of its life is not required to be returned to the dealer. Users must find an approved collection and recycling facility in the area. -
Page 24: Distributor Responsibility
Within the warranty period of the microinverter, the invoice and date of purchase are required for the service. Besides, the trademark on the product should be visible, otherwise, warranty is not available. More information can be found in TSUN Warranty Policy. V1.0... - Page 25 G3 Microinverter V1.0 - 25 -...
Need help?
Do you have a question about the G3 Series and is the answer not in the manual?
Questions and answers