
Related Manuals for Metcalfe M10


Summary of Contents for Metcalfe M10
- Page 1 Metcalfe M10 10 Litre Planetary Mixer Installation & Operating Instructions 01766 830 456 sales@metcalfecatering.com www.metcalfecatering.com...
-
Page 3: Table Of Contents
Index Your Mixer …………………………………………………………………………………………….. Technical Data ……………………..…………………............. Installation - Unpacking & Handling …………………..........- Location ................... - Electrical Connection ………………………………………………………………… - Safety Instructions …………………………………………………………………….. - Tool Selection …………………………………………………………………………… Operation Before using for the first time ............Starting work …………….………………………………………………………………… How to stop the machine …………………………………………………………….. Adding ingredients during processing …………………………………………. -
Page 4: Your Mixer
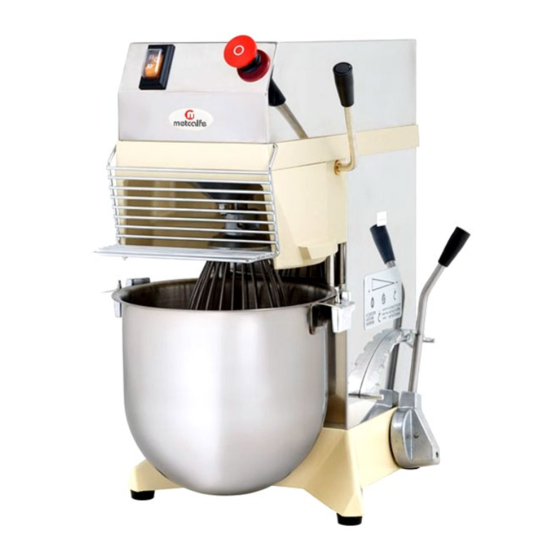
Your Mixer Cover fixing screw Emergency stop button Bowl lift handle On/off switch Cover Grid Speed control lever Bowl centering device Rack Tool shaft Bowl Bowl support Belt Variable speed pulley Capacitor Mains power cable Column Motor Base Rack fixing screw... -
Page 5: Technical Data
Metcalfe M10 (10 Litre Planetary Mixer) The Metcalfe MP10 planetary mixer has a powerful, variable speed motor. It comes complete with a 10 litre stainless steel removable bowl, beater, whisk and dough hook. It is also fully interlocked for safety whilst in use. -
Page 6: Installation
Installation Unpacking & Handling Unpack the mixer immediately after receipt. Please inspect the mixer to ensure no damage and all parts i.e. Bowl, Beater, Whisk & Dough Hook have been provided. If the machine is found to be damaged, keep all the packaging material and contact us immediately or contact your source of the equipment. -
Page 7: Electrical Connection
Electrical Connection • Before connecting the mixer to an electrical supply, please read the specifications on the rating plate to ensure that they comply with those of the electrical supply. • The machine works off 220/240V 50Hz 1 phase supply and comes fitted with a 3-pin 13amp fused plug. -
Page 8: Operation
Operation Before using for the first time: • Pull the bowl lift handle forwards to unlock and lower the bowl • Remove the bowl support, bowl and accessories in their wrappings • Remove, unwrap and wash the three tools in clean water •... -
Page 9: Changing The Tool
Changing the tool All tool changes must be carried out with the appliance halted and the bowl support in the lowered position. 1. Place the tool on the rotating shaft 2. Push the tool upwards 3. Turn and lift the tool slightly anticlockwise to engage the pin bayonet on the tool rotation shaft To remove, do the same operations as for fitting, in reverse. -
Page 10: Safety Features
Safety Features Bowl presence safety device • The bowl must be centered and held firmly in the upper position between the bowl support and the machine frame before the appliance is allowed to work. • The bowl must be present to allow the appliance to be started. •... -
Page 11: Maintenance
Maintenance This machine requires no specific maintenance. The bearings are lubricated for life. If work is required to replace worn parts such as transmission belt, tools, or the electric or other components, refer to the parts list (see exploded view at the end of the manual). For all spare part orders (see references in the exploded view at the end of the manual), state: •... - Page 12 If the distance measured is correct, then the belt change operations are finished. All that is needed is to carry out the following operations: • Replace the cover and screw the locking screw home. • Connect the appliance to the mains electricity supply and start the beater-mixer, then change the speed a few times to check that the variable speed drive operates correctly over the whole range of speeds.
-
Page 13: Troubleshooting
Troubleshooting Identify the cause of appliance stoppage with precision. If the problem persists, switch off the power supply to the appliance (unplug the cable from the mains socket) and call in your engineer or contact us (details on page 16). The appliance will not start: Check : that the grid is in the low position, and that the bowl is locked in the up position •... -
Page 16: Wiring Diagram
Wiring Diagram... -
Page 17: Spare Parts & Service Contact Details
Spare Parts and Service For more information on Metcalfe spare parts, accessories and service support, please contact us on the details below. Please always quote the Serial Number of the machine. This can be found on the serial number plate which is located on the rear of the machine. -
Page 18: Warranty
2 year parts only) and full after sales service. All Metcalfe MP mixers are covered by a 3-year warranty (1st year parts and labour, 2nd & 3rd year parts only) and full after sales service. There is a limited 6-month warranty on the following: •... - Page 19 Some other products in the Metcalfe portfolio: NS Slicer Range Peeler Range Ceado Roband...
- Page 20 8/2023 Metcalfe Catering Equipment Ltd Haygarth Park Blaenau Ffestiniog Gwynedd, LL41 3PF 01766 830 456 sales@metcalfecatering.com www.metcalfecatering.com...
Need help?
Do you have a question about the M10 and is the answer not in the manual?
Questions and answers