Table of Contents
Advertisement
PrepMate
Automated Accessory
Operator's Manual
Australian and New Zealand Sponsors:
Macquarie Park NSW 2113, Australia
Mt. Wellington Auckland 1060, New Zealand
Becton, Dickinson and Company
7 Loveton Circle
Sparks, Maryland 21152 USA
Becton Dickinson Ireland Ltd.
Donore Road, Drogheda
Co. Louth, A92 YW26
BD Switzerland Sàrl
Terre Bonne Park – A4
Route de Crassier 17
1262 Eysins, Switzerland
Becton Dickinson Pty Ltd.
66 Waterloo Road
Becton Dickinson Limited
14B George Bourke Drive
500005571(05) 2022-01
491103, 491424, 491257*
bd.com/e-labeling
™
Ireland
English
Advertisement
Table of Contents

Related Manuals for BD PrepMate Automated Accessory


Summary of Contents for BD PrepMate Automated Accessory
- Page 1 Sparks, Maryland 21152 USA Becton Dickinson Ireland Ltd. Donore Road, Drogheda Co. Louth, A92 YW26 Ireland BD Switzerland Sàrl Terre Bonne Park – A4 Route de Crassier 17 1262 Eysins, Switzerland Australian and New Zealand Sponsors: Becton Dickinson Pty Ltd.
- Page 2 2017/746 and not represented by the stated EU Authorized Representative BD, the BD Logo, CytoRich, PrepMate, PrepStain, Surepath, and Totalys are trademarks of Becton, Dickinson and Company or its affiliates. © 2022 BD. All rights reserved. No part of this publication may be reproduced, transmitted, transcribed, stored in a retrieval system or...
-
Page 3: Table Of Contents
2.1 Materials provided ......................12 2.2 Materials required but not provided................12 2.3 Equipment required ......................12 3 BD PrepMate™ Automated Accessory Operating Sequence ........... 12 3.1 Operating sequence overview..................12 3.2 Operating sequence details.................... 13 4 Operator Controls ........................13 4.1 Control key descriptions .................... - Page 4 A.1 About these instructions....................29 A.2 Document conventions ....................29 A.3 Advisory information ......................30 A.4 Unpacking the BD PrepMate™ Automated Accessory ........... 31 A.5 Initial setup and test run ....................32 A.6 Load BD PrepMate Automated Accessory for test run ..........32...
-
Page 5: Introduction
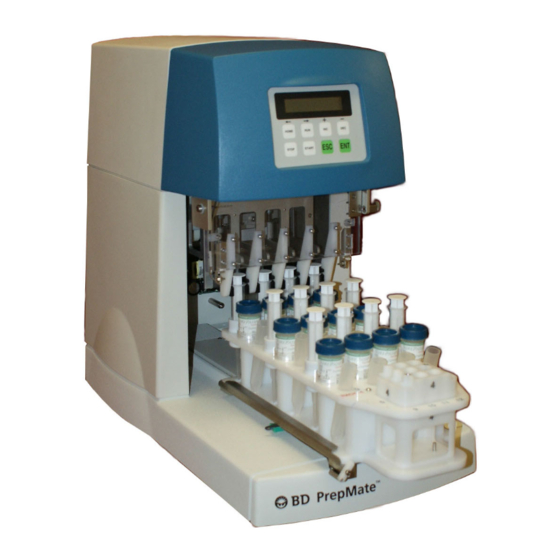
The BD PrepMate™ Automated Accessory mixes and removes the specimen from a BD SurePath™ Collection Vial or BD CytoRich™ Clear Vial. It then layers the specimen onto the density reagent in a centrifuge tube. The automated process handles from one to twelve specimens per cycle. - Page 6 BD PrepMate™ Instrument User’s Manual Hold down Specimen rack door latch Tray latch On/Off switch Figure 1 – BD PrepMate™ Automated Accessory front view Power cord inlet Figure 2 – BD PrepMate™ Automated Accessory rear view...
-
Page 7: About This Manual
Accessory. The BD PrepMate™ Automated Accessory is not a stand-alone system; it is a component of the BD SurePath™ Liquid-based Pap Test and may be used with either the BD PrepStain™ Slide Processor or the BD Totalys™ SlidePrep to prepare BD SurePath™ slides. Likewise, this manual is not intended to be a stand-alone document;... -
Page 8: Symbol Glossary
Indicates the possibility of severe equipment damage or invalid results if instructions are not followed. NOTE Gives helpful information about the BD PrepMate™ Automated Accessory. Symbol glossary There are several symbols used on the instrument. Those symbols and their meanings are shown below ... -
Page 9: Safety And Precautions
AND CLOTHING PROTECTION SHOULD BE WORN AT ALL TIMES. General Precautions Good laboratory practices should be followed and all procedures for use of the BD PrepMate™ Automated Accessory should be strictly observed. Failure to follow recommended procedures as outlined in this manual may compromise performance. -
Page 10: Mechanical Hazards
1.6.2 Mechanical Hazards The BD PrepMate™ Automated Accessory is a computer controlled device. There is a potential for injury and bodily harm from moving mechanical components when the instrument is in operation. A safety guard cover is provided to prevent accidental contact with any moving components. -
Page 11: Electrical Hazards
TV reception or the functionality of other electrical devices. NOTE If it is necessary to interrupt operation of the instrument, press the STOP key on the user interface of the BD PrepMate™ Automated Accessory. 1.6.3 Electrical hazards The same precautions considered when using any electrical equipment should be observed with this instrument. -
Page 12: Materials
Operating sequence overview The following steps summarize the BD PrepMate™ Automated Accessory operating sequence. The user loads the BD PrepMate™ specimen rack with up to 12 specimens and processing components. The user loads the specimen rack into the BD PrepMate™ Automated Accessory and presses START. -
Page 13: Operating Sequence Details
The syringes are lowered so that their tips puncture the seals on the caps of the BD SurePath Liquid-based Pap Test preservative vials and stop near the bottom of each vial.To reduce the possibility of specimen contamination, the tops of vials are not removed during this process. -
Page 14: Control Key Descriptions
BD PrepMate™ Automated Accessory. HOME Use this key to return all BD PrepMate™ Automated Accessory components to their start-up positions. If a row is being processed when HOME is pressed the components do not return to the home position until that row is processed. This key is also used during power up to home the motors. -
Page 15: Operating The Bd Prepmate™ Automated Accessory
These keys do not have a role in the day-to-day use of the product. Do not use these keys. Operating the BD PrepMate™ Automated Accessory Please read this procedure carefully before operating. CAUTION Manually moving metal tray may cause instrument malfunction. Contact BD for assistance with moving the metal tray by hand. -
Page 16: Loading/Unloading The Specimen Rack
1 Figure 5 – Loading the specimen rack Load the centrifuge tubes into the specimen rack. Insert each tube adjacent to its specimen vial, and then pipette 4 mL of BD Density Reagent into each tube. 4 mL density reagent... - Page 17 BD PrepStain™ slide tray is illustrated in Figure 7. The illustration identifies the location of Position 1 (row 1, column 1) in three places: the syringe, vial, and tube rows on the BD PrepMate™ specimen rack; the centrifuge rack rows; and the rows on the slide tray.
-
Page 18: Bd Prepmate™ Operating Instructions
30 minutes to obtain optimum process results. CAUTION To maintain chain of custody, take care to properly orient the labeled, centrifuge tubes and specimen vials when loading the BD PrepMate™ specimen rack and when transferring the centrifuge tubes to centrifuge racks. -
Page 19: Instrument Shut Down
System Maintenance When a specimen rack processing cycle completes, an audible tone sounds. Replace the finished rack with the next rack to be processed, reset the number of rows if necessary, and press START. Inspect the centrifuge tubes to verify that the correct amount of sample has been transferred. -
Page 20: Operating Messages
BD PrepMate™ Instrument User’s Manual Dispose of all wipes by placing them into a biohazard material container. As needed, wash the specimen racks in soap and warm water to remove any residue or buildup. This type of cleaning does not need to be performed after every run. -
Page 21: Error Messages
Operating Messages BD PREPMATE™ READY v x.x LOAD SPECIMEN RACK In this message, "x.x" indicates the current software version. When the normal start up sequence is complete, this message is displayed until a specimen rack is loaded into the instrument. -
Page 22: Fault Messages
The mechanical draw action of the syringes is verified on each draw. This message is displayed if the draw action is insufficient. The last step of the BD PrepMate™ operating instructions is a visual verification of the draw volume. The absence of this error message indicates only that the mechanical draw action is correct. -
Page 23: Preventive Maintenance
The BD PrepMate™ Automated Accessory is designed to operate with no routine maintenance other than cleaning. Refer to System Maintenance for details. • Once every 12 months, preventive maintenance is required to be performed by BD authorized service personnel. Troubleshooting Instrument generated fault messages This section describes messages that indicate an operating fault condition. - Page 24 CLOSE VIAL HOLD-DOWN DOOR, PRESS RUN The vial hold-down door must be latched in the down position for the BD PrepMate™ Automated Accessory to run. Attached to this door are mechanical fingers that engage the top of the specimen vial so that the vial cannot be raised out of the rack when the syringe tip is removed from the vial.
- Page 25 The last step of the BD PrepMate™ operating instructions is a visual verification of the draw volume. The absence of this error indicates only that the mechanical draw action is correct.
- Page 26 Vial old-down door hinge screws loose NOTE If there is a loss of power to the BD PrepMate™ Automated Accessory, the processor does not retain memory. The operator will need to determine which step the process was in and restart testing...
-
Page 27: Repair And Disposal
Becton, Dickinson and Company Technical Support. 11.1 Warranty information The BD PrepMate™ Automated Accessory is warranted one year from the date of delivery. For repair or technical support information, contact your authorized distributor, or Becton, Dickinson and Company Technical Support. -
Page 28: Operational Specifications
12.5 Fusing The BD PrepMate™ has 2 fuses, located in the power entry module. All fuses are 5x20 mm and are 3.15 A @ 250 VAC time-delay, IEC 60127 rated. The product name plate is located on the rear panel with the power inlet and provides fuse information. Replacement fuses must be the... -
Page 29: Appendix: Prepmate™ Installation Instructions
Appendix: PrepMate™ Installation Instructions About these instructions These instructions describe the steps necessary to install the BD PrepMate™ Automated Accessory. The installer is expected to be either a BD PrepMate Automated Accessory user or an authorized representative of Becton, Dickinson and Company. It is also expected that the... -
Page 30: Advisory Information
• Installing a power cord with incorrect polarity could create an electrical shock hazard or damage to the instrument. Hold down Specimen rack door latch Tray latch On/Off switch Figure A.1 - BD PrepMate™ Automated Accessory front view... -
Page 31: Unpacking The Bd Prepmate™ Automated Accessory
Automated Accessory (1) • Power cord (1) • Specimen Racks (4) numbered 1 through 4 • One (1) Disposable Installation Kit (491288: BD PrepMate™ Installation Kit) containing: • Syringing pipettes (12) • Empty specimen collection vials (12) • Vial lids (12) •... -
Page 32: Initial Setup And Test Run
NOTE Use of a UPS (recommended but not supplied) between the power source and the BD PrepMate™ Automated Accessory is recommended to prevent interruption of the process in case of a power outage or brown out. The UPS should have a minimum rating of 150 VA for 5 minutes. - Page 33 Make sure that the plunger of each syringe is fully seated. NOTE The BD PrepMate™ Automated Accessory will not operate if a plunger is too high. NOTE For the purposes of this installation procedure, no live patient specimens are used.
-
Page 34: Process A Test Cycle
The syringes are lifted and lowered back into the specimen rack. When a specimen rack processing cycle completes, an audible tone sounds. If the functions in steps 4 are not performed as described, shut down the BD PrepMate Automated Accessory and call Customer Service.
Need help?
Do you have a question about the PrepMate Automated Accessory and is the answer not in the manual?
Questions and answers