Table of Contents
Advertisement
Quick Links
Advertisement
Table of Contents

Related Manuals for Gage Bilt GB784SR


Summary of Contents for Gage Bilt GB784SR
- Page 1 ORIGINAL INSTRUCTIONS GB784SR INSTALLATION TOOL GAGE BILT TOOLS ARE AVAILABLE WORLDWIDE E-MAIL US FOR A DISTRIBUTOR NEAR YOU. 44766 Centre Court, Clinton Twp., MI. 48038 USA GAGE BILT Ph: +1 (586) 226-1500 Fax: +1 (586) 226-1505 solutions1@gagebilt.com / www.gagebilt.com MADE in USA...
-
Page 2: Table Of Contents
Description ....................................4 Description of Functions ................................5 Safety Warnings ..................................6 Principle of Operation ................................7 How to Set Up the GB784SR ..............................8 How to use the GB784SR ................................9 Maintenance ..................................... 10 Filling ....................................11-12 Bleeding ....................................13 Troubleshooting .................................. -
Page 3: Eu Conformity & Warranty
GAGE BILT DECLARATION OF CONFORMITY MANUFACTURER: Gage Bilt Inc. 44766 Centre Ct., Clinton Twp., Michigan U.S.A. +1(586-226-1500) WE DECLARE THAT THE EQUIPMENT SPECIFIED HEREIN CONFORMS TO THE FOLLOWING DIRECTIVES AND STANDARDS Machinery Directive 2006/42/EC EN12100-1 & EN12100-2 EN792-1:2000+A1 The Supply of Machinery (Safety) Regulations 2008 EU REPRESENTATIVE Edgar Hausmann GmbH Förster-Busch-Str. -
Page 4: Description
CHERRYLOCK®, NAS1398, NAS1399, NAS1738 and NAS1739 double action blind rivets. The handle and head assembly when held in hand weighs 3.5 lbs. (1.59 kg). The GB784SR has a .875" (22.2 mm) fastener setting stroke and a rated pull load of 2,650 lbs. (11.79 kN) with 90 psi (6.2 bar) of air pressure at the air inlet. -
Page 5: Description Of Functions
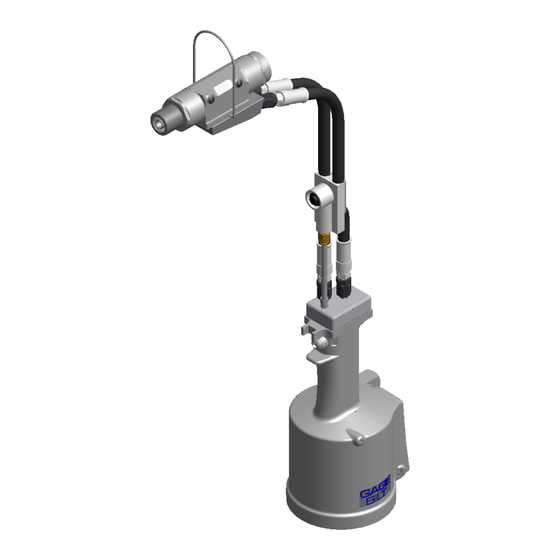
DESCRIPTION OF FUNCTIONS Hanger Head Cylinder Assembly Actuator Hydraulic Hose “Return” Air Line Hydraulic Hose “Pull” Manifold-Handle Bleed Screw Handle Assembly Air Inlet Image may not reflect actual tool. GB784SR INSTALLATION TOOL Rev. 6/23... -
Page 6: Safety Warnings
4. Support the weight of the tool in a stand, tensioner or balancer, because a lighter grip can then be used to support the tool. GB784SR INSTALLATION TOOL Rev. 6/23... -
Page 7: Principle Of Operation
PULL Cycle RETURN Cycle Piston Travel Piston Travel Air exhaust Air exhaust Air exhaust Pressurized Oil Pressurized Air Unpressurized Oil Unpressurized Air Images may not reflect actual tool. GB784SR INSTALLATION TOOL Rev. 6/23... -
Page 8: How To Set Up The Gb784Sr
HOW TO SET-UP THE GB784SR WARNING: Only qualified and trained operators shall install, adjust or use the assembly power tool for non-threaded mechanical fasteners. WARNING: Operator MUST read and understand all warnings and cautions. WARNING: It is required that eye protection, hearing protection and safety boots be worn at all times while handling this equipment. -
Page 9: How To Use The Gb784Sr
HOW TO USE THE GB784SR WARNING: Only qualified and trained operators shall install, adjust or use the assembly power tool for non-threaded mechanical fasteners. WARNING: Operator MUST read and understand all warnings and cautions. WARNING: It is required that eye protection, hearing protection and safety boots be worn at all times while handling this equipment. -
Page 10: Maintenance
WARNING: Tool must be maintained in a safe working condition at all times and examined on a daily basis for damage or wear. Any repair should be done by qualified personnel trained on Gage Bilt procedures. WARNING: Excessive contact with hydraulic oil and lubricants should be avoided. -
Page 11: Filling
5b. Completely fill up fill bottle (745263). 6. Connect fill bottle (745263) to manifold-handle (745303) side hole marked “P”. 6a. Remove front button head cap screw (402482) and stat-o-seal (S572) from head cylinder (784221). CONTINUE “FILLING PROCEDURE” ON NEXT PAGE. GB784SR INSTALLATION TOOL Rev. 6/23... - Page 12 Button head cap screw (402482) & stat-o-seal (S572) Air Bleeder Assembly Front bleeder hole on head cylinder (704153) (784221). Button head cap screw (402482) & stat-o-seal (S572) Fill Bottle (745263) Images may not reflect actual tool GB784SR INSTALLATION TOOL Rev. 6/23...
-
Page 13: Bleeding
Add dimension (B) to dimension (A). If stroke is not consistent within 1/64" (.396 mm) repeat bleeding procedure until stroke met. Gage Bilt offers a depth gage (Pt.# A-1935) to help simplify and more accurately check your tool stroke. Please contact Gage Bilt for more information. -
Page 14: Troubleshooting
DISCONNECT AIR FROM TOOL, remove the nose from the tool and disassemble. Replace worn or broken parts. Clean the surface the jaws ride on. Stems lodged side by side in the follower. Disassemble, remove stems, and reassemble. GB784SR INSTALLATION TOOL Rev. 6/23... -
Page 15: Overhaul
Perform overhaul in a clean, well lit area using care not to scratch or nick any smooth surface that comes in contact with an o'ring. Use of Lubriplate® (Gage Bilt part no. 402723) or other lubricant is recommended during reassembly to prevent tearing or distorting of o'rings. - Page 16 Remove the release piston assembly (784130) from the rear cap (784132). Note: After servicing the tool, to reassemble, reverse the above procedures. Make sure to use proper tools and tighten all parts to manual torque specifications. (See page 10). GB784SR INSTALLATION TOOL Rev. 6/23...
- Page 17 If ports are plugged, use needle nose pliers to grasp end of spring (744144), turning clockwise and pulling to dislodge from groove in casting. Valve spring installation tool (744251) will facilitate the proper installation of the spring (744144). Valve sleeve (743144) can be pulled out using valve sleeve removal tool (744152). GB784SR INSTALLATION TOOL Rev. 6/23...
-
Page 18: Disassembly And Parts Lists
PARTS LIST GB784SR INSTALLATION TOOL Rev. 6/23... - Page 19 PARTS LIST GB784SR INSTALLATION TOOL Rev. 6/23...
-
Page 20: Dexron® Iii Oil Safety Data (Sds)
Use material for its intended purpose or recycle if possible. Oil collection services are available for used oil recycling or disposal. Place contaminated materials in containers and dispose of in a manner consistent with applicable regulations. GB784SR INSTALLATION TOOL Rev. 6/23... -
Page 21: Setting The Shift Point / Shift Piston Check
If stem protrusion is too high, turn adjustment knob clockwise to lower. b. If stem protrusion is too low, turn adjustment knob counter clockwise to higher. Adjuster Knob Limit Pin 784159 - STROKE SETTING GAGE GB784SR INSTALLATION TOOL Rev. 6/23... - Page 22 #3 in front of tool head as shown in figure B. Gage point #3 should be flush (Fig. B) to .062” (1.57 mm) past the end of the tool (Fig. C). 4. If tool fails to meet the above check, it should be overhauled. FIGURE A FIGURE B FIGURE C GB784SR INSTALLATION TOOL Rev. 6/23...
-
Page 23: Nose Assemblies
Nose assemblies are not furnished with the tool and must be purchased separately. In ordering heads be sure to specify the shank diameter and head style (universal or countersunk) of the fasteners to be installed. The following pulling heads will fit directly on the GB784SR Installation tool. (NOTE: Cherry® 681 series pulling heads fit directly on the GB784SR). -
Page 24: Accessories
GB784SR ACCESSORIES Approved for use on Gage Bilt CE installation tools and/or other manufacturer’s CE approved tools of similar design. (Sold Separately) Grip Gage #269G3 Grip Gage #GB105093 For CHERRYMAX® and CHERRYLOCK® rivets For NAS LOCKBOLTS and blind fasteners (Sold Separately) (Sold Separately) Gage Bilt also supplies pin &... - Page 25 Alternative Styles (Sold Separately) GB784 Stroke - .875" (22.2 mm) Hand held weight - 8.00 lbs. (3.6 kg) Pull load - 2,650 (11.79 kN) GB784SR INSTALLATION TOOL Rev. 6/23...
- Page 26 Entire tool weight - 12.5 lbs. (5.67 kg) Pull load - 2,650 lbs. (11.79 kN) Standard Hyd. Hose Length - 8ft (2.4m) 5ft Hyd. Hoses are recommended with use of Backpack Additional custom lengths are available. GB784SR INSTALLATION TOOL Rev. 6/23...
- Page 27 This page intentionally left blank GB784SR INSTALLATION TOOL Rev. 6/23...
- Page 28 Riveter Kits Available (Sold Separately) Gage Bilt offers a wide selection of standard and custom kits tailored to your needs. Contact us for more information. GB784RK-1 Riveter Kit GB784RK Riveter Kit Approved Approved Split Riveter Tool Backpacks For 5ft hose Split System Tools.
Need help?
Do you have a question about the GB784SR and is the answer not in the manual?
Questions and answers