Table of Contents
Advertisement
Quick Links
Advertisement
Table of Contents

Related Manuals for Diamond RM32A


Summary of Contents for Diamond RM32A
- Page 1 01/2013 Mod: P42/XV Production code: P05RP24010...
- Page 2 ROLLING MACHINE RM32A - RM42A - RM42TA (P42/XV) - M42A (P42/XVM) Reseller Stamp for Warranty...
- Page 4 In agreement with EC Regulation No. 1935/2004 of the European Parliament and of the Council of 27 October 2004 on materials and articles intended to come into contact with food Type of equipment ROLLING MACHINES Trademark DIAMOND RM32A - RM42A - RM42TA (P42/XV) Model M42A (P42/XVM) Manufacturer PIZZA GROUP S. r. l. Manufacturer address...
- Page 5 Our equipment is constructed and tested in accordance with the safety regulations indicated in the reference European directives. This manual is intended for people who are assigned to installing, using or servicing the rolling machine, in order to make the best use of the product characteristics.
- Page 6 INDEX INTRODUCTION SYMBOLS INTENDED USE PURPOSE AND CONTENT OF THE MANUAL CONSERVATION OF THIS MANUAL MANUAL UPDATING GENERAL INFORMATION 1.7 RELEVANT SAFETY AND ACCIDENT PREVENTION RULES AND DIRECTIVES LEGAL WARRANTY MANUFACTURER LIABILITY 1.10 USER CHARACTERISTICS 1.11 TECHNICAL ASSISTANCE 1.12 SPARE PARTS 1.13 IDENTIFICATION PLATE 1.14...
- Page 7 5.2.1 Electrical connection 5.2.1.1 Earth connection EQUIPMENT START UP AND USE DESCRIPTION OF THE CONTROLS FIRST STARTING OF THE MACHINE 6.2.1 Thickness regulation 6.2.2 Shape regulation 6.2.3 6.2.3 SHUT DOWN PHASE MAINTENANCE AND CLEANING SAFETY PRECAUTIONS ROUTINE MAINTENANCE FOR THE USER LUBRICATION OF SHAFTS AND ROLLERS INFORMATION FOR DEMOLITION AND DISPOSAL EXPLODED SPARE PARTS VIEW...
-
Page 8: Intended Use
Dear customer, Above all, thank you for choosing our product and we would like to congratulate you on your selection. In order to better use your new rolling machine, please read the information contained in this manual carefully. 1 INTRODUCTION The manufacturer reserves the right to change technical features and/or functions of the product at any time without notice. -
Page 9: Purpose And Content Of The Manual
PURPOSE AND CONTENT OF THE MANUAL Purpose: The purpose of this manual is to allow the user to operate the machine in compliance with all regulations and to make use of the necessary materials for correct, safe and long-term use. Content: This manual contains all necessary information for installation, use and maintenance of the machine. -
Page 10: General Information
GENERAL INFORMATION Information: If exchanging information with the equipment Manufacturer or the Dealer, please refer to the serial number and the identification data of the machine reported on the plate. Liability: With delivery of this manual, the Manufacturer declines any and all liability, both civil and criminal, for accidents deriving from partial or total non-adherence to the specifications contained herein. - Page 11 RELEVANT SAFETY AND ACCIDENT PREVENTION RULES AND DIRECTIVES • Directive 2006/95/EC "“Concerning harmonization of legislation of the member States in relation to electrical materials destined for use within certain voltage limits”. • Directive 2004/108/EC “Concerning harmonization of legislation of the member States in relation to electromagnetic compatibility and that repealed by Directive 89/336/EEC”.
-
Page 12: Legal Warranty
LEGAL WARRANTY The period of the warranty is in agreement with the European community standards and starts from the date of the invoice issued at the time of purchase. Within such a period parts will be replaced or repaired free of charge, only ex works that, for unequivocal and well ascertained reasons, are found to have manufacturing defects;... -
Page 13: User Characteristics
USER CHARACTERISTICS 1.10 The user of the oven must be an adult, responsible person with all necessary technical knowledge for the machine’s ordinary maintenance, such as its daily cleaning. Make sure to keep children and unauthorized people away from the machine while it is operating. -
Page 14: Safety Recommendations
ROLLING MACHINE DELIVERY 1.14 The equipment is provided in a closed cardboard package bound with straps. Inside the package, in addition to the machine, there are also user, installation and maintenance instructions, as well as the declaration of conformity to the current rules and regulations. 2 SAFETY RECOMMENDATIONS 2.1 WARNINGS FOR THE INSTALLER Check that the location of the machine is in compliance with local,... - Page 15 In addition, the user must: make sure to keep children away from the machine while it is operating; adhere to the instructions in this manual. not remove or tamper with the safety devices on the machine; always pay careful attention to the work being carried out and not use the machine when distracted;...
-
Page 16: Handling And Transport
3 HANDLING AND TRANSPORT The machine is provided with all necessary parts in a closed package attached to a wooden pallet with straps. The machine must be unloaded from the transport vehicle, lifting it with suitable equipment. To transport the machine to its installation area, use a rolling cart with an adequate load capacity. -
Page 17: Safety Precautions
4 PREPARATION OF THE INSTALLATION AREA 4.1 SAFETY PRECAUTIONS The user is responsible for operations executed in the room where the machine is located. The user is also responsible for checking the proposed installation solutions. The user must comply with all local, national and European safety regulations. -
Page 18: Installation
Min. 20 cm Min. 20 cm Min. 20 cm Min. 20 cm 5 INSTALLATION Installation must be carried out by qualified personnel in compliance with local, national and European regulations. 5.1 EQUIPMENT POSITIONING Ensure that the machine is placed on a flat support surface with a suitable carrying capacity. -
Page 19: Equipment Hook-Up
5.2 EQUIPMENT HOOK-UP 5.2.1 Electrical connection It is sufficient to connect the power supply cable to the electrical mains power supply. The electrical outlet must be easy to access, no moving should be necessary. The electrical connection (plug) must be easily accessible, also after installing the mixer. -
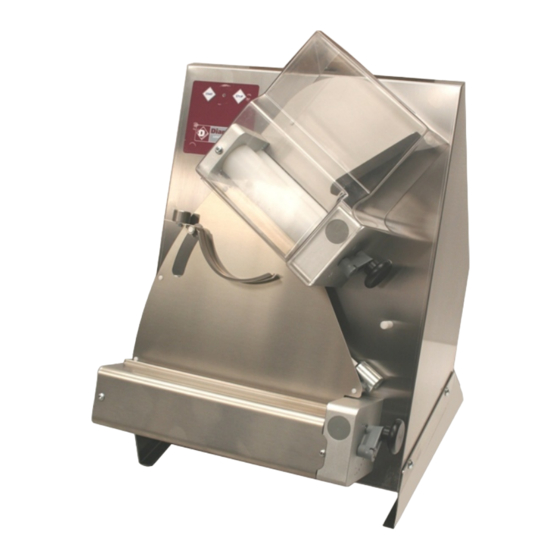
Page 20: Control Board Description
6 MACHINE START UP AND USE CONTROL BOARD DESCRIPTION Our rolling machines are provided with an electronic start/stop control unit with control pedal (except for RM32AE -RM42AE - RM42TAE models, which do not have a pedal). The picture below shows the board’s control buttons. A) START –... - Page 21 WORKING PHASE 6.2.1 Thickness regulation While the machine is not working, it is always possible to adjust the dough thickness parameters. In order to do this, use the top and bottom roller regulation levers. Roller regulation lever To meet individual requirements, the machine can be regulated to various dough thicknesses by turning the two levers (A and B) to various positions (from Min to Max).
- Page 22 assessing the result each time. The final result and the right thickness are influenced by the following variable conditions: dough texture; weight; thickness; size; disc shape All adjustments are to be done while the machine is stopped! To avoid the dough being ragged, pass it just once through the rollers.
- Page 23 Maximum sensitivity: move the counterweight towards the inside; recommended for low weights. Medium sensitivity: put the counterweight in the middle; recommended for intermediate weights. Minimum sensitivity: move the counterweight towards the outside; recommended for high weights. After each adjustment tighten the screw again to lock the counterweight. 6.2.3 Work sequence WARNING: while the machine is operating, it is...
- Page 24 Models with oblique top rollers 1) Start the machine as described in paragraph 6.1 2) Position the dough ball so that it passes smoothly through the top rollers (shape one side like a wedge to simplify the operation) 3) Passing through the top rollers the dough is shaped like a disc and gets the thickness (S) chosen by the operator.
- Page 25 Models with parallel rollers (disc shaping) 1) Start the machine as described in paragraph 6.1; 2) Position the dough ball so that it passes through the top rollers shape one side like a wedge to simplify the operation) 3) When the dough is about to come out of the rollers, support the dough with one hand until is has come completely out.
- Page 26 Models with parallel rollers (rectangle shaping) Put a clean baking-tin under the rolling machine. It should be compatible with the width of the support feet. 1) Start the machine as described in paragraph 6.1; 2) Position the dough ball so that it passes through the top rollers (shape one side like a wedge to simplify the operation) 3) After this step the dough thickness is reduced.
-
Page 27: Maintenance And Cleaning
7 MAINTENANCE AND CLEANING 7.1 SAFETY PRECAUTIONS Before performing any maintenance operations take the following precautions: Ensure that the machine is not working and that it has completely cooled down. Ensure that the machine is disconnected from electricity supply. Ensure that the electrical power cannot be accidentally reconnected. Disconnect the plug from the electrical power socket;... - Page 28 • Turn the regulation levers opening the rollers to their maximum extent. • Thoroughly clean the machine and all the removed components using a sponge or cloth moistened with water and neutral detergent for food preparation areas; • Carefully rinse until the detergent is completely removed. •...
- Page 29 Upper chute Upper protection Lower chute Lower protection Dough scraper Springs Dough Scraper 7.3 LUBRICATION OF SHAFTS AND ROLLERS Shafts and rollers must be lubricated once a year. • Remove the protections, chutes, springs and dough scrapers. • Remove the back A (loosen the locking screws). •...
- Page 30 Roller Support Roller Shafts Joint...
-
Page 31: Information For Demolition And Disposal
8 INFORMATION FOR DEMOLITION AND DISPOSAL Demolition and disposal of the machine is the sole responsibility of the owner, who must perform these tasks in compliance with laws in force pertaining to safety and environmental protection in the country where the machine is installed. - Page 32 USER INFORMATION "The equipment is included in the field of application of European Directive 2002/96/CE, which requires that this product be disposed of separately from normal domestic waste. To avoid causing possible damage to the environment or human health, please keep this product separate from other waste in order to recycle it safely from an environmental point of view.
- Page 33 9 EXPLODED SPARE PARTS VIEW...
- Page 36 MOD. RM42TA M42A RM32A RM42A POS. S31DL54008 S31DL54011 S31DL54011 S33PS54016 S33PS54020 S33PS54020 S61IE54001 S61IE54003 S61IE54003 S61IE54003 A90SU78001 A90SU78010 A90SU78009 A93OL78004 A93OL78004 A93OL78004 A86PQ42001 A86PQ42001 A86PQ42001 S74CQ54005 S74CQ54005 S74CQ54005 S66CI54002 S66CI54002 S66CI54002 A90XP78001 S47IE54006 S47IE54007 S47IE54013 S47MO54001 S47SR54001 S47SR54003 S47SR54006 S56IE54001...
- Page 37 S52IE54003 S52IE54003 S52IE54003 S52IE54003 A86ME30003 A86ME30003 A86ME30003 A86ME30003 S52RD54001 S52RD54001 S31RD54001 S63CD54001 S63CD54005 S63CD54003 S63EC54001 S63EC54002 S63EC54003 S75CD54001 S75CD54003 S75CD54004 S75EC54001 S75EC54003 S75EC54004 S52SR54001 S52SR54001 S52SR54002 A87MR55002 A87MR55003 A87MR55003 A87MR55003 A90UL78002 A90UL78002 A90UL78002 A90UL78002 A90UL78001 A90UL78001 A90UL78001 A90UL78001 A90KI78009 A90KI78001 A90KI78001 A90KI78002 A90BI54001...
-
Page 38: Technical Data
Ø Pizza Model power (Kg) (mm) (mm) (mm) voltage (V) (Hz) weight (gr) (cm) (kW) RM32A 0,25 80 ÷ 210 14÷ 31 RM42A 0,37 210 ÷ 600 26 ÷ 40 RM42TA 0,37 210 ÷ 600 26 ÷ 40 (P42/XV) M42A 0,37 210 ÷... -
Page 39: Wiring Diagram
11 WIRING DIAGRAM Wiring diagram legend ELECTRONIC CONTROL UNIT START/STOP PEDAL PEDAL CONNECTION MOTOR... - Page 40 31-01-2013...
Need help?
Do you have a question about the RM32A and is the answer not in the manual?
Questions and answers