Table of Contents
Advertisement
Quick Links
Advertisement
Table of Contents

Related Manuals for Timeguard NTM02


Summary of Contents for Timeguard NTM02
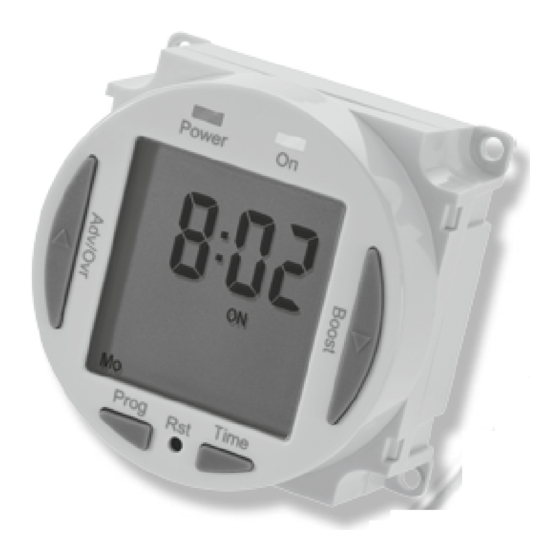
- Page 1 7 Day Digital Time Switch Model: NTM02 7 Day Digital Timer Module...
-
Page 2: General Information
fluorescent lighting 100W LED lighting. The LED switching capabilities of this product can be increased to 200W by the addition of the Timeguard ZV900 Automatic switch load controller – sold separately. • Switch Type: 16A Relay • Voltage free contacts •... -
Page 3: Installation
• Power Status LED Indicator: • Output LED Indicator: Green • 7 Day Time Period: (7 Day, 5 + 2 Days or Individual Day) – 4 ON/OFF switching programmes per day • Operating Temperature: 0°C to +40°C • CE Approved Note: Not suitable for use with Discharge Lighting. -
Page 4: Mounting Details
5. Connection • The connections are marked as follows; Live Supply (Brown or Red) Neutral Supply (Blue or Black) Normally Open Normally Closed Note: this device needs to be left to charge for a minimum of 15 minutes once powered up, before it will operate. -
Page 5: Setting The Clock
7. Battery • The time switch has a factory fitted rechargeable battery to give clock operation and programme memory back up during loss of mains supply. • Before programming for the first time, connect the unit to the mains for at least 15 minutes prior to pressing the Rst button and programming the unit. - Page 6 • Use the Adv/Ovr to increase (or the Boost buttons to decrease) the value and set to the correct year. • Press the Time button once to save the year, and the screen with show the month; • Use the Adv/Ovr or boost button to set the correct month.
- Page 7 There is no automatic exit from Time/date entry mode. 10. Programming ON/OFF times The NTM02 has 4 independent On/Off periods available for programming each day. There is a choice of programming options, including 7 days the same (24 hours), 5 + 2 days...
- Page 8 • Use the Adv/Ovr or Boost to change the day grouping mode. This will step through the following options; 24hour – Mo Tu We Th Fr Sa Su 5 day – Mo Tu We Th Fr (followed automatically in programming by 2 day – Sa Su) Individual day –...
- Page 9 just leave the dashes in place and scroll past the rest of the programs using the Prg button. • After Programme 4 has been entered, then next day grouping will follow e.g. In this example the day grouping will change to 2 day –...
- Page 10 or group of days. Alternatively, leaving the programme entry mode before filling in all the ON/OFF times will leave the remaining times blank. Note: The only way to re-enter a blank times (or dashes) is to reset the unit. Programming across midnight •...
-
Page 11: Boost Button
11. Advance/Override button In normal operating mode the Adv/Ovr button advances the programme to the next time change. • If the output is currently OFF, it will change the output to ON ADVANCE, until the next programmed OFF time. • If the output is currently ON, it will change the output to OFF ADVANCE, until the next programmed ON time. -
Page 12: Year Guarantee
020 8450 0515. Note: a proof of purchase is required in all cases. For all eligible replacements (where agreed by Timeguard) the customer is responsible for all shipping/postage charges outside the UK. All shipping costs are to be paid in advance before a replacement is sent.
Need help?
Do you have a question about the NTM02 and is the answer not in the manual?
Questions and answers