
Related Manuals for Kramer VP-427X


Summary of Contents for Kramer VP-427X
- Page 1 USER MANUAL MODELS: VP-427X 4K HDBT/HDMI Receiver Scaler Switcher P/N: 2900-301713 Rev 1 www.kramerav.com...
-
Page 2: Table Of Contents
Wiring RJ - 45 Connectors Operating and Controlling VP-427X Principles of Operation Operating and Controlling the Device Using the OSD Menu Controlling VP-427X via the RS-232 Port Upgrading Firmware USB Firmware Upgrade (USB Format FAT32) Technical Specifications Default Communication Parameters... -
Page 3: Introduction
Kramer Electronics Ltd. Introduction Welcome to Kramer Electronics! Since 1981, Kramer Electronics has been providing a world of unique, creative, and affordable solutions to the vast range of problems that confront the video, audio, presentation, and broadcasting professional on a daily basis. In recent years,... -
Page 4: Overview
European Advanced Recycling Network (EARN) and will cover any costs of treatment, recycling and recovery of waste Kramer Electronics branded equipment on arrival at the EARN facility. For details of Kramer’s recycling arrangements in your particular country go to our recycling pages at www.kramerav.com/il/quality/environment. -
Page 5: Typical Applications
Flexible Connectivity • Wired and Wireless Auto Switcher — When the receiver is connected to a wireless connectivity device such as Kramer VIA, can automatically select between a wired source at the transmitter or the wireless source at the receiver. •... -
Page 6: Defining Vp-427X
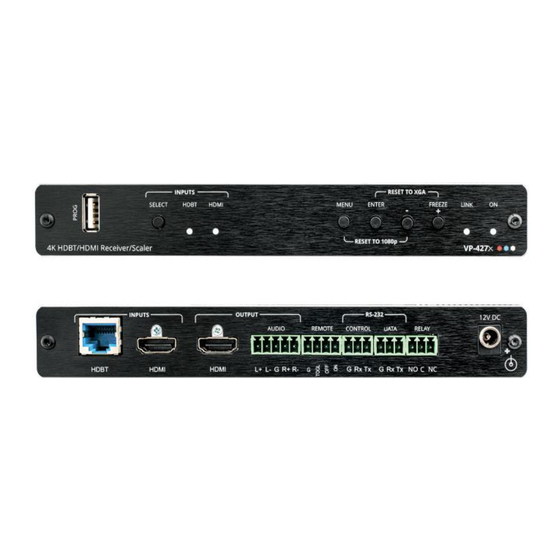
Kramer Electronics Ltd. Defining VP-427X This section defines VP-427X. Figure 1: VP-427X 4K HDBT/HDMI Receiver Scaler Switcher Front Panel Feature Function PROG USB Connector Connect to a USB stick to perform firmware upgrades. INPUTS SELECT Button Press to select the input (HDBT or HDMI). - Page 7 Kramer Electronics Ltd. Figure 2: VP-427X 4K HDBT/HDMI Receiver Scaler Switcher Rear Panell Feature Function INPUTS HDBT RJ-45 Connect to a transmitter (for example, the Kramer TP-580T Connector HDMI Connector Connect to an HDMI source (for example, kramer VIA GO...
-
Page 8: Mounting Vp-427X
Kramer Electronics Ltd. Mounting VP-427X This section provides instructions for mounting VP-427X. Before installing, verify that the environment is within the recommended range: • Operation temperature – 0 to 40C (32 to 104F). • Storage temperature – -40 to +70C (-40 to +158F). -
Page 9: Connecting The 4K Hdbt/Hdmi Receiver Scaler Switcher
Connecting the 4K HDBT/HDMI Receiver Scaler Switcher Always switch off the power to each device before connecting it to your VP-427X. After connecting your VP-427X, connect its power and then switch on the power to each device. Figure 3: Connecting to VP-427X... -
Page 10: Connecting The Output To A Balanced/Unbalanced Stereo Audio Acceptor
Pin 2 to the TX pin on the VP-427X RS-232 terminal block • Pin 3 to the RX pin on the VP-427X RS-232 terminal block • Pin 5 to the G pin on the VP-427X RS-232 terminal block VP-427X – Connecting the 4K HDBT/HDMI Receiver Scaler Switcher... -
Page 11: Wiring Rj-45 Connectors
It is recommended that the cable ground shielding be connected/soldered to the connector shield. EIA /TIA 568B Wire Color Orange / White Orange Green / White Blue Blue / White Green Brown / White Brown VP-427X – Connecting the 4K HDBT/HDMI Receiver Scaler Switcher... -
Page 12: Operating And Controlling Vp-427X
Using the MENU, ENTER (when in the OSD menu), + and – buttons to control the device (see Using the OSD Menu on page 11). • Pressing MENU and - to reset the resolution to 1080p. VP-427X – Operating and Controlling VP-427X... -
Page 13: Using The Osd Menu
Default values appear in bold in the following table. Mode Function PICTURE CONTRAST Set the contrast (0~60) (30) BRIGHTNESS Set the brightness (0~60) (30) FINETUNE Connector Function Parameter HDBT/HD 0~60 (30) SATURATION 0~60 (30) SHARPNESS 0~63 (0) VP-427X – Operating and Controlling VP-427X... - Page 14 OFF/AUTO SCAN/LAST CONNECTED FREEZE FREEZE + MUTE / ONLY FREEZE / ONLY MUTE EDID MANAGE Port EDID Value HDBT EDID Def. 1080P Def. 4K2K(3G) Def. 4K2K(3G-4:2:0) USER1 USER2 OUTPUT HDMI EDID Def. 1080P Def. 4K2K(3G) VP-427X – Operating and Controlling VP-427X...
- Page 15 OUTPUT CEC ON/OFF BYPASS INFORMATION Displays the source, the input and output resolution, and the software version. FACTORY Reset to factory default parameters (resolution is set to Native). EXIT Select to exit the menu. VP-427X – Operating and Controlling VP-427X...
- Page 16 OSD menu. To set the input source: 1. On the front panel press MENU. The menu appears. 2. Click Input and select the Source: HDBT (default) or HDMI. An input signal is selected. VP-427X – Operating and Controlling VP-427X...
- Page 17 2. Click Advanced and select EDID Manage. Select the parameters according to the information in the OSD Values table (see OSD Values Table on page 11). The selected EDID is sent to the input. VP-427X – Operating and Controlling VP-427X...
- Page 18 Leave the outputs active always. Fast Disable the outputs after ~ 10 seconds of no input detection. Slow Disable the outputs after ~ 2 minutes of no input detection. Immediate Disable the outputs immediately. Sleep mode is defined. VP-427X – Operating and Controlling VP-427X...
- Page 19 ▪ On – Pass CEC commands from the source to the display. CEC functionality is defined. VP-427X – Operating and Controlling VP-427X...
- Page 20 2. Click Factory and select either Reset (full reset) or a Soft Reset (reset device information excluding Ethernet parameters), then click Yes. Wait for completion of factory reset (resolution is set to Native). Device is reset. VP-427X – Operating and Controlling VP-427X...
-
Page 21: Controlling Vp-427X Via The Rs-232 Port
Kramer Electronics Ltd. Controlling VP-427X via the RS-232 Port Connect the RS-232 port to a system controller to control the VP-427X. To control VP-427X via RS-232: 1. Connect a controlling system to the RS-232 CONTROL port (see Connecting to VP-427X via RS-232 on page 8). -
Page 22: Upgrading Firmware
Kramer Electronics Ltd. Upgrading Firmware Upgrade the firmware in any of the following ways: • Connecting the device to your PC and using Kramer K-UPLOAD software. • Via PROG USB port (see USB Firmware Upgrade (USB Format FAT32) on page 20). -
Page 23: Technical Specifications
Maximum Output Level 14dBu Extended RS-232 Baud Rate 300 to 115200 Control RS-232 Baud Rate 115200 baud Power Source 2A/12V Consumption Enclosure Size MegaTOOLS® Type Aluminum Cooling Convection Ventilation Operating Temperature 0° to +40°C (32° to 104°F) VP-427X – Technical Specifications... - Page 24 Shipping Dimensions (W, D, H) 35.1cm x 21.2cm x 7.2cm (13.8" x 8.4" x 2.8") Net Weight 0.9kg (2.0lbs) approx. Shipping Weight 1.1kg (2.4lbs) approx. Accessories Included Power cord and adapter Specifications are subject to change without notice at www.kramerav.com VP-427X – Technical Specifications...
-
Page 25: Default Communication Parameters
Go to: Menu > Factory > select either Reset (full reset) or a Soft Reset (reset device information excluding Ethernet parameters). Front panel buttons Press the Reset to XGA/1080p Button while plugging the power to reset the machine. Embedded web pages Device Settings > Soft Factory Reset. VP-427X – Technical Specifications... -
Page 26: Protocol 3000 For Vp-427X
Kramer Electronics Ltd. Protocol 3000 for VP-427X Kramer devices can be operated using Kramer Protocol 3000 commands sent via serial or Ethernet ports. Understanding Protocol 3000 Protocol 3000 commands are a sequence of ASCII letters, structured according to the following. -
Page 27: Protocol 3000 Commands
Set display to OFF via CEC: 0 – Off #CEC-ON<CR> #CECstate<CR> 1 – On FEEDBACK ~nn@CECstate<CR><LF> – CEC state CEC-PASS state Set CEC device bypass. COMMAND Bypass device: 0 – Off #CEC-PASSstate<CR> #CEC-PASS1<CR> 1 – On FEEDBACK ~nn@CEC-PASSstate<CR><LF> VP-427X – Protocol 3000 for VP-427X... - Page 28 ~nn@HDCP-MODin_index,mode<CR><LF> input: – HDCP mode: mode 0 – HDCP Off HDCP supported - 1 – HDCP On HDCP_ON [default]. HDCP not supported - HDCP OFF. HDCP support changes following detected sink - MIRROR OUTPUT. VP-427X – Protocol 3000 for VP-427X...
- Page 29 Get auto-sync features: 1 – Scaler1 #SCLR-AS?scaler_index<CR> #SCLR-AS?1<CR> Gets the auto sync – 0, 1 or 2 sync_speed FEEDBACK features for the 0 – off ~nn@SCLR-ASscaler_index,sync_speed<CR><LF> selected scaler. 1 – fast 2 – slow VP-427X – Protocol 3000 for VP-427X...
- Page 30 7=1360x768@60 8=1400x1050@60 9=1440x900@60 10=1600x1200@60 11=1680x1050@60 12=1920x1200@60 RB 13=2560x1600@60 RB 14=1920x1080@60 15=1280x720@60 16=2048x1080@50 17=2048x1080@60 18=2560x1440@60 RB 19=3440x1440@30 20=3440x1440@60 21=720x480P@60 22=720x576P@50 23=1280x720P@50 24=1280x720P@60 25=1920x1080P@24 26=1920x1080P@25 27=1920x1080P@30 28=1920x1080P@50 29=1920x1080P@60 30=2560x1080P@50 31=2560x1080P@60 32=3840x2160P@24 33=3840x2160P@25 34=3840x2160P@30 35=3840x2160P@50 36=3840x2160P@60 VP-427X – Protocol 3000 for VP-427X...
- Page 31 ▪ – Signal ID <signal_type> attribute: o AUDIO ▪ – Indicates a specific <index> channel number when there are multiple channels of the same type – Audio level (range audio_level between 0 to +100) VP-427X – Protocol 3000 for VP-427X...
- Page 32 VIDEO ROUTEout.sdi.5.v ▪ <index> – Indicates a specific ideo.1,in.sdi.1.v channel number when there ideo.1<CR> are multiple channels of the same type: 1 This is an Extended Protocol 3000 command. VP-427X – Protocol 3000 for VP-427X...
- Page 33 VIDEO – Indicates a specific ▪ <index> channel number when there are multiple channels of the same type: 1 – Input Signal Status status 0 – No signal 1 – There is a signal VP-427X – Protocol 3000 for VP-427X...
-
Page 34: Result And Error Codes
(Reserved) ERR_RESERVED_9 (Reserved) ERR_RESERVED_10 (Reserved) ERR_RESERVED_11 (Reserved) ERR_RESERVED_12 (Reserved) ERR_EDID_CORRUPTED EDID corrupted ERR_NON_LISTED Device specific errors File has the same CRC – not changed ERR_SAME_CRC ERR_WRONG_MODE Wrong operation mode ERR_NOT_CONFIGURED Device/chip was not initialized VP-427X – Protocol 3000 for VP-427X... - Page 35 This limited warranty gives you specific legal rights, and you may have other rights which vary from country to country or state to state. This limited warranty is void if (i) the label bearing the serial number of this product has been removed or defaced, (ii) the product is not distributed by Kramer Electronics or (iii) this product is not purchased from an authorized Kramer Electronics reseller.
- Page 36 SAFETY WARNING Disconnect the unit from the power supply before opening and servicing For the latest information on our products and a list of Kramer distributors, visit our website where updates to this user manual may be found. We welcome your questions, comments, and feedback.
Need help?
Do you have a question about the VP-427X and is the answer not in the manual?
Questions and answers