Advertisement
Quick Links
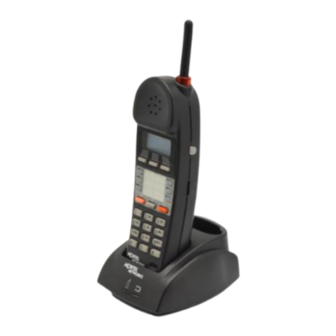
Avaya 7406 Cordless
Telephone User Card
www.avaya.com
© 2010 Avaya Inc.
NN40110-102 03.01
Printed in Canada
Your 7406 cordless telephone
Antenna collar light
A
Flashes to signify an incoming call.
Display
B
Shows the time and date, call information, handset
status icons, and guides you through features and
options menus.
C
Display buttons
The labels for display buttons appear on the second
line of the display. Display button functions change
with each feature.
Feature message
Display button label
Display icons
Display button
D
Memory and line buttons
These buttons provide one-touch dialing, feature
operations, line access or answering a line.
Handset card
E
Write the button function on this card.
Antenna
Collar light
B
Display
Display buttons
C
Memory and
Feature
G
line buttons
Handset Card
Release
F
Hold
H
N
Headset port
1
2
3
ABC
DEF
4
5
6
GHI
JKL
MNO
7
8
9
PQRS
TUV
WXYZ
0
#
M
Lanyard
anchor
J
Microphone
Volume
I
control
Options
Dialpad
L
button/Mute
K
Your 7406 cordless telephone
Release button
F
Ends an active call.
Feature button
G
Starts or cancels a feature.
Hold button
H
Places calls on hold.
I
Dialpad
J
Microphone
Options button/Mute
K
Answers calls, mutes the microphone on an active
call, and accesses the Options list on the display.
Volume control
L
Adjusts the handset, headset, and ringer volume.
Lanyard anchor
M
For attaching a wrist strap.
N
Headset port
For connecting a headset.
O
Battery pack
Installation: First-time battery charging
WARNING: The rechargeable battery pack must be fully charged
before you use your 7406 handset for the first time.
A
To correctly charge a new battery pack and handset:
1. Charge the battery pack in the bat-
tery port at the back of the charger for a
minimum of 30 minutes.
2. Install the battery pack onto the back
of the handset.
D
3. Put the handset into the handset port
E
on the charger. When the contacts
touch correctly, the handset charge
indicator (left LED) lights up red. The
battery pack is fully charged when the
LED turns green (three hours).
4. Place the spare pack into the back
battery port. The battery pack indicator
light (right LED) turns red while it
charges. The spare battery pack is fully
charged in approximately 12 hours
(LED turns green).
Telephone setup
O
Each handset must be registered to a base by sharing an identi-
Battery
Pack
cal security code. A base can support up to three independent
handsets. Each handset assigned to a base station must have a
unique Set ID (1, 2 or 3).
When viewing the back of the base station, the TCM/RJ-11 jacks
from left to right correspond to the handset ID # 1, 2, and 3.
Handset ID #
For each new handset, you must first configure the handset ID #
to identify the handset to the base station:
1. Press the Options button.
2. Press
.
3. Press
until the display shows
4. Press
. The display shows the current Handset ID.
5. If you want to change the ID number, press
The display shows
6. Enter the six-digit password (default 000000)
7. Press
. The display shows
8. Press the appropriate digit on the dialpad.
9. Press
to accept the configuration.
Refer to the Installation manual for instructions about how to
change the password.
Security code
If your installer has already set up a base, obtain the security
code and follow steps 1 to 8, inclusive.
If you need to assign a security code to the base, follow all the
steps in this section.
To assign a security code to a handset follow steps 1 to 8:
1. Press the Options button.
2. Press
.
3. Press
until the display shows
Continued...
Telephone setup continued
Security code (continued)
4. Press
to assign a security code to the handset.
The display shows
5. Enter the six-digit password (default 000000).
6. Press
. The display shows
7. Enter the six-digit Security code that was assigned to the
base you are connecting to.
8. Press
to accept the code.
The display shows
If you are assigning a handset to an existing base, your
handset is now connected to the system.
If you are assigning the first handset to a new base station
(which has no security code), continue with the following
steps:
9. When the displays shows
to get ready to send the security code to the base.
The display shows
10. Unplug the AC power adapter connected to the base,
and plug it back in again.
11. Within 15 seconds, press and hold the
onds to send the security code to the base. The display
shows
is successful.
Note: If the Security Code transfer fails,
plays. To correct this, repeat steps 10 and 11.
12. Press the Options button. The date and time displays.
Handset options
To access the following handset options:
1. Press the Options button.
2. Press
.The display shows
3. Press
until the display shows you the selection.
4. Follow the directions in each section.
5. Press
to exit the menu.
Ring type
.
To select a ring type for your handset:
1. When the display shows
.
2. Press
to listen to the different types of ring.
.
Note: There is also a Ringer Off setting.
3. Press
to accept the ring type of your choice.
.
The display shows the ring type number you chose.
Volume level
To select the ringer volume level for your handset:
1. Press
until the display shows
2. Press
. The display shows
3. Press the volume bar on the left side of the handset to
adjust the ringer volume.
4. Press
to accept the ringer volume.
The display shows
Lock Handset
To lock the buttons on the handset to prevent unintentional
button presses:
1. Press
until the display shows
.
2. Press
. The display shows
3. To release the handset, press
.
press
.
for five sec-
and you hear a beep when the transfer
dis-
.
, press
.
.
.
.
.
.
, then press
.
Advertisement

Subscribe to Our Youtube Channel
Related Manuals for Avaya 7406


Summary of Contents for Avaya 7406
- Page 1 Telephone setup continued Antenna WARNING: The rechargeable battery pack must be fully charged Security code (continued) before you use your 7406 handset for the first time. 4. Press to assign a security code to the handset. Collar light To correctly charge a new battery pack and handset:...
- Page 2 Recycling Center near you. 2. Write the button Priority calls with DND active: When the handset is asleep and Handset charger a Priority call is made to the 7406, it appears to the caller that assignment beside Note: Plug the each button.
Need help?
Do you have a question about the 7406 and is the answer not in the manual?
Questions and answers