Advertisement
Quick Links
————— Assembly and Safe Use Manual —————
MAX P
Models BA853A, BA853G and BA853GXL
Item
Description
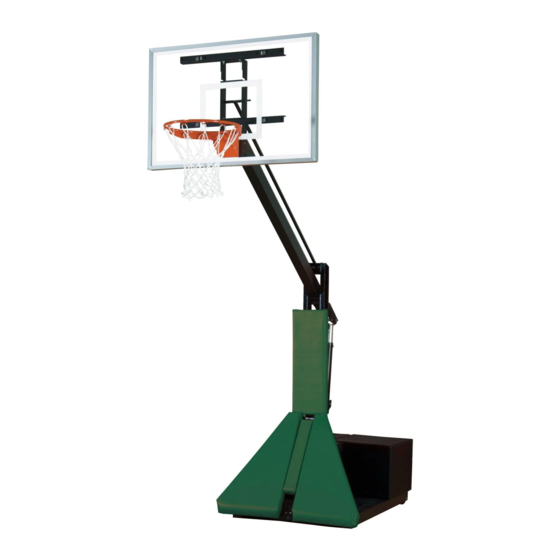
A
Base Assembly
B
Left Hand Protection Pad
C
Right Hand Protection Pad
D
Center Protection Pad
E
Pole Protection Pad
F
4" Square U-Bolt
G
1/4" Flat Washer
H
1/2" Hex Nut
I
1/2" Lock Washer
J
1/4" X 1" Hex Bolt
K
Weight Cover
L
Vertical Pole
M
Horizontal Extension Arm
N
Horizontal I-Rod
O
Safety Shock
P
Height Adjustment Crank
Q
Shock Bushings
R
1/2" X 6 " Hex Bolt
S
1/2" X 4 1/2" Hex Bolt
T
1/2" Lock Nut
U
1/2" X 8" Hex Bolt
V
1/2" X 4" Hex Bolt
W
Rim Height Indicator Label
X
Backboard Padding
(If applicable)
Y
4" X 8" X 16"Solid Concrete
Blocks (supplied by costumer)
Z
BA29JR Rim
AA
BA32 Rim
BB
BA46A Backboard
NOTE: Some items listed on this parts list do no apply to all models. Some parts on this list are packaged in
separate rim, backboard or H-Frame boxes.
Implementation Date: 4/18/23
/A
S
P A R T S L I S T
BA853A
BA853G
BA853GXL
Qty
Qty
1
1
1
1
1
1
1
1
1
1
2
2
12
12
4
4
4
4
12
12
1
1
1
1
1
1
1
1
3
3
1
1
7
7
2
2
1
1
8
8
2
4
1
1
1
1
1
1
25
25
1
1
1
Rev: 12
N.J.C.
File: I:\publisher\instructions\BA853.pub
B
Item
Description
Qty
1
CC
BA481 Backboard
1
DD
BA487 Backboard
1
EE
Backboard Mounting
H-Frame (BA18AHF)
1
FF
Board Mounting
Angle (BA18AHF)
1
GG
1/2" X 7" Hex Bolt
2
HH
Backboard Mounting
H-Frame(BA36GHF)
12
II
5/16" X 1 1/4" Hex
Bolt
4
JJ
5/16" X 1" Screw
4
KK
5/16" Flat Washer
12
LL
5/16" Lock Washer
1
MM
5/16" Hex Nut
1
NN
Black Rubber
Bumper
1
OO
1/4" X 1 1/4" Elevator
Bolt
1
PP
1/4" Hex Nut
3
QQ
Tubular Spacer
1
RR
Rim Mounting
Bushing
7
SS
1/2" Flat Washer
2
1
8
4
1
1
1
25
1
1
Customer Service
(800) 247 7668
BA853A
BA853G
BA853GXL
Qty
Qty
Qty
1
1
1
2
2
1
1
4
4
4
4
4
4
4
4
4
4
4
4
8
4
4
4
4
4
4
10
10
10
Ref# 930151
L.M.
Advertisement

Subscribe to Our Youtube Channel
Related Manuals for Bison BA853A


Summary of Contents for Bison BA853A
- Page 1 ————— Assembly and Safe Use Manual ————— MAX P Customer Service (800) 247 7668 Models BA853A, BA853G and BA853GXL P A R T S L I S T Item Description BA853A BA853G BA853GXL Item Description BA853A BA853G BA853GXL Base Assembly...
- Page 2 Inspect all contents prior to installation. Report any missing parts to dealer immediately. ¨ Read all instructions before proceeding. ¨ Save this instruction in the event that the manufacturer must be contacted in the future. ¨ Warning! While gym floor installers and refinishers often indicate floors are OK to walk or play on in 7-10 days after oil based polyurethane finishes are applied, in reality, it can actually take up to 30 days for all the chemicals in the polyurethane to dissipate.
- Page 3 7. Install bottom of Safety Shocks (O) using Figure 2 1/2” X 8” Hex Bolts (U), 1/2” Flat Washers (SS) and Shock Bushings (Q) onto the small tabs on the Vertical Pole (L). See Figure 4 8. Attach top of Safety Shocks (O) to Horizontal Extension Arm (M) using 1/2”...
- Page 4 If you are assembling BA853A: 11a. Install the 8 Black Rubber Bumpers (NN) into the Board Mounting Angles (FF). See Figure 7. 12a. Use 5/16” X 1 1/4” Hex Bolts (II), 5/16” Lock Washers (LL) and 5/16” Hex Nuts (MM) to attach one Board Mounting Angle (FF) to the top front mount positions and the second Board Mounting Angle (FF) to the bottom mount position on the Backboard Mounting H-Frame (EE).
- Page 5 If you are assembling a BA853G or BA853GXL Portable: 11b. Lay backboard front face down on your work surface. Check to ensure that the four Rim Mount Bushings (RR) are installed in the corresponding rim holes in the backboard. If any are missing, check the inside of the backboard box.
- Page 6 20. To attach the Rim Height Indicator Label (W) crank up the unit until the top of the Rim (Z or AA) is 10' from the playing surface. Using a pencil make a line on one of the outer Safety Shocks (O) at the bottom end of the outer tube.
Need help?
Do you have a question about the BA853A and is the answer not in the manual?
Questions and answers