
Subscribe to Our Youtube Channel
Related Manuals for Hay CRATE Series


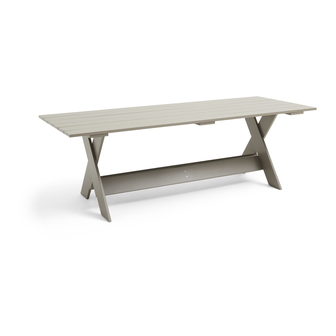
Summary of Contents for Hay CRATE Series
- Page 1 – INSTRUCTION MANUAL – CRATE COLLECTION DINING TABLE L180CM AND DINING TABLE L230CM DESIGN BY GERRIT RIETWELD...
-
Page 3: Care And Maintenance
– CARE AND MAINTENANCE – With a little care you can prolong the life of your ◊ Avoid improper use such as sitting on the back or armrests, tilting the seats on their back legs, furniture. Follow the instructions for the materials putting your feet on the furniture or standing on it. - Page 4 Protect the table from scratches and other damage while assembling. Two people are required to carry out this assembly.
- Page 5 – PARTS – Leg section x2 Tabletop x1 Cross bar x2 Cross bar x2 Bracket x1 Dowel x12 Barrel nut x8 Bracket x1 Screw x24 Allen key x1 Screws M6x75 mm x4 M6x50mm x4...
- Page 6 Connect the first cross bar to the leg sections Make sure the leg sections are positioned as illustrated. Secure with screws and dowels in between. First tighten all the screws loosely, before tightening them completely.
- Page 7 Connect the first cross bar . Secure with screws and dowels in between. First tighten all the screws loosely, before tightening them completely.
- Page 8 Rotate the base 180°. Connect the next cross bar . Secure with screws and dowels in between. First tighten all the screws loosely, before tightening them completely.
- Page 9 Connect the next cross bar . Secure with screws and dowels in between. First tighten all the screws loosely, before tightening them completely.
- Page 10 Place the base upright and insert the bracket from underneath. Secure with screws . First tighten all the screws loosely, before tightening them completely.
- Page 11 Place the base on its head and insert the bracket from underneath. Secure with screws . First tighten both the screws loosely, before tightening them completely.
- Page 12 Turn the base upside down and place it on the underside of the tabletop. Insert the barrel nuts and the dowels . Make sure they are turned the same way as illustrated.
- Page 13 Secure the leg sections to the tabletop using screws Pay attention to the different lengths of screws. First tighten all the screws loosely, before tightening them completely. 75 mm 50 mm Pay attention to the different 50 mm 75 mm screw lengths 75 mm 50 mm...
- Page 14 Secure the bracket to the tabletop with screws...
- Page 15 After carefully placing the table upright, it is ready to use. Retighten the screws after a few weeks of use if needed.
- Page 16 – CARE & MAINTENANCE – Our Care & Maintenance offers guidance for optimal maintenance of your HAY product. It includes advice and instructions on cleaning and caring for specific materials to prolong the life of your furniture. Please find our Care & Maintenance...
- Page 24 Havnen 3 8700 Horsens Denmark +45 4282 0282 / hay@hay.com 25/09/2023...
Need help?
Do you have a question about the CRATE Series and is the answer not in the manual?
Questions and answers