
Subscribe to Our Youtube Channel
Related Manuals for HOMCOM 820-382V90


Summary of Contents for HOMCOM 820-382V90
- Page 1 IN230500313V01_IT 820-382V90 EN_IMPORTANT, RETAIN FOR FUTURE REFERENCE: READ CAREFULLY. IT_IMPORTANTE! CONSERVARE IL PRESENTE MANUALE PER FUTURO RIFERIMENTO E LEGGERLO ATTENTAMENTE.
- Page 2 Please read all the information in this manual, including the safety, operating and maintenance information. To avoid potential risks of fire, electric shock or injury to persons, users should read and understand all directions and warnings in this manual. 1. Read all instructions before using this heater. 2.
- Page 3 For safety, ensure this product is grounded. If it malfunctions or breaks down, grounding will provide a path of least resistance for electric current, reducing the risk of electric shock. The product comes with a cord that has an equipmentgrounding conductor and a grounding plug.
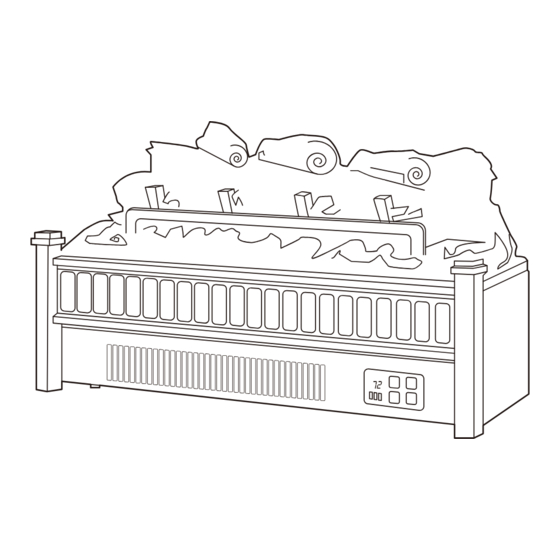
- Page 5 The display unit (1) shows information about the flame level, timer and current temperature. The timer button (3) is used to set the amount of time you want the fireplace/heater to run. The button controls both the flames and the heater function. If the heater is on when the timer is set, then the heater will run on the timer. If the flames are on, then the timer will control the flames.
- Page 6 The heater button (4) is used to turn the heater on or off. There is no speed setting for the heater blower. If you put the heater in standby mode (turned off with the main power button (6)), the unit will remember the settings. When you turn the power back on, the heater will have the same settings as before.
- Page 7 To turn the fireplace/heater on and off, press the power button (6). Press once to turn the unit on. Press again to turn the unit off. Due to safety concerns during transportation, batteries are not included – they must be purchased separately. The part number for the battery is Cr2025.
- Page 8 Using the remote control is the same as using the buttons on the unit. See the operation section for more information on how to use these buttons. NOTE: The remote control does not lock/unlock the flame and heating function. The remote control cannot switch the unit between Fahrenheit and Celsius.
- Page 9 The display unit on the control panel shows '88' and the function Unplug the unit from the wall outlet for five minutes. After five indicator is flashing quickly, indicating it is in alarm mode. minutes. plug the unit back into the wall outlet and operate as normal.
-
Page 10: Table Of Contents
Elenco dei Contenuti Elenco dei Contenuti............9 Pre-installazione..............11 Informazioni sulla sicurezza..........9 Specifiche elettriche............11 Informazioni importanti sulla sicurezza......9 Contenuti nella confezione..........11 Conservare queste istruzioni..........9 Funzionamento..............12 Informazioni sulla sicurezza (successive)......10 Utilizzo del telecomando..........14 Istruzioni per la Messa a Terra........10 Cura e manutenzione............15 Risoluzione dei problemi..........16 Informazioni sulla sicurezza Conservare queste istruzioni Informazioni importanti sulla sicurezza... -
Page 11: Informazioni Sulla Sicurezza (Successive)
Informazioni sulla sicurezza (istruzioni successive) Istruzioni per la Messa a Terra PERICOLO: Il collegamento improprio del conduttore di messa a terra dell'apparecchiatura può comportare il rischio di scosse elettriche. In caso di dubbi sulla corretta messa a terra del prodotto, rivolgersi a un elettricista o a un tecnico qualificato. -
Page 12: Pre-Installazione
Pre-installazione Specifiche elettriche Voltaggio: 220-240V, 50HZ Potenza: 1800W Contenuti nella confezione... -
Page 13: Funzionamento
Funzionamento Identificazione del Pannello di Comprensione degli Indicatori di funzione controllo Il pannello di controllo si trova all'angolo superiore destro L'indicatore di funzionamento (2) è composto da tre spie dell'unità. LED quadrate: rosso, verde e blu. Ecco il significato di ciascuno di essi;... - Page 14 Funzionamento (istruzioni successive) Utilizzo del controllatore del riscaldatore Il pulsante del riscaldatore (4) serve ad accendere o spegnere il riscaldatore. Non esiste un'impostazione di velocità per la ventola del riscaldatore. Se il riscaldatore viene messo in modalità standby (spento con il pulsante di accensione principale (6)), l'unità...
-
Page 15: Utilizzo Del Telecomando
Funzionamento (istruzioni successive) Utilizzo del pulsante di accensione principale Per accendere e spegnere il caminetto/riscaldatore, premere il pulsante di accensione (6). Premere una volta per accendere l'unità. Premere nuovamente per spegnere l'unità. Utilizzo del telecomando Installing the battery Per motivi di sicurezza durante il trasporto, le batterie non sono incluse e devono essere acquistate separatamente. Il numero di parte della batteria è... -
Page 16: Cura E Manutenzione
Utilizzo del telecomando (istruzioni successive) AVVERTENZA: Non ingerire le batterie. NOTA: 1. Non caricare batterie non ricaricabili. Smaltimento delle batterie 2. Inserire le batterie con la corretta polarità. Si prega di smaltire 3. Rimuovere le batterie esaurite dal prodotto. sempre le batterie in un 4. -
Page 17: Risoluzione Dei Problemi
Risoluzione dei problemi Problemi Soluzioni Verificare che l'unità sia collegata a una presa di corrente standard da 120V. L'unità non si accende. Premere il pulsante di accensione sul pannello di controllo. L'interruttore principale si è attivato, ma non c'è alcun effetto Aprire il pannello superiore e posteriore per verificare se il fuso fiamma.
Need help?
Do you have a question about the 820-382V90 and is the answer not in the manual?
Questions and answers