
Related Manuals for HighPoint RocketStor 6614V


Summary of Contents for HighPoint RocketStor 6614V
- Page 1 RocketStor 6614V & 6618V User Manual RocketStor 6614V & 6618V User Manual V1.00- Nov 17, 2023 Copyright 2023 HighPoint Technologies, Inc. All rights reserved...
- Page 2 Backup your important data before using HighPoint's products and use at your own risk. In no event shall HighPoint be liable for any loss of profits, or for direct, indirect, special, incidental or consequential damages arising from any defect or error in HighPoint's products or manuals.
-
Page 3: Table Of Contents
For Windows Users ..........................18 For Mac Users ............................19 For Linux Users ............................19 Step 3: Install HighPoint RAID Management Software (WebGUI & CLI) ........... 20 For Windows Users ..........................20 For Mac Users ............................21 For Linux Users ............................21 Uninstall HighPoint RAID Management (WebGUI &... - Page 4 RocketStor 6614V & 6618V User Manual Step 6: Initialize and format the RAID Array ....................30 For Windows Users ..........................30 For Mac Users ............................31 For Linux Users ............................32 Step 7: Manage your RAID array ......................... 33 RAID Spare Pool ............................33 Add/Remove Spare Using WebGUI ......................
- Page 5 Recover with RAID Maintenance ......................52 Recover RAID with Recover Tab ....................... 53 Online Array Roaming ..........................54 Appendix A: Navigating the HighPoint WebGUI ..................55 Appendix A-1: Global View Tab ........................56 HBA Properties ............................56 Storage Properties ........................... 56 Appendix A-2: Physical Tab .........................
- Page 6 Diagnotic View ............................78 Log Saving ..............................79 Appendix A-9: Logout ..........................80 Appendix B: WebGUI Icon Guide ........................ 81 Appendix C: RAID Level Reference Guide1 ....................83 HighPoint List of Recommended Hard Drives ..................... 84 Resource ............................... 84 Customer Support ............................85...
-
Page 7: Product Overview
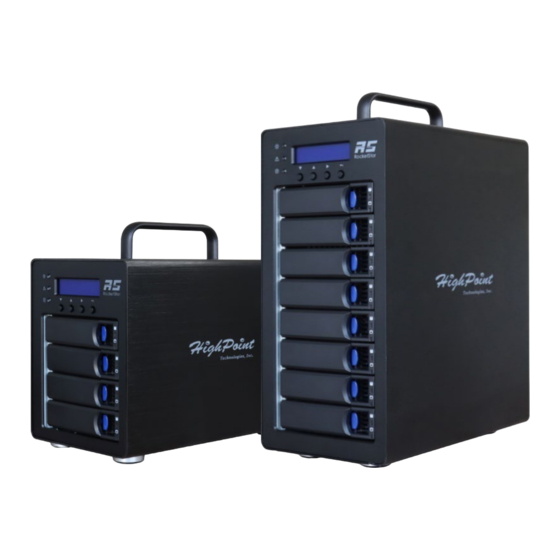
The RocketStor 6618V and 6614V are 4-Bay/ 8-Bay 40Gb/s Thunderbolt™ 3 Tower RAID Enclosures are ideal for I/O intensive applications that require consistent transfer performance and high levels of data redundancy. RocketStor 6614V and 6118V enclosures can be easily integrated into any PC or Mac platform with Thunderbolt™ 3 USB-C connectivity. Kit Contents Before getting started, check to see if any items are missing, damaged, or incorrect. -
Page 8: Feature Specifications
RocketStor 6614V & 6618V User Manual Feature Specifications RocketStor 6614V RocketStor 6618V Feature Specifications Description 4-Bay Thunderbolt 3 Tower RAID 8-Bay Thunderbolt 3 Tower RAID Enclosure Enclosure Port Type 2x Thunderbolt™ 3 USB-C Number of Drives Drive interface 12Gb/s SAS & 6Gb/s SAS/SATA Drive Form Factor 3.5"... - Page 9 Auto resume incomplete rebuilding after power on or reboot system Automatic remap and repair of bad blocks for RAID configurations (HDD) RocketStor 6614V Redundant RAID Levels (RAID1, RAID10, RAID5, RAID6) RocketStor 6618V Redundant RAID Levels (RAID1, RAID10, RAID5, RAID50, RAID6)
-
Page 10: Step 1: Install The Rocketstor 6614V/6618V
RocketStor 6614V & 6618V User Manual Step 1: Install the RocketStor 6614V/6618V The following instructions describe how to install your RocketStor 6614V/6618V for use. Important: Before installing the RocketStor 6614V/6618V, ensure your system is powered OFF. Take the RocketStor 6618V as an example. - Page 11 Note: The RocketStor 6614V/6618V connects to the host system via a Thunderbolt™ cable. As a result, the RocketStor 6614V/6618V will automatically power on when the host system is powered on, and power off when the host system is powered off.
-
Page 12: Step 2: Install/Update Drivers
RocketStor 6614V & 6618V User Manual Step 2: Install/Update Drivers Drivers provide a way for your operating system to communicate with your new hardware. Updating to the latest drivers ensures your product has the latest performance, stability, and compatibility improvements. -
Page 13: For Mac Users
RocketStor 6614V & 6618V User Manual For Mac Users 1. Download the latest driver files from our website and locate the download. Note: The Driver Software revision shown in the screenshots may not correspond with current software releases. Please make sure to download the latest Driver Software updates from the product’s Software Updates page. - Page 14 RocketStor 6614V & 6618V User Manual 5. You will be prompted that installer is trying to install new software, enter the Administrator Username and Password. Once these have been entered, Click Install Software. 6. If no pop-ups appear, please proceed to the next step of installation. Click Restart.
- Page 15 RocketStor 6614V & 6618V User Manual 8. Make sure App Store and identified developers is checked, and then click Allow. 9. You will see a popup window, prompting you to restart. Enter the Administrator Username and Password and click Restart.
- Page 16 RocketStor 6614V & 6618V User Manual 11. After the system restarts, the driver’s status can be viewed under System Information→Extensions; The following screenshot shows the HighPointRR driver has been loaded. Note: The driver revision shown in the screenshots may not correspond with current software releases.
-
Page 17: For Linux Users
RocketStor 6614V & 6618V User Manual For Linux Users Download the latest driver files from our website. Open a terminal and go to the directory where the drive package is located. Use root permissions to extract the driver package. # tar zxvf RR37xx_8xx_28xx_Linux_X86_64_Src_ vx.x.x_xx_xx_xx.tar.gz... -
Page 18: Uninstall Drivers
RocketStor 6614V & 6618V User Manual Uninstall Drivers For Windows Users 1. Power down the system and remove the RS6614V/6618V from the motherboard. 2. Power on the system and boot Windows. 3. Access Control Panel and select Programs > Programs and Features, and click on the RR37xx/8xx/28xx Driver entry. -
Page 19: For Mac Users
RocketStor 6614V & 6618V User Manual For Mac Users 1. Open a terminal and enter Administrator Privileges. 2. Enter the command: # cd /Library/Extensions/ # rm -rf HighPointIRR.kext/ 3. Restart your computer when prompted to complete the process of uninstalling the driver. -
Page 20: Step 3: Install Highpoint Raid Management Software (Webgui & Cli)
RocketStor 6614V & 6618V User Manual Step 3: Install HighPoint RAID Management Software (WebGUI & CLI) The HighPoint RAID Management Software (WebGUI and CLI utilities) are used to create, maintain, and view your RAID arrays hosted by the RS6614V/6618V. Download the latest software package from the HighPoint website. -
Page 21: For Mac Users
Note: The HighPoint RAID Management Software revision shown in the screenshots may not correspond with current software releases. Please make sure to download the latest HighPoint RAID Management Software updates from the product’s Software Updates page. 3. Double click the HighPointWebGUI.pkg to start the HighPoint RAID Management Software installation. - Page 22 Note: The HighPoint RAID Management Software revision shown in the screenshots may not correspond with current software releases. Please make sure to download the latest HighPoint RAID Management Software updates from the product’s Software Updates page. 4. Install the HighPoint RAID management software (WebGUI & CLI) using the following command:...
-
Page 23: Uninstall Highpoint Raid Management (Webgui & Cli)
RocketStor 6614V & 6618V User Manual Uninstall HighPoint RAID Management (WebGUI & CLI) For Windows Users 1. Access Control Panel and select ProgramsPrograms and Features, and right-click on the HighPoint RAID Management entry. 2. Click Uninstall/Change. 3. After uninstalling the HighPoint RAID Management, click Finish. -
Page 24: For Mac Users
RocketStor 6614V & 6618V User Manual For Mac Users 1. Navigate to /Applications/HPTWEBGUI/uninstall. 2. Click on the uninstall script. 3. Type in the Administrator password when prompted. For Linux Users 1. Open the system terminal with root privileges. Enter the following commands to uninstall the RAID... -
Page 25: Step 4A: Login Webgui
RocketStor 6614V & 6618V User Manual Step 4A: Login WebGUI The Web-based Management Interface (WebGUI), is a simple, and intuitive web-based management tool available for Windows /Linux /macOS operating systems. The Wizard-like Quick Configuration menu allows even the most novice user to get everything up and running with a few simple clicks. -
Page 26: Step 4B: Login Cli
Software Updates section of the product category webpages. For Windows Users 1. Method1: Run “Command Prompt” as Administrator and enter hptraidconf and press Enter. 2. Method2:Click “Start” to find the HighPoint RAID Management folder, and click on hptraidconf. For Linux Users 1. -
Page 27: Step 5A: Create Raid Arrays Using Webgui
RocketStor 6614V & 6618V User Manual Step 5A: Create RAID Arrays using WebGUI For Windows, Mac and Linux Users 1. Open the WebGUI. 2. Select the proper controller from the drop down on the top left. 3. Click the Logical tab. - Page 28 RocketStor 6614V & 6618V User Manual 7. If desired name the array. The example shown below uses the name “Default”. 8. Select Quick Init as the initialization method. Note: Quick Init gives immediate access to the array by skipping parity synchronization.
-
Page 29: Step 5B: Create Raid Arrays Using Cli
5. To create a 8 disk RAID 0 array named RAID0 input the following command: HPT CLI > create RAID0 name=RAID0 disks=* 6. To view the created array, type query arrays. Note: For more HighPoint CLI information type help in the command line or refer to the documentation included in the software package. -
Page 30: Step 6: Initialize And Format The Raid Array
RocketStor 6614V & 6618V User Manual Step 6: Initialize and format the RAID Array Before using the newly created RAID array, you must initialize and format the new volume. For Windows Users 1. After creating the RAID array, open Windows Disk Management. -
Page 31: For Mac Users
RocketStor 6614V & 6618V User Manual 5. Once the disk has been confirmed, right click the unallocated space and click New Simple Volume. 6. Follow the on-screen instructions to configure and format the drive. 7. Once finished, the new volume will receive a drive letter and be available for use. -
Page 32: For Linux Users
RocketStor 6614V & 6618V User Manual 4. When finished, your new RAID volume will be available for use. For Linux Users 1. Enter the terminal with root privileges. 2. Enter the command “lsblk”, lists information for all available block devices. -
Page 33: Step 7: Manage Your Raid Array
RocketStor 6614V & 6618V User Manual Step 7: Manage your RAID array The following features allow you to monitor and maintain your arrays to prevent any critical failures from occurring: Spare Pool Email Notifications WebGUI Remote Login ... - Page 34 RocketStor 6614V & 6618V User Manual 6. Disks that have been added to the Spare Pool are displayed in the Spare Pool. Note: Disks added to the spare pool will show under Spare Pool and can be removed by checking...
-
Page 35: Email Notifications
RocketStor 6614V & 6618V User Manual Email Notifications When enabled, all added recipients will receive an email notification for any event log entries. The following topics are covered under email: SMTP Setting Adding Recipients SMTP settings Note: After you click Change Setting, the password field will be reset. - Page 36 RocketStor 6614V & 6618V User Manual button. 4. On the "Account Security" page, click the "Allow apps that use less secure sign in" Outlook Setting: 1. Sign in to mail and set it up, Login email address link: https://outlook.live.com/mail/inbox 2. Click Settings in the upper right corner, select the lower left corner: View all outlook settings...
-
Page 37: Adding Email Recipients
RocketStor 6614V & 6618V User Manual 4. Let devices and apps use pop select “yes”. 5. Choose ‘Let app and devices delete messages from Outlook’ Notes: The screenshot below can be used as a reference. The POP setting is the mailbox server. -
Page 38: Webgui Remote Login
RocketStor 6614V & 6618V User Manual WebGUI Remote Login A user connected to a local network can remotely access the WebGUI using the IP address of the host device. To obtain your IP address Note: If you want to use this function, please set WEBGUI login password to prevent others from changing... -
Page 39: For Linux Users
RocketStor 6614V & 6618V User Manual For Linux Users 1. Open a terminal window on the host computer 2. Type “ip addr”. 3. Look for the section that contains your network adapter information. 4. Note the IP address. Example: enp5s0 has active status, the IP is 192.168.0.184... -
Page 40: Storage Health Inspection (Shi)
RocketStor 6614V & 6618V User Manual Storage Health Inspection (SHI) The Storage Health Inspector (SHI) monitors each individual disk’s health. Monitoring disk SMART attributes can prevent critical RAID failures from occurring. This section covers the following: Enabling SMART Monitoring ... -
Page 41: Disabling Smart Monitoring
RocketStor 6614V & 6618V User Manual Disabling SMART monitoring You have the option to disable SMART monitoring on each individual disk: 1. Select the proper controller using the drop down menu on the top left. 2. Click the SHI tab. -
Page 42: Storage Health Inspector Scheduling
RocketStor 6614V & 6618V User Manual Storage Health Inspector Scheduling The Scheduler enables you to schedule disk/array checkups to ensure disks/array are functioning optimally. RAID1/10/50/6 will appear under New Verify Task: Log into the HRM. 1. Select the proper controller from the top left drop down. - Page 43 RocketStor 6614V & 6618V User Manual 9. Click Submit. 10. Your entry will appear under Tasks List. Note: New Verify Task box only appears if you have normal status arrays. If you have a critical array, New Rebuild Task will replace New Verify Task.
-
Page 44: Raid Expansion (Oce/Orlm)
RocketStor 6614V & 6618V User Manual RAID Expansion (OCE/ORLM) Important: Before using OCE/ORLM, we recommend that you Verify the current RAID array, using the WebGUI’s Verify function, under Maintenance. The OCE/ORLM process is irreversible; once you start an OCE/ORLM procedure, the process can be temporarily paused (using the Maintenance option), but it must ultimately be resumed until completion. - Page 45 RocketStor 6614V & 6618V User Manual 5. This will open the “Array transform/transforming” menu. 6. First, check the box before the top entry (A) – this is the current array. 7. Next, check the box for each additional drive you want to add to the array (B) 8.
- Page 46 RocketStor 6614V & 6618V User Manual 9. The Status will change to “Expanding/Migrating” and will display a progress bar. 10. Once complete, your operating system will recognize the additional capacity as unpartitioned space – you are free to partition/format this space as a separate volume, or expand the current partition to include...
-
Page 47: Troubleshooting - Hardware
RocketStor 6614V & 6618V User Manual Troubleshooting – Hardware If you face any hardware related issues involving the RS6614V/RS6618V Enclosure OR disk drives, refer to the following sections for troubleshooting tips. For all other problems, submit a support. Enclosure Mute Button The mute button on the back will mute the alarm for enclosure related issues such as enclosure FAN or TEMPERATURE failures. -
Page 48: Replacing A Failed Disk
RocketStor 6614V & 6618V User Manual Disk Tray Bottom • FLASHING BLUE: the disk is in use (read/write I/O) Power LED • SOLID BLUE:the enclosure is powered on • UNLIT:the enclosure is not connected to an active host system Fail LED SOLID RED. -
Page 49: Troubleshooting - Software
RocketStor 6614V & 6618V User Manual Troubleshooting - Software If you have problems in use, please submit the to our online service (https://www.highpoint- tech.com/support-and-services). -
Page 50: Troubleshooting - Raid
RocketStor 6614V & 6618V User Manual Troubleshooting – RAID If you face any RAID related issues involving your RAID array, refer to the following sections for troubleshooting tips. For all other problems, submit a support ticket at https://www.highpoint- tech.com/support-and-services Critical Arrays When your disk is critical, that means your array as a whole is still accessible, but a disk or two is faulty (depending on your RAID level) is in danger of failing. -
Page 51: Rebuild Failed
RocketStor 6614V & 6618V User Manual The Rebuild process should now begin. If the rebuild process does not start, click Rescan. Note: Rebuilding an array takes on average 2 hours per 1 Terabyte of disk capacity. The process will scan through the entire disk, even if you have very little used disk space. -
Page 52: Disabled Arrays
RocketStor 6614V & 6618V User Manual Disabled Arrays If two or more disks in your array go offline due to an error or physical disconnection your array will become disabled. To recover a disabled array, using the ‘Recover Tab’ will yield the best results. To utilize the Recover tab, you will need to insert the exact physical drives that are listed on the recover list. -
Page 53: Recover Raid With Recover Tab
RocketStor 6614V & 6618V User Manual Recover RAID with Recover Tab Before using the Recover tab to recover your array, check to see if the RAID array is listed in your Recover List. Once you have confirmed the RAID array is there, proceed to delete the disabled array. -
Page 54: Online Array Roaming
RocketStor 6614V & 6618V User Manual Online Array Roaming One of the features of all HighPoint RAID Enclosure is online array roaming. Information about the RAID configuration is stored on the physical drives. So, if the RS6614V/RS6618V fails or you wish to use... -
Page 55: Appendix A: Navigating The Highpoint Webgui
RocketStor 6614V & 6618V User Manual Appendix A: Navigating the HighPoint WebGUI Tab Name Function Global View View HBA and Storage Properties View Additional Controller properties View disk properties Physical Adjust selected disk behaviors Logical Manage and create RAID arrays... -
Page 56: Appendix A-1: Global View Tab
Storage Properties On the top left of the page is a drop-down menu that allows you to select which controller you want to manage (if you have multiple HighPoint products connected). HBA Properties Host Adapter model: the model name of the Enclosure ... -
Page 57: Appendix A-2: Physical Tab
RocketStor 6614V & 6618V User Manual Appendix A-2: Physical Tab The physical tab shows general and extended information about the Enclosure you are using. Information about the MCU, BIOS, and PCB are all located here. This information is useful for identifying what Enclosure model you have and to make sure you have the most updated version available. -
Page 58: Physical Devices Information
– Type of the physical disk Notes * Disk properties that can be adjusted. This information is only displayed in the Windows HighPoint RAID Management Software. Read Ahead Enabling disk read ahead will speed up read operations by pre-fetching data and loading it into RAM. -
Page 59: Appendix A-3: Logical Tab
RocketStor 6614V & 6618V User Manual Appendix A-3: Logical Tab The Logical tab is where you are edit, delete, and maintain your RAID configurations, as well as, adding drives to your spare pool. The logical tab has the following settings: ... -
Page 60: Create Array
RocketStor 6614V & 6618V User Manual Create Array An array is a collection of physical disks that will be seen as one virtual drive by your Operating System (OS). The RS6614V/RS6618V capable of creating the following array types Array Type: ... - Page 61 RocketStor 6614V & 6618V User Manual Foreground: The array initialization process will be set at high priority. During this time array will be • non-accessible, but initialization completion time will be shorter. Background: The array initialization process will have a lower priority. During this time array will be •...
-
Page 62: Normal Status
RocketStor 6614V & 6618V User Manual Normal Status A Normal Status Array has the following options: Delete – deletes the selected RAID array Unplug – powers off the selected RAID array Verify – verifies the integrity of the RAID array ... -
Page 63: Disabled Status
RocketStor 6614V & 6618V User Manual Disabled Status A disabled status array means that your RAID level does not have enough disks to function. Your data will be inaccessible. Rebuilding will not trigger, since the RAID array does not have enough parity data to rebuild. -
Page 64: Delete Array
RocketStor 6614V & 6618V User Manual Delete Array Used to delete a created Array. Open the WebGUI. Click the Logical tabManintenance. Click Delete to delete the RAID array. A pop-up box pops up on the page, click OK to confirm the RAID deletion. -
Page 65: Logical Device Information
RocketStor 6614V & 6618V User Manual Logical Device Information Logical device tab is the default page upon clicking the Logical tab of the WebGUI. This page contains information about your RAID arrays and individual disks your system detects. Logical Device Information Arrays you create and the properties associated with them will appear here. -
Page 66: Spare Pool
RocketStor 6614V & 6618V User Manual Spare pool Spare disks are physical disks that will immediately replace critical disks in an array. Only redundant RAID arrays (RAID 1, 5, 6, 50, and 10) support spare drives. Physical drives marked as a spare will automatically be added to an array whenever there is a disk failure. -
Page 67: Rescan
RocketStor 6614V & 6618V User Manual 6. Disks that have been added to the Spare Pool are displayed in the Spare Pool. Note: Disks added to the spare pool will show under Spare Pool and can be removed by checking the disk checkbox from Spare Pool >... -
Page 68: Appendix A-4: Setting Tab
RocketStor 6614V & 6618V User Manual Appendix A-4: Setting Tab Windows Setting Tab Mac Setting Tab Linux Setting Tab Under this tab, user can... -
Page 69: System Settings
There are 5 levels of priority [Lowest, Low, Medium, High, Highest] Port Number (default: 7402) The default port that the HighPoint WebGUI listens on is 7402. You may change it to any open port. Enable collecting system logs (default: Disabled) You can set it to enabled to collect system logs at any time. -
Page 70: Password Setting
RocketStor 6614V & 6618V User Manual parts exceeding 800MB will be overwritten forward. Temperature Unit (default: °F) The default temperature unit is Fahrenheit, you can change it to Celsius. Password Setting Changing your WebGUI password Under Password Setting type your new password and confirm it, then click submit... -
Page 71: Email Setting
RocketStor 6614V & 6618V User Manual Email Setting The following topics are covered under email: SMTP Setting Adding Recipients You can set the controller to send an email out to recipients of your choosing when certain events (refer to Event Tab) trigger. -
Page 72: How To Add Recipients
RocketStor 6614V & 6618V User Manual How to Add Recipients You can add multiple email addresses as receivers of a notice. 1. Type the email of the recipient in the E-mail text box. 2. Type the name of the recipient in the Name text box. -
Page 73: Appendix A-5: Recover Tab
RocketStor 6614V & 6618V User Manual Appendix A-5: Recover Tab Previously created arrays will be stored under this tab. Recovering an array from here will attempt to recover a “disabled” array and make it “normal”. The Recover List will list all your previous and current created arrays. Each entry will list the following properties: ... -
Page 74: How To Reload Your Backup Recover List
RocketStor 6614V & 6618V User Manual How to Reload your Backup Recover List In the case that you cleared the recover list or it does not appear for any reason, you can recover it if you saved the list beforehand. -
Page 75: Appendix A-6: Event Tab
RocketStor 6614V & 6618V User Manual Appendix A-6: Event Tab In the event tab, you can see log entries associated with the HighPoint device. The event log provides useful information when troubleshooting your set up. In the event tab, there are four options available: ... - Page 76 RocketStor 6614V & 6618V User Manual Hardware related Error problems • Hard disk failure • Broken errors Memory failure • The event view is a basic error logging tool built into the HighPoint WebGUI.
-
Page 77: Appendix A-7: Shi (Storage Health Inspector)
RocketStor 6614V & 6618V User Manual Appendix A-7: SHI (Storage Health Inspector) S.M.A.R.T Attributes HDD Temperature Threshold Storage Health Inspector Scheduling The SHI outputs information collected using SMART (Self-Monitoring Analysis and Reporting Technology) Hard Drive Technology. The data provided on this tab helps you to anticipate any disk failures based on a variety of monitored hard disk properties. -
Page 78: Appendix A-8: Help
RocketStor 6614V & 6618V User Manual Appendix A-8: Help Online Help Online Help redirects you to additional documentation concerning the HighPoint WebGUI. Diagnostic collect log information Diagnotic View 1-Click Self-Diagnostic Solution: Diagnostic View provides a “1-click” information collection system for troubleshooting. -
Page 79: Log Saving
RocketStor 6614V & 6618V User Manual Log Saving 1. Click the “Save Logs” button to create the diagnostic file. 2. “Logs Location” will display the location of the saving path. -
Page 80: Appendix A-9: Logout
RocketStor 6614V & 6618V User Manual Appendix A-9: Logout Logout of WebGUI, set password will appear. Clicking “Logout” will safely exit “WebGUI”. -
Page 81: Appendix B: Webgui Icon Guide
RocketStor 6614V & 6618V User Manual Appendix B: WebGUI Icon Guide Critical – missing disk A disk is missing from the array bringing it to ‘critical’ status. The array is still accessible but another disk failure could result in data loss. - Page 82 RocketStor 6614V & 6618V User Manual Initializing The array is initializing, either foreground or background initialization Initialization Stopped The initialization has been stopped. Current status is uninitialized. Critical – Inconsistency Data in the array is inconsistent and needs to be rebuilt.
-
Page 83: Appendix C: Raid Level Reference Guide1
RocketStor 6614V & 6618V User Manual Appendix C: RAID Level Reference Guide1 Type Description Min. Usable Advantage Disadvantage Application disks space Each drive can be No fault tolerance - failure Backup accessed as a single of one drive results in... -
Page 84: Highpoint List Of Recommended Hard Drives
RAID environment. Regular, desktop grade drives are highly not recommended for RAID use. Compatibility List: https://www.highpoint-tech.com/rs661xv-series Resource A variety of manuals, guides and FAQs are available for the RocketStor 6614V/6618V. In addition, we recommend visiting the Software Downloads webpage for the management interfaces, and installation guides. Software Download: https://www.highpoint-tech.com/rs661xv-series FAQ &... -
Page 85: Customer Support
RocketStor 6614V & 6618V User Manual Customer Support If you encounter any problems while utilizing the RocketStor 6614V/6618V, or have any questions about HighPoint Technologies, Inc. products & solutions, feel free to contact our Customer Support Department. Web Support: https://www.highpoint-tech.com/support-and-services HighPoint Technologies, Inc.
Need help?
Do you have a question about the RocketStor 6614V and is the answer not in the manual?
Questions and answers