HighPoint RocketStor 6414TS User Manual
Hide thumbs
Also See for RocketStor 6414TS:
- Setup manual (10 pages) ,
- Software installation manual (12 pages)

Related Manuals for HighPoint RocketStor 6414TS


Summary of Contents for HighPoint RocketStor 6414TS
- Page 1 RocketStor 6414TS User Manual January 15 , 2016 Revision 1.5 HighPoint Technologies, Inc.
- Page 2 Backup your important data before using HighPoint's products and use at your own risk. In no event shall HighPoint be liable for any loss of profits, or for direct, indirect, special, incidental or consequential damages arising from any defect or error in HighPoint's products or manuals.
-
Page 3: Table Of Contents
Step 1: Setting Up the Hardware ....................10 Step 2: Install/Update Drivers ....................11 Step 3: Install HighPoint RAID Management (WebGUI) ............17 Step 4: Create RAID Arrays using WebGUI ................20 Step 5: Initialize and format the RAID Array ............... 24 Manage your RAID array ...................... - Page 4 Appendix A-6: Event Tab ......................62 Appendix A-7: SHI (Storage Health Inspector) ..............63 Appendix B: WebGUI Icon Guide ................... 64 Appendix C: RAID Level Quick Reference ................66 Help .............................. 67 HighPoint Recommended List of Hard Drives ..............67 Contacting Technical Support ....................67...
-
Page 5: Product Overview
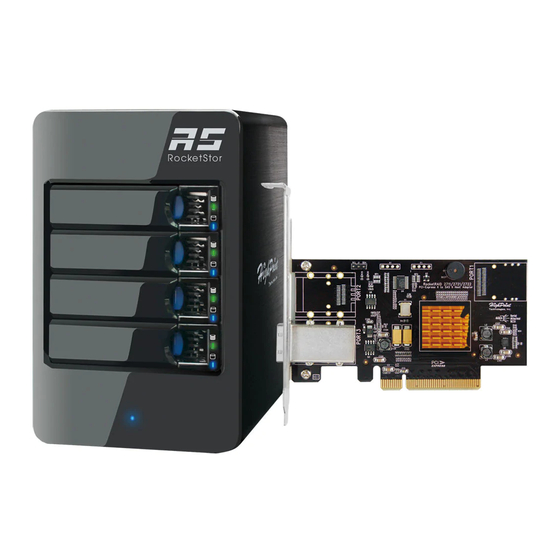
Product Overview The RocketStor 6414TS bundle package includes a enclosure for housing your physical drives and a RAID Controller to manage and create RAID arrays of different levels. RocketStor 6414S Enclosure HighPoint RocketRAID 2711 Controller Kit Contents Before getting started, check to see if any items are missing, damaged, or incorrect. For any discrepancy contact your reseller or go to www.highpoint-tech.com... - Page 6 RAID Level 0, 1, 5, 10, 6, and JBOD Max. Capacity Up to 32 TB Number Of drives Up to 4 Drive Interface SATA Drive Form Factor 3.5" Chassis Material Brushed Aluminum housing Dimension 8.66"(H)x5.31"(W)x8.67"(D) Weight Warranty 1 Years Flash ROM for Upgradeable Firmware Storage Health Inspector Redundant RAID Configurations Multiple RAID Partitions supported...
-
Page 7: Rocketstor 6414S Enclosure Overview
FreeBSD 9.0 and Later Mac OS X OS X 10.6 and later Driver embedded OS X 10.10 Operating Environment Temperature (Operating) 5° C – 45° C / (Non-operating) -40° C – 65° C (operating) 8% – 90% RH (Non-condensing) / (Non- Relative Humidity operating) 5% –... - Page 8 Back Panel Overview Front Panel Disk Present LED Indicates disk is present and available Indicates disk is performing I/O Disk Status LED operations Enclosure Power LED Indicated enclosure is properly powered Back Panel Mini-SAS port SFF-8088 port Mutes enclosure alarm only. Alarm Mute Button sounds off only when FAN and TEMPERATURE fail.
-
Page 9: Rocketraid 2711 Overview
BEEP1 Alarm/Beeper Getting Started Thank you for purchasing HighPoint Technologies RocketStor 6414TS. You are only a few steps away from utilizing RAID storage using the industry’s most affordable hardware RAID solution. To start using your RocketStor 6414TS take the following steps: 1. -
Page 10: Step 1: Setting Up The Hardware
Step 1: Setting Up the Hardware Ensure all items listed under Kit Contents are included in your package. For any discrepancy contact your reseller or submit a support ticket online at www.highpoint- tech.com/websupport. Preparing the Enclosure 1. Press then pull the blue tab on the disk tray to unlock and slide the disk tray out. -
Page 11: Step 2: Install/Update Drivers
Drivers are updated regularly www.highpoint-tech.com For Windows Users: 1. Download the latest driver files from our website www.highpoint-tech.com > Support > Documents and Downloads > RocketStor 6414TS. 2. Extract the downloaded files onto your PC and note the location of the files. - Page 12 3. Open Windows Device Manager (Control Panel > Hardware and Sound > Devices and Printers > Device Manager). 4. Under Other devices, right-click RAID Controller. 5. Click Update Driver Software. 6. Click Browse my computer for driver software.
- Page 13 7. Navigate to where you saved the driver files. 8. Click OK.
- Page 14 9. Click Next, Windows security will prompt to ask if you are sure you want to install HighPoint Software. 10. After clicking Install, driver will be installed. 11. Reboot for changes to take effect. For Mac Users:...
- Page 15 HighPoint Mac Drivers have file extension .dmg; make sure the file extension for the files you downloaded are the same. 1. Obtain latest driver online at www.hptmac.com>PCIe Controller Card > 6 Gb/s SAS/SATA RAID HBA > RocketRAID 2711 > Download ...
- Page 16 5. Follow the on-screen instructions of the installer. 6. Reboot computer for changes to take effect.
-
Page 17: Step 3: Install Highpoint Raid Management (Webgui)
7. Make sure Driver Installed is Yes. Click Apple Icon > About this Mac > System Report > PCI Step 3: Install HighPoint RAID Management (WebGUI) The HighPoint RAID Management (WebGUI) software is necessary to create, maintain, and view your RAID arrays. -
Page 18: For Windows Users
For Windows Users: 1. Download the latest WebGUI from our website at www.highpoint-tech.com > Support > Documents and Downloads > RocketStor 6414TS > Windows WebGUI 2. Extract and open the contents of the downloaded file. 3. Double-click HighPoint RAID Management.exe... - Page 19 5. Double-click the HighPoint RAID Management desktop icon to start the WebGUI 6. Your default web browser will open and prompt for username and password (Default username: RAID / password: hpt). Username and password are case- sensitive. For Mac Users: 1.
-
Page 20: Step 4: Create Raid Arrays Using Webgui
Uninstalling HighPoint RAID Management (WebGUI) For Windows Users: 1. Open Control Panel. 2. Click Uninstall a program. 3. Select HighPoint RAID Management to uninstall. For Mac Users: 1. Navigate to /Applications/HPTWEBGUI/uninstall. 2. Click on the uninstall script. 3. Type in the Administrator password when prompted. - Page 21 3. Click Create Array: 4. The RAID creation page provides many features, options, and settings. Detailed descriptions are provided on pg. 48. 5. Select RAID 5 for Array Type. (RAID Quick Reference on pg. 66) 6. Set array name as “Tutorial_Array”. 7.
- Page 22 13. Once created, the WebGUI will acknowledge the array has been created and the system will prompt you to initialize the new volume. Array disk is created...
- Page 23 The new volume needs to be initialized before use Array successfully created (Windows) For Windows platforms, user will be prompted to initialize disks in Disk Management.
-
Page 24: Step 5: Initialize And Format The Raid Array
14. Tutorial_Array can now be seen under Logical Device Information. (Take note that the OS name is HPT DISK 0_0; this will help identify which volume to initialize) Tutorial_Array is now created and can be seen in Logical tab. Step 5: Initialize and format the RAID Array Before using the newly created RAID array, you must initialize and format the new volume. - Page 25 3. Right click the new disk, and click properties. 4. In properties, check and make sure it is a HPT VD (HighPoint Virtual Disk). Disk properties show HPT VD 0-0. 5. Once the disk has been confirmed, right click the unallocated space and click...
- Page 26 Right Click unallocated space, then click New Simple Volume. 6. Follow the on-screen instructions to configure and format the drive. 7. Once finished, the new volume will receive a drive letter and be available for use. RAID array is now formatted as NTFS and drive letter E: For Mac Users: 1.
- Page 27 Disk Utility for Mac 2. In Disk Utility, select the Volume you created on the right, then click the Erase tab.
-
Page 28: Manage Your Raid Array
3. Select the desired disk format and disk name then click Erase. (Note: All previous data on disks will be erased.) 4. When finished, your new RAID volume will be available for use. (Mac) Tutorial_Array volume created and mounted on desktop. Manage your RAID array The following features allow you to monitor and maintain your arrays to prevent any critical failures from occurring:... - Page 29 1. Log in WebGUI 2. Click Logical 3. Click Spare Pool 4. Check the box for the disk you want as a spare from Available Disks 5. Click Add Spare Disks added to the spare pool will show under Spare Pool and can be removed by checking the disk checkbox from Spare Pool >...
-
Page 30: Webgui Remote Login
3. Check which type(s) of events will trigger an email in the respective Event Level check boxes. 4. (Optional) Click test to confirm settings are correct by sending out a test email. 5. Click add to add the recipient to recipient list. 6. - Page 31 (default port is 7402) For Mac Users: 1. Open a terminal window on the host computer (computer that is connected to the RocketStor 6414TS enclosure) 2. Type ifconfig. 3. Look for the connection that has status: active 4. Write the IP address located after inet:...
-
Page 32: Storage Health Inspector (Shi)
Example: en2 has active status, the IP is 192.168.1.254 Storage Health Inspector (SHI) The Storage Health Inspector monitors each individual disk’s health. Monitoring disk SMART attributes can prevent critical RAID failures from occurring. This section covers the following: Enabling SMART Monitoring ... -
Page 33: Utilizing The Health Inspector Scheduler
To access the SMART attributes of an individual disk: 1. Log in to WebGUI (default user: RAID password: hpt). 2. Select the proper controller using the drop down menu on the top left. 3. Click the SHI tab. 4. Click SMART on the desired disk. 5. - Page 34 Creating a New Verify Task in HIS All arrays will appear under New Verify Task 1. Log in to WebGUI. 2. Select the proper controller from the top left drop down. 3. Click SHI. 4. Click Schedule. 5. Select the array you want to schedule the verify task. 6.
-
Page 35: Raid Expansion (Oce/Orlm)
RAID Expansion (OCE/ORLM) Important: It is recommended to Verify/Rebuild your array before Expanding or Migrating. Once you start an OCE/ORLM procedure, you can stop the process but it must be resumed until completion. To add more capacity to your current configuration follow these steps: 1. -
Page 36: Troubleshooting - Hardware
If you face any hardware related issues involving the RocketStor 6414S enclosure, disk drives or RAID controller, refer to the following sections for troubleshooting tips. For all other problems, submit a support ticket at www.highpoint-tech.com/websupport. Enclosure Mute Button The mute button on the back will mute the alarm for enclosure related issues such as enclosure FAN or TEMPERATURE failures. - Page 37 Disk is in use and performing I/O BLINKING BLUE activity such as: Rebuilding an array Verifying data integrity Transferring data STABLE BLUE Enclosure is properly powered Unit is powered OFF UNLIT Disk tray is empty ...
-
Page 38: Replacing A Failed Disk
Power LED When enclosure is powered on LED will be SOLID BLUE Power LED will be UNLIT if not connected to a running host system Table 3. LED Reference Chart Present Active Failed Identify Disk Tray GREEN BLUE Enclosure BLUE LEDs... -
Page 39: Troubleshooting - Software
Troubleshooting – Software If you face any software related issues involving the HighPoint RAID Management (WebGUI), refer to the following sections for troubleshooting tips. For all other problems, submit a support ticket at www.highpoint-tech.com/websupport. WebGUI – Connection cannot be established 1. - Page 40 Rebuild failed Rebuilding operations may fail due to bad disk sector errors (check in the Event Log), there is an option to continue rebuilding on error in HighPoint WebGUI. 1. Log in to WebGUI. 2. Click Setting tab. 3. Under System Setting, change Enable Continue Rebuilding on Error to Enabled.
-
Page 41: Disabled Arrays
This option will enable rebuilding to ignore bad sectors and attempt to make your data accessible. It is important to backup immediately after backup is complete and replace or repair the disks with bad sectors. Critical array becomes disabled when faulty disk was removed If this is the case, check to make sure you removed the correct disk. -
Page 42: Frequently Asked Questions
Frequently Asked Questions This section covers some commonly asked questions: How do I recover my WebGUI password? (see pg. 42) If I purchase another HighPoint RAID Controller, will my data be retained? (see pg. 42) Recovering your Password For Windows Users: 1. -
Page 43: Appendix A: Navigating The Highpoint Webgui
The latest drivers can be found at www.highpoint-tech.com Appendix A: Navigating the HighPoint WebGUI The HighPoint WebGUI management utility allows you to do several key things: Tab Name Function Global View View HBA (Host Bus Adapter) and... -
Page 44: How To Login Highpoint Webgui
Online Web Support How to Login HighPoint WebGUI You can reach the HighPoint WebGUI log in page either by: Double clicking on the HighPoint RAID Management icon created on your desktop Opening your preferred web browser and typing http://localhost:7402 in the address bar. -
Page 45: Appendix A-1: Global Tab
Username and Password are Case-Sensitive (Username is not changeable) Appendix A-1: Global Tab The GUI Global view provides an overview of what each HighPoint controller card connected to your computer detects. It is also the first page you see when logging in. -
Page 46: Appendix A-2: Physical Tab
Controller Information: Lists the controller model name, BIOS version, and vendor. Model Name: RocketRAID 2711 SAS Controller BIOS Version: v1.0 Vendor: HighPoint Technologies, Inc. Update Firmware: Allows you to update the controller BIOS through the WebGUI. - Page 47 The following properties are part of the Physical Devices Information box under the physical tab. Model – Model number of the physical drive Capacity – Total capacity of the physical drive Revision – HDD device firmware revision number ...
-
Page 48: Appendix A-3: Logical Tab
NCQ* – (Enable/Disable) Native Command Queuing Serial Number – serial number of the physical disk Identify LED – N/A Unplug – Safely ejects selected disk. Other methods of disk removal will trigger alarm if enabled. * Disk properties that can be adjusted. Read Ahead Enabling disk read ahead will speed up read operations by pre-fetching data and loading it into RAM. - Page 49 Rescan Beeper Mute An array is a collection of physical disks that will be seen as one virtual drive by your Operating System (OS). The RocketStor 6414TS has a RocketRAID 2711 controller capable of creating the following array types...
- Page 50 Array Type: JBOD – Just a Bunch of Disks RAID 0 - Striping RAID 1 - Mirroring RAID 5 – Rotating Parity bit RAID 1/0 – Striping of Mirrored Drives RAID 6 – Double Parity Bit Each RAID level has its pros and cons based on the application you use it for (Note: Refer to RAID level Quick Reference) Array Name:...
- Page 51 previous user data, but will not build parity. Recommended for testing purposes only or when new disks are used. Not recommended for RAID 5, and RAID 6. Foreground: The array initialization process will be set at high priority. During this time array will be non-accessible, but initialization completion time will be shorter.
- Page 52 Spare Pool Spare disks are physical disks that will immediately replace critical disks in an array. Only redundant RAID arrays (RAID 1, 5, 6, and 10) support spare drives. Physical drives marked as a spare will automatically be added to an array whenever there is a disk failure.
- Page 53 Clicking on the maintenance button will show you the Array information box. Different array statuses (Normal, critical, disabled) will have different maintenance options. Normal Status Maintenance options for Normal Arrays. Delete – deletes the selected RAID array Unplug – powers off the selected RAID array Verify –...
- Page 54 Critical Status Maintenance options for Critical Arrays. A critical status array has all the normal status options except the following: The Array can no longer be renamed Add Disk replaces the Verify disk option Once array status changes to critical, the faulty disk will be taken offline and you can either: ...
- Page 55 Disabled Status Maintenance options for Disabled Arrays. A disabled status array means that your RAID level does not have enough disks to function. Your data will be inaccessible. Rebuilding will not trigger, since RAID does not have enough parity data to rebuild upon.
- Page 56 Physical Device Information Location – which controller and port the drive is located in Model – model number of the drive connected Capacity – total capacity of the drive Max Free – total capacity that is not configured Rescan Clicking rescan will force drivers to report array status.
-
Page 57: Appendix A-4: Setting Tab
Appendix A-4: Setting Tab Under this tab, user can Enable auto-rebuilding Enable rebuilding on error Turn audible alarm on/off Set spindown time for idle disks Restrict to localhost Set rebuild priority Change port number ... -
Page 58: System Settings
You can specify the amount of system resources you want to dedicate to rebuilding the array. There are 5 levels of priority [Lowest, Low, Medium, High, Highest] Port Number (default: 7402) The default port that the HighPoint WebGUI listens on is 7402. You may change it to any open port. - Page 59 Password Setting - Changing your WebGUI password Under Password Setting type your new password and confirm it, then click submit Email Setting The following topics are covered under email: SMTP Setting Adding Recipients You can set the controller to send an email out to recipients of your choosing when certain events (refer to Event Tab) trigger.
-
Page 60: Appendix B-5: Recover Tab
How to Add Recipients You can add multiple email addresses as receivers of a notice. 1. Type the email of the recipient in the E-mail text box 2. Type the name of the recipient in the Name text box 3. Check which type(s) of events will trigger an email in the respective Event Level check boxes 4. - Page 61 Previously created arrays will be stored under this tab. Recovering an array from here will attempt to recover a ‘disabled’ array and make it ‘normal’. The Recover List will list all your previous and current created arrays. Each entry will list the following properties: ...
-
Page 62: Appendix A-6: Event Tab
5. Click Submit Appendix A-6: Event Tab In the event tab, you can see log entries associated with the HighPoint device. The event log provides useful information when troubleshooting your set up. In the event tab, there are four options available: ... -
Page 63: Appendix A-7: Shi (Storage Health Inspector)
Hard disk failure Broken errors Memory failure The event view is a basic error logging tool built into the HighPoint WebGUI. Appendix A-7: SHI (Storage Health Inspector) S.M.A.R.T Attributes HDD Temperature Threshold Storage Health Inspector Scheduling The SHI outputs information collected using SMART (Self-Monitoring Analysis and Reporting Technology) Hard Drive Technology. -
Page 64: Appendix B: Webgui Icon Guide
Appendix B: WebGUI Icon Guide Critical – missing disk A disk is missing from the array bringing it to ‘critical’ status. The array is still accessible but another disk failure could result in data loss. Verifying The array is currently running a disk integrity check. Rebuilding The array is currently rebuilding meaning you replaced a failed disk or added a new disk to a ‘critical’... - Page 65 Initializing The array is initializing, either foreground or background initialization Initialization Stopped The initialization has been stopped. Current status is uninitialized. Critical – Inconsistency Data in the array is inconsistent and needs to be rebuilt. Critical – missing disk A disk has been removed or experienced failure, and user needs to reinsert disk or add a new disk.
-
Page 66: Appendix C: Raid Level Quick Reference
Appendix C: RAID Level Quick Reference Type Description Min. Usable Advantage Disadvantage Application disks space JBOD Just a bunch of 100% Each drive can be No fault tolerance - failure Backup disk accessed as a single of one drive results in volume complete data loss RAID... -
Page 67: Help
Online Help redirects you to additional documentation concerning the HighPoint WebGUI. Register Product takes you to HighPoint’s web support. On this page you can create a new customer profile where you can register your product or post an online support ticket.
Need help?
Do you have a question about the RocketStor 6414TS and is the answer not in the manual?
Questions and answers