Gozney Arc Technical Manual
Hide thumbs
Also See for Arc:
- Technical manual (55 pages) ,
- Technical manual (104 pages) ,
- Technical manual (86 pages)
Table of Contents
Advertisement
Advertisement
Table of Contents
Troubleshooting

Related Manuals for Gozney Arc


Summary of Contents for Gozney Arc
- Page 1 Technical Manual...
- Page 3 Live-Fire cooking made easy.
- Page 4 Introduction DANGER If you smell gas: Shut off gas to the appliance. Extinguish any open flame. If odour continues, keep away from the appliance and immediately call your fire department. WARNING Do not store or use gasoline or other flammable liquids or vapors in the vicinity of this or any other appliance.
- Page 5 This instruction manual contains important information necessary for the proper assembly and safe use of the appliance. Read and follow all warnings and instructions before assembling and using the appliance. Follow all warnings and instructions when using the appliance. Keep this manual for future reference.
-
Page 6: Table Of Contents
OVEN PLACEMENT DIGITAL TEMPERATURE DISPLAY SET UP RECOMMENDED TEMPERATURE RANGES TROUBLESHOOTING E1 ERROR CODE E3 ERROR CODE OPTIONAL ACCESSORIES ARC MANTEL ARC BOOSTER ARC COVER 3 FIRING UP GAS CONNECTING TO GAS GAS SAFETY INSTALLING THE IGNITER BATTERY CONNECTING THE GAS HOSE... - Page 7 FIRST FIRING TROUBLESHOOTING GAS BURNER DISCONNECTING GAS PUSH FIT REGULATOR CLOCKWISE/ANTICLOCKWISE REGULATOR 4 GENERAL MAINTENANCE MAINTENANCE CLEANING THE VENTURI CLEANING THE OVEN INTERNAL EXTERNAL REPLACING THE PROBE...
-
Page 8: General Advice
Arc can stay hot for a few hours after use. Do not over fill Arc or cover the burner. Do not use under any apartment or balcony or deck. -
Page 9: Eu Declaration Of Comformity
Manufacturer’s Name: Gozney Limited Manufacturer’s Address: Gozney Group Ltd, Bobbys, Third floor, The Square, 2-12 Commercial Rd, Bournemouth BH2 5LP. Herewith declare that this product Product: Arc Oven, Arc XL oven Type(s): Arc: GOZ-1485 Arc XL: GOZ-1728 Trade name: Arc, Arc XL... -
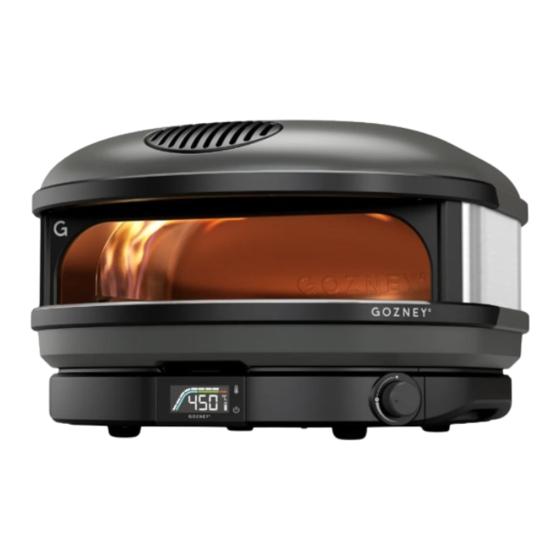
Page 10: Product Overview
Product Overview - What's in the Box Oven Dock Thermometer Gas Control Dial Gas Hose & Regulator Burner Guard Flue Outlet... - Page 11 Gas Inlet Stone Adjustment Tool Torx Screwdriver...
-
Page 12: Data Plate
Data Plate Gozney Group Ltd, Bobbys, Third floor, The Square, 2-12 Commercial Rd, Bournemouth BH2 5LP Gozney Arc Appliance Name: Gozney Arc XL Model/Type No.: GOZ-1485 Arc: GOZ-1728 Arc XL: Gozney Arc Trade name: Gozney Arc XL Total nominal output for the gas burner: Arc: 4.5 kW for I... - Page 13 LT, LU, MT, MK, NL, NO, IT, LT, LU, MT, MK, NL, PT, SI HR, NL, PL RO, SI, SE NO, RO, SI, SE, TR ARC XL Total nominal heat output for the gas burner 5.5kW for I B/P( 3+(28-30/37) B/P( )
- Page 14 This section details the correct operation and install of a Gozney Arc.
-
Page 16: Safety Considerations
Do not cover oven mouth when there is an active flame, this will cause damage to the oven. The Arc unit and the burner must always be well ventilated. This oven is not intended to be installed in or on recreational vehicles. -
Page 17: Fire
• Depressed heart action, slowed thoroughly soak the area around the respiration appliance. When spraying water on Arc itself, do not use a strong jet of water, If the exposure has been severe it may as this may cause splashing of burning cause death. - Page 18 This section details the set up of the oven and the accessories included with your Arc.
-
Page 20: Adjusting The Stones
Adjusting The Stones Before using Arc it is important that the four blue stone retention wedges and other packaging inside of the oven are removed. The removable stone design of Arc means that it is not fixed inside the oven and as such can shift backwards during transport. -
Page 21: Installing The Flue & Burner Guard
Installing The Flue & Burner Guard... -
Page 22: Moving The Oven
Moving the Oven Use the hand holds on the underside edges of the oven to carry it. Do not move Arc whilst in operation or when it is still hot. Be sure that you have the capability to safely move the oven and set it in place. -
Page 23: Oven Placement
OVEN PLACEMENT When deciding where to place Arc ensure the area is large enough to accommodate the oven with 2” (50mm) around the base of the dock for air intake. It is important nothing is blocking this area as this will affect the performance of Arc. - Page 24 Ensure the surface the oven is being placed on is completely level, stable and capable of easily holding the weight of the oven - 20kg Arc, 25kg Arc XL. Floor Height WARNING Never operate the oven in high winds or if the wind is blowing into the oven mouth.
-
Page 25: Digital Temperature Display
Digital Temperature Display... -
Page 26: Set Up
SET UP After installing the batteries hold the power button down until the display turns on. Find the sensors jack by removing the plastic cap and plug it into the rear of the display, the screen will then show SECONDS the temperature from within the oven. -
Page 27: Recommended Temperature Ranges
Digital Temperature Display Recommended temperature ranges: New York Pizza - 320 - 370°C+ Roman Style Pizza - 370 - 430°C Neapolitan Pizza - 430 - 480°C Over Temp (Too Hot) - 480°C+ °C TROUBLESHOOTING °C °C E1 ERROR CODE E3 ERROR CODE If the thermometer is displaying an If the thermometer is displaying an error code E1. -
Page 28: Optional Accessories
ARC BOOSTER Raise your cooking game and your oven with the Arc booster allowing you to use Arc at the optimal height when placed on an outdoor counter-top or table. The easy access shelf will keep all of... - Page 30 Your guide to burning gas.
-
Page 32: Connecting To Gas
WARNING: If at any point you smell gas: Shut off the gas from the cylinder, turn off the switch on Arc and extinguish any open flames. If odour continues, move away from Arc and gas supply then contact your gas supplier or fire service. -
Page 33: Gas Safety
If there is excessive Some foods produce flammable fats and abrasion or wear it must be replaced juices. Therefore the Arc oven should be with a Gozney approved hose assembly attended at all times whilst being used. - Page 34 Keep the cylinder outdoors in its upright position. Do not connect multiple gas canisters to Arc or store a spare within the same vicinity. A regulator which complies with EN or EN must fit between the gas canister and the oven.
-
Page 35: Installing The
INSTALLING THE IGNITOR BATTERY Before using the gas burner for the first time you’ll need to install an AAA battery into the ignition module. To do this remove the thermometer from the front of the oven, the module will be inside and to the left. -
Page 36: Connecting The Gas Hose
CONNECTING THE GAS HOSE To attach the quick connection gas hose hose must be replaced prior to the to your Arc pull the collar back on the appliance being put into operation. Any connector and place the hose onto the replacement hose assembly or pressure gas inlet. -
Page 37: Push Fit Regulator
PUSH FIT REGULATOR Make sure the lever is in the horizontal position so the button can be pressed. Pressing in the button, place the regulator onto the gas bottle. After releasing the button, turn the lever to a vertical position. This connection must be tested for leaks before using the oven. -
Page 38: Testing For Leaks
Testing For Leaks If there is a leak at the hose to oven connection, re-attach the fitting and WARNING check for leaks by applying a soap-and- You should always check for gas water solution to the highlighted areas leaks every time you disconnect and with a brush. -
Page 39: Ignition
Ignition Remove the stone retention wedges before lighting the oven. To light the gas burner press the control knob in and turn the knob 90˚ until you hear a clicking sound and the burner ignites. The flame should be yellow in colour and roll along the top of the oven. -
Page 40: First Firing
First Firing On your first firing we highly recommend putting the burner on a medium to low flame for 30 minutes to help cure the oven before moving to a high flame. Minutes Approx On subsequent firings after curing, you can bring the oven up to the desired temperature from ignition. -
Page 41: Troubleshooting Gas Burner
5 minutes and retry igniting it. If the problem persists still review the cleaning and maintenance instructions to remove debris in the burner. If the problem persists after trying the following solutions please contact Gozney for further support. -
Page 42: Disconnecting Gas
After cooking, be sure to turn off the gas from the gas canister first before turning off Arc. This will allow any gas left in the burner or pipe to be used up safely. Three minutes after turning the gas off... -
Page 43: Clockwise/Anticlockwise Regulator
After cooking, be sure to turn off the gas from the gas canister first before turning of Arc. This will allow any gas left in the burner or pipe to be used up safely. Three minutes after turning the gas off... -
Page 44: General Maintenance
Your guide to general maintenance. -
Page 46: Maintenance
When the oven is turned off, disconnect it from the gas and let it cool. Make sure Arc is on a soft surface that won't cause scratches before gently rolling it onto its side. -
Page 47: Cleaning The Oven
Cleaning The Oven INTERNAL The best way to clean the inside of Arc is to burn off any food debris or soot that is left behind. When the oven is over 350˚C it will start self cleaning and any burnt on food will burn off after a period of three hours. -
Page 48: External
EXTERNAL For the exterior of Arc ensure the oven is cool and use a non caustic bleach free cleaning spray on the dirty areas. Clean the area with warm soapy water and a sponge or non abrasive dish cloth and then wipe clean with paper towels. -
Page 49: Replacing The Probe
Replacing The Probe Only when the oven is cold, remove the thermometer and unplug the cable. Gently roll the oven over onto its side and use the torx screwdriver to remove the bottom panel of the oven. Use the spanner to unscrew the old probe from inside the oven and replace it with the new one.
Need help?
Do you have a question about the Arc and is the answer not in the manual?
Questions and answers