Table of Contents
Advertisement
Quick Links
Advertisement
Table of Contents

Related Manuals for WATANABE A5000 Series


Summary of Contents for WATANABE A5000 Series
- Page 1 A5000 Series Users Manual Watanabe Electric Industry Co., Ltd. UW-48240c a...
-
Page 2: Table Of Contents
Contents Safety Precautions………………………….……………………………………….3 1.Before Using the Product………………………………………………………..4 1.1. Model Codes………………………………………………………………….4 1.2. Checking Each Unit Type and Its Accessories ………………………….5 1.3. Check Before Use……………………………………………………………5 2. About Assembly…………………………………………………………………. 6 2.1. Method Assembly……………………………………………………………6 3. Block Diagram……………………………………………………….……………7 4. Mounting the Product…………………………………………………….……..8 4.1. Mounting the Product to the Panel……………………….………………8 5. -
Page 3: Safety Precautions
9.2. Hold Function…………………………………………………..…………55 9.3. Digital Zero Function……………………………………………..……..55 9.4. Peak Hold Function………………………………………..…………….56 10. Output Functions……………………………………………..……………..56 10.1. Comparison Output Function………………………..……………….56 10.2. Analog Output Function………………………………..……………..56 10.3. RS-485 Interface Function…………………………………..………..56 10.4. RS-232C Interface Function………………………………..…………56 11. Error Messages……………………………………………………..………..57 12. Specifications and External Dimensions………………………..……….58 12.1. Input Specifications………………………………………….…………58 12.2. -
Page 4: Before Using The Product
Before Using the Product Model Codes... -
Page 5: Checking Each Unit Type And Its Accessories
Checking Each Unit Type and Its Accessories Check Before Use... -
Page 6: About Assembly
About Assembly Assembly Method... -
Page 7: Block Diagram
Block Diagram... -
Page 8: Mounting The Product
Mounting the Product Mounting the Product to the Panel 4.1.1 Panel Cut Size 4.1.2 How to Mount the Unit on the Panel Caution ! (1) The recommended panel thickness is 0.8 to 5mm. The tightening torque should be approximately 0.39 to 0.49N・m(4 to 5kgf・ cm). (2) Do not install the instrument in locations exposed to direct sunligth, an environment where the ambient temperature goes beyond the range of 0 to 50℃... -
Page 9: Terminal Description And Connection Method
Terminal Description and Connection Method Comparison Serial Analog output output communication 12 13 14 15 16 17 18 19 24 25 26 10 11 External Power Input (the shape depends on the unit.) control connector Connecting Power Name Description Power terminal without polarity for both POWER DC and AC 10 11... - Page 10 5.2.2 DC Voltage Measuring Unit (Range 12 to 15) Description Name Positive input terminal for range 12 ( ± 999.9 mV) Positive input terminal for range 13 ( ± 9.999 V) Positive input terminal for range 14 ( ± 99.99 V) Positive input terminal for range 15 ( ±600 Negative input terminal 5.2.3...
- Page 11 5.2.6 AC Current Measuring Unit (Ranges 23 to 25) Description Name Positive input terminal for range 23 (9.999 m A ) Positive input terminal for range 24 (99 . 99 mA ) Positive input terminal for range 25 (999.9 mA ) Negative input terminal 5.2.7 AC Current Measuring Unit (Range 26)
- Page 12 5.2.9 Temperature Measuring Unit (TC) Description Name Positive terminal for thermocouple Do not connect this terminal. Negative terminal for thermocouple 5.2.10 Temperature Measuring Unit (RTD) Name Description Resistance sensor wire Resistance sensor wire Connection of three-wire sensor Elimination of wire resistance When A or B is disconnection, it is displayed as OL, and when C is disconnection, it is displayed as ----.
-
Page 13: Connecting External Controls
5.2.13 Strain Gauge Input Unit (Load cell) Name Description +SIG Positive input terminal -SIG Negative input terminal +EXC Power output for sensor (positive) -EXC Power output for sensor (negative) Common terminal (grounding terminal for input circuit) 5.2.14 Process Input Measuring Unit Name Description V-IN... -
Page 14: Connecting Analog Output
Connecting Analog Output Name Description 24 25 26 Common terminal for analog output A-OUT Current output terminal (4 to 20 mA) Voltage output terminal (1 to 5 V, 0 to 1 V, V-OUT and 0 to 10 V) Connecting Serial Communication 20212223 Name Description... -
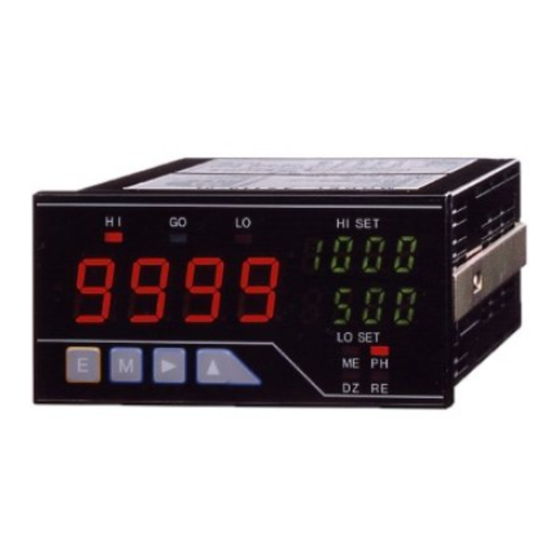
Page 15: Components And Their Functions
Components and Their Functions Multi Display Main Functions Name During measurement During parameter setup IIndicates information on the (1) Main display Indicates the measured value. parameter to be set. Indicates the result of judgment and turns on if the measured value > HI judgment value. -
Page 16: Single Display Unit
Single Display Main Functions Name During measurement During parameter setup IIndicates information on the Indicates the measured value. parameter to be set. (1) Main display Indicates information on the item in the maximum/minimum/(maximum- minimum)/input value monitoring mode. Indicates the result of judgment and turns on if the measured value >... -
Page 17: Parameter Setup
Parameter Setup Parameter Group Group name Description A group of the parameters concerning basic operations (such as measurement range power supply frequency, and sampling Condition data speed) and the operations of special functions and optional functions. A group of parameters concerning comparison operations such Comparator data as HI/LO comparison judgment value and hysteresis. -
Page 18: Data Lists And Default Settings
Data Lists and Default Settings Default Equipped Input unit number Output unit number Indication Name value 15 16 17 Condition data Peak hold setup ○ RANG Measurement range setup × ○ ○ ○ ○ ○ ○ ○ × ○ × ○... -
Page 19: Differences Between Display Units
Differences Between Display Units 7.5.1 Single Display Unit Setup contents and parameter name 7.5.2 Multi Display Unit Setup contents Parameter name... -
Page 20: Operation Flow
Operation Flow Calibration data Measurement Condition data Comparator data Scaling data Linearization data Pressing the ENTER key saves the data and returns to the measurement mode. (Data are backed up with EEPROM even when the power is turned off.) -
Page 21: Condition Data
Condition Data 7.7.1 Setting the Peak Hold Type List of the display and description (The * denotes the default.) Display Description Peak hold Valley hold Peak valley hold Multi-display unit Single display unit ① Press the Mode and Enter keys together during measurement. -
Page 22: Measurement Range
7.7.2 Setting the Measurement Ranges List of the display and description (The *denotes the default.) Input unit No.01:DC voltage measuring unit Input unit No.02:DC voltage measuring unit Display Description Display Description Range 11 (±99.99mV) Range 12 (±999.9mV) Range 13 (±9999.V) Range 14 (±99.99V) Range 15 (±600V) Input unit No.03:DC current measuring unit... - Page 23 Multi display unit Single display unit ①Press the Mode and Enter keys together during measurement. ②Press the Mode key a few times to change the measurement range setup menu. 1 sec. ③Press the Increment key a few times to set 13 range. ④Press the Enter key to return to the measurement mode (Pressing the Mode key changes to the next parameter.).
-
Page 24: Number Of Averaging Times
7.7.3 Setting the Number of Averaging Times List of the display and description (The * denotes the default.) For input units other than the frequency measuring units Display Description Display Description Single averaging (sampling rate:12.5 times/s) 10-time averaging (sampling rate:1.25 times/s) Double averaging (sampling rate:6.25 times/s) 20-time averaging (sampling rate:approx. -
Page 25: Number Of Moving Averaging Times
7.7.4 Setting the Number of Moving Averaging Times List of the display and description (The * denotes the default.) Display Description Display Description Without moving averaging Eight-time moving averaging Double moving averaging 16-time moving averaging Four-time moving averaging 32-time moving averaging Multi display unit Single display unit ①Press the Mode and Enter keys together during... -
Page 26: Step Wide
7.7.5 Setting Step Wide List of the display and description (The * denotes the default.) Display Description Least significant digit's resolution 1 Least significant digit's resolution 2 Least significant digit's resolution 5 Least significant digit's resolution 0 (resolution 1/10) Multi display unit Single display unit ①Press the Mode and Enter keys together during measurement. -
Page 27: Display Blank
7.7.6 Setting up Display Blank List of the display and description (The * denotes the default.) Display Description Display blank function OFF Display blank level 3 (slightly dark) Display blank level 2 (dark) Display blank level 1 (very dark) Display blank function ON (extinguished) Multi display unit Single display unit ①Press the Mode and Enter keys together during... -
Page 28: Baud Rate(Rs232C/Rs485)
7.7.7 Setting the Baud Rate List of the display and description (The * denotes the default.) Display Description 9600 9600bps 4800 4800bps 2400 2400bps 384- 38400bps 192- 19200bps Multi display unit Single display unit ①Press the Mode and Enter keys together during measurement. -
Page 29: Data Length(Rs232C/Rs485)
7.7.8 Setting the Data Length List of the display and description (The * denotes the default.) Display Description 7bits 8bits Multi display unit Single display unit ①Press the Mode and Enter keys together during measurement. ②Press the Mode key a few times to change to the data length setup menu. -
Page 30: Parity Bit(Rs232C/Rs485)
7.7.9 Setting the Parity Bit List of the display and description (The * denotes the default.) Display Description Even parity Odd parity No parity Multi display unit Single display unit ①Press the Mode and Enter keys together during measurement. ②Press the Mode key a few times to change the parity bit setup menu. -
Page 31: Stop Bid(Rs232C/Rs485)
7.7.10 Setting the Stop Bit List of the display and description (The * denotes the default.) Display Description 2bits 1bit Multi display unit Single display unit ①Press the Mode and Enter keys together during measurement. ②Press the Mode key a few times to change the stop bit setup menu. -
Page 32: Delimiter(Rs232C/Rs485)
7.7.11 Setting the Delimiter List of the display and description (The * denotes the default.) Display Description CR.LF CR and LF Multi display unit Single display unit ①Press the Mode and Enter keys together during measurement. ②Press the Mode key a few times to change the delimiter setup menu. -
Page 33: Equipment Id(Rs485)
7.7.12 Setting the Equipment ID Multi display unit Single display unit ①Press the Mode and Enter keys together during measurement. ②Press the Mode key a few times to change the equipment ID setup menu. 1 sec. ③Press the Shift key (change digit) and press the Increment key (change numeric value) to set to 10 of the &... -
Page 34: Analog Output Type
7.7.13 Setting the Analog Output Type List of the display and description (The * denotes the default.) Display Description Without analog output 0 to 1V output 0-10 0 to 10V output 1 to 5V output 4-20 4 to 20mA output Multi display unit Single display unit ①Press the Mode and Enter keys together during... -
Page 35: Digital Zero Backup
7.7.14 Setting Digital Zero Backup List of the display and description (The * denotes the default.) Display Description Digital zero backup OFF Digital zero backup ON Multi display unit Single display unit ①Press the Mode and Enter keys together during measurement. -
Page 36: Linearization Function
7.7.15 Setting Linearize Function List of the display and description (The * denotes the default.) Display Description Linearize OFF Linearize ON Multi display unit Single display unit ①Press the Mode and Enter keys together during measurement. ②Press the Mode key a few times to change the linearization setup menu. -
Page 37: Input Selection(Input Board 15)
7.7.16 Setting Input Switching List of the display and description (The * denotes the default.) Display Description Open collector input Logic input Magnet input Multi display unit Single display unit ①Press the Mode and Enter keys together during measurement. ②Press the Mode key a few times to change the input selection menu. -
Page 38: Tracking Zero Time
7.7.17 Setting Tracking Zero Time Multi display unit Single display unit ①Press the Mode and Enter keys together during measurement. ②Press the Mode key a few times to change the tracking zero time setup menu. 1 sec. ③Press the Shift key (change digit) and press the Increment key (change numeric value) to set to 10 of the &... -
Page 39: Tracking Zero Width
7.7.18 Setting Tracking Zero Width Multi display unit Single display unit ①Press the Mode and Enter keys together during measurement. ②Press the Mode key a few times to change the tracking zero width setup menu. 1 sec. ③Press the Shift key (change digit) and press the Increment key (change numeric value) to set to 10 of the &... -
Page 40: Sensor Power(Input Board 17)
7.7.19 Setting Sensor Power List of the display and description (The * denotes the default.) Display Description 10V (30mA) 5V (15mA) Multi display unit Single display unit ①Press the Mode and Enter keys together during measurement. ②Press the Mode key a few times to change the sensor power setup menu. -
Page 41: Power -On Delay Time
7.7.20 Setting Power-ON Delay Time List of the display and description (The * denotes the default.) Display Description Display Description Power-ON delay function OFF " ---- " displayed for approx. 16 seconds " ---- " displayed for approx. 1 second "... -
Page 42: Protect Function
7.7.21 Setting Protect Function List of the display and description (The * denotes the default.) Display Description Protect OFF Protect ON Multi display unit Single display unit ①Press the Mode and Enter keys together during measurement. ②Press the Mode key a few times to change the protect setup menu. -
Page 43: Unit Number Display
7.7.22 Setting Unit Number Display List of the display and description (The * denotes the default.) Display Description Unit number display ON Unit number display OFF Multi display unit Single display unit ①Press the Mode and Enter keys together during measurement. -
Page 44: Comparator Data
Comparator Data 7.8.1 Example of Operations Available When Hysteresis is not Used HI side judgment value : 900 HI side hysteresis value LO side judgment value : 300 LO side hysteresis value Indicated value HI side judgment value 1000 LO side judgment value Judgment 7.8.2 Example of Operations Available When Hysteresis is Used... - Page 45 7.8.3 Setting Method The display of each parameter, and the list of the description Display Description Default S-HI HI side judgment value 1000 S-LO LO side judgment value H-HI HI side hysteresis value H-LO LO side hysteresis value Multi display unit Single display unit ①Press the Mode and Enter keys together during measurement.
-
Page 46: Scaling Data
Scaling Data 7.9.1 Display Scaling of Input Units Other Than Frequency-measuring Units 7.9.1.1 Scaling Setting Example 1 Display Input voltage : 0 to 10V D i s p l a y 0 to 80.00 8000 F S C : 8000 F I N : 9999 O F S : 0 O I N : 0... - Page 47 7.9.1.3 Scaling Setting Example 3 Display Input voltage : 0.6 to 7.8V D i s p l a y 10.00 to 60.00 6000 F S C : 6000 F I N : 7800 O F S : 1000 1000 O I N : 600 Input D L H I : 9999 0.6V...
- Page 48 7.9.1.5 Scaling Setting Example 5 Display 9999 Input voltage : 0 to 5V D i s p l a y 0 to 9999 F S C : 9999 F I N : 5000 O F S : 0 O I N : 0 Input D L H I : 9999 DLLO : -9999...
- Page 49 7.9.3 Analog Output Scaling 7.9.3.1 Scaling Setting Example 1 Output 20mA D i s p l a y : 0.0 to 500.0 O u t p u t 4 to 20mA A O H I : 5000 AOLO : 0 Display 5000 7.9.3.2...
- Page 50 7.9.4 Setting Method Display Description Default Display Description Default Full-scale indicated value 9999 DLHI Digital limit HI set value 9999 Full-scale input value 9999 DLLO Digital limit LO set value -9999 Offset indicated value AOHI Analog output HI set value 9999 Offset input value AOLO...
-
Page 51: Linearization Data
7.10 Linearization Data Multi display unit Single display unit ①Press the Mode key and the Enter key during measurement. ②Press the Shift key a few times to move to the linearization data menu. ③Press the Mode key to move to the setup for the number of data to be corrected. -
Page 52: Calibration Data
7.11 Calibration Data 7.11.1 Method of Setting Actual Load Calibration Multi display unit Single display unit ①Press the Shift, Increment, and Enter keys together during measurement. ②Press the Mode key to change to the actual load calibration mode. ③Press the Mode key while applying pressure that will cause the display to show zero. - Page 53 7.11.2 Method of Setting Equivalent Calibration Multi display unit Single display unit ①Press the Shift, Increment, and Enter key together during measurement. ②Press the Increment key to select the equivalent calibration mode. ③Press the Mode key to move to the equivalent calibration mode.
-
Page 54: Other Functions
Other Functions The Display Shift Function Multi display unit Single display unit ①Press the Shift key with the Mode key held down during measurement operation. ②For a single display, press the Mode key to move to the parameter information display status (This move is automatically achieved in approximately 1 second.) ③Using the Shift key (digit change) and Increment key... -
Page 55: Control Functions
Control Functions About Control Function Input circuit Note:The control circuit and input circuit GND/LO are not generally isolated from each other. 10kΩ HOLD/ (Note that the AC current-measuring unit DZ/PH (26 ranges) is isolated from the other circuits because it uses CT.) Hold Function Digital Zero Function 9.3.1... -
Page 56: Peak Hold Function
Peak Hold Function 10 Output Functions 10.1 Comparison Output Function 10.2 Analog Output Function 10.3 RS-485 Interface Function 10.4 RS-232C Interface Function... -
Page 57: Error Messages
11 Error Messages Didplay Error description Remedy Turn the power supply OFF and then ON The meter’s internal memory again. If this does not solve the problem, One of segments ゛a゛ 1 error contact your sales representative or our to ゛g゛ of the least sales department directly. -
Page 58: Specifications And External Dimensions
12 Specifications and External Dimensions 12.1 Input Specifications 12.1.1 DC voltage measuring unit (range 11) Measurement Highest Input Maximum Range Indication Accuracy range resolution impedance permissible input Offset : ±9999 About ±99.99mV 10μV ±100V ±(0.1% of FS) Full scale : 0 to ±9999 100MΩ... - Page 59 12.1.5 AC voltage measuring unit (average value detection: ranges 14 and 15) Measurement Highest Input Maximum Range Indication Accuracy range resolution impedance permissible input ±(0.2% of FS 99.99V 10mV 250V Offset : ±9999 1MΩ +10digit) Full scale : 0 to ±9999 or more ±(0.3% of FS 600.0V...
- Page 60 12.1.9 AC current measuring unit (average value detection: range 26) Measurement Highest Input Maximum Range Indication Accuracy range resolution impedance permissible input Offset : ±9999 ±(0.5% of FS (CT) Full scale : 0 to ±9999 +10digit) Input circuit : CT isoration type Operating system : ΔΣ...
- Page 61 12.1.13 Temperature measuring unit (TC) Input Highest Range Indication Accuracy sensor resolution -50.0 to 199.9℃ 0.1℃ ±(0.5% of FS) -50 to 1200℃ ±(0.2% of FS) -50 to 1000℃ -50 to 400℃ ±(0.6% of FS) 1℃ 0 to 1700℃ ±(0.4% of FS) -10 to 1700℃...
-
Page 62: Common Specifications
12.1.17 Strain gage input unit (load cell) Sensor power Zero adjusting range Span adjusting range Highest resolution Accuracy 0.5μV/digit -0.3 to +1mV/V ±(0.1% of FS +2digit) 1 to 3mV/V 1μV/digit Input circuit : Single ended type Operating system : ΔΣ conversion Maximum sampling rate : 12.5 times per second Conformity sensor : 350Ω... -
Page 63: Output Specifications
12.3 Output Specifications 12.3.1 Output for Comparison Conditions for comparison Judgment result Indicated value > Upper limit judgment value Lower limit judgment value ≦ Indicated value ≦ Upper limit judgment value Lower limit judgment value > Indicated value Control system : Micro computer operating system Judgment value setup range : -9999 to +9999... -
Page 64: External Dimensions
12.4 External Dimensions... -
Page 65: Detailed Communications Specifications
13 Detailed Communications Specifications 13.1 Terminal Assignments and Connection Method 13.1.1 Terminal Assignments 21 TXD(-) 22 NC 20 RXD(+) 23 SG Terminal Description Name RS-232C: Receive Data terminal; RXD(+) RS-485: Non-inverting output RS-232C: Transmit Data terminal; TXD(-) RS-485: Inverting output Do not connect. -
Page 66: Communication Function Parameters
13.1.3 Example of RS-485 Connection RS-485/ RS-232C converter Model SI-30 from Sekisui Chemical Co., Ltd. or other equivalent converters Note: If these lines are likely to be affected by noise or the like, use shielded wire. Note: The figure below identifies the position of the selector socket for switching between the ON and OFF positions. -
Page 67: Communication Commands
13.3.2 Available Control Codes Control Code Hexadecimal Name Description Start of Text Marks the starting point of text. End of Text Marks the ending point of text. End of Transmission Marks the end of transmission. Enquiry Denotes an enquiry. Acknowledge Denotes an affirmative reply. - Page 68 Function 9 10 11 12 13 14 15 16 17 18 19 20 21 22 23 9 10 11 12 13 14 15 16 17 18 19 20 Char. Length Char. Length Digital zero remote control response R CR LF F CR LF (Response with the status of the digital zero function being set to OFF by remote control)
- Page 69 Function 9 10 11 12 13 14 15 16 17 18 19 20 21 22 23 9 10 11 12 13 14 15 16 17 18 19 20 Char. Length Char. Length Range response (except for G CR LF 2 CR LF thermometers) (Response with the status of range 12 being selected) 4 CR LF...
- Page 70 Function 9 10 11 12 13 14 15 16 17 18 19 20 21 22 23 9 10 11 12 13 14 15 16 17 18 19 20 Char. Length Char. Length Digital zero backup status response Z CR LF N CR LF (Response with the status of digital zero backup being ON.) F CR LF...
- Page 71 Function 9 10 11 12 13 14 15 16 17 18 19 20 21 22 23 9 10 11 12 13 14 15 16 17 18 19 20 Char. Length Char. Length Scaling data response T CR LF 9 CR LF Note: The reading of the main unit changes to MET the moment it receives an MET command.
-
Page 72: Warranty And After-Service
Function 9 10 11 12 13 14 15 16 17 18 19 20 21 22 23 9 10 11 12 13 14 15 16 17 18 19 20 Char. Length Char. Length Calibration data response 2 CR LF V CR LF Note: The reading of the main unit changes to CAL2 the moment it receives a CAL2 (Response with a zero input value.) command.
Need help?
Do you have a question about the A5000 Series and is the answer not in the manual?
Questions and answers