
Related Manuals for Renishaw RUP1


Summary of Contents for Renishaw RUP1
- Page 1 RUP1 installation and user's guide www.renishaw.com RUP1 installation and user's guide Document part number H-1000-5396-01-A Issued 11 2023...
- Page 2 Renishaw warrants its equipment and software for a limited period (as set out in the Standard Terms and Conditions), provided that they are installed and used exactly as defined in associated Renishaw documentation. You should consult these Standard Terms and Conditions to find out the full details of your warranty.
- Page 3 Renishaw probes and associated systems are precision tools used for obtaining precise measurements and must therefore be treated with care. Changes to Renishaw products Renishaw reserves the right to improve, change or modify its hardware or software without incurring any obligations to make changes to Renishaw equipment previously sold. Company registration details Renishaw plc.
- Page 4 RUP1 installation and user's guide www.renishaw.com Patents Features of Renishaw's RUP1 system and associated products (such as REVO-2) are the subjects of one or more of the following patents and patent applications: CN100453970 EP1877727 JP2016-533484 US10260856 WO2014/191729 CN101166951 EP1877732 JP2017-535758...
-
Page 5: Eu Declaration Of Conformity
Information to user (47 CFR 15.21) The user is cautioned that any changes or modifications not expressly approved by Renishaw plc or authorised representative could void the user's authority to operate the equipment. -
Page 6: Reach Regulation
RUP1 installation and user's guide www.renishaw.com ICES-001 (Canada only) This ISM device complies with Canadian ICES-001(A) / NMB-001(A). Cet appareil ISM est conforme à la norme ICES‐001﴾A﴿ / NMB‐001﴾A﴿ du Canada. REACH regulation Information required by Article 33﴾1﴿ of Regulation ﴾EC﴿ No. 1907/2006 ﴾“REACH”﴿ relating to products containing substances of very high concern (SVHCs) is available at: www.renishaw.com/REACH... - Page 7 The RUP1 is only to be used with the Renishaw REVO-2 head. Operators must be trained in the use and application of the REVO-2 system and accompanying products, in the context of the machine it is fitted to, before being allowed to operate that machine.
- Page 8 It is the machine supplier's responsibility to ensure that the user is made aware of any hazards involved in operation, including those mentioned in Renishaw product documentation, and to ensure that adequate guards and safety interlocks are provided. Refer to the machine supplier's operating instructions.
- Page 9 The RUP1 probe should be handled with care Avoid dropping the RUP1 probe or colliding with workpieces or parts of the CMM structure Particular care should be given to the stylus tip - avoid contact with the elastomer ball unless it is being used for measurement...
- Page 10 RUP1 installation and user's guide www.renishaw.com RUP1 references and associated documents The following Renishaw documents are referred to in this document or may be a source of further relevant information. They can easily be acquired from Renishaw web site www.renishaw.com. Title...
-
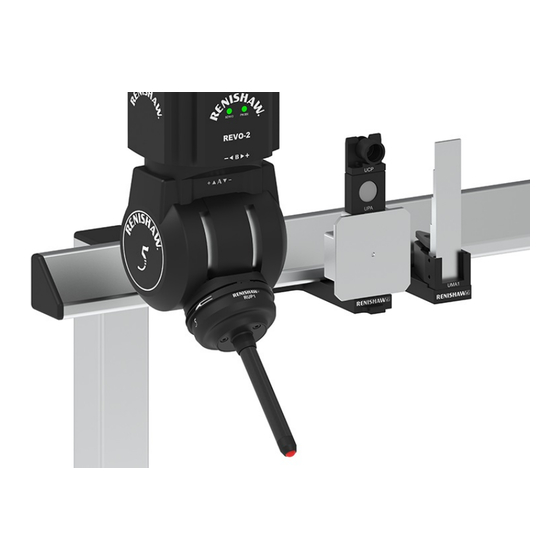
Page 11: System Components Overview
Specific RUP1 software is also required to interpret the data collected by the REVO-2 system. Because the RUP1 system is used as part of a multi-sensor system, and uses specially designed calibration routines, the location of the stylus tip is known precisely. - Page 12 RUP1 installation and user's guide www.renishaw.com Issued 11 2023...
-
Page 13: Protective Cap
Protective cap The RUP1 should always be stored with the protective cap in-place as it extends the life of the tip (elastomer ball). The protective cap fits over the “endcap” and is held in‐place by the friction of the sealing ring. Automated routes automatically remove and replace the cap during use. - Page 14 The UCP holds the protective cap during use. The UCP sits on the top of the calibration assembly. UPA ultrasonic probe artefact The UPA is used to determine the RUP1 probe length (tip Z) and the ultrasonic axis. ULA ultrasonic location artefact The ULA determines the XY of the position of the ultrasonic axis (location).
- Page 15 RUP1 installation and user's guide www.renishaw.com UMA1 ultrasonic material artefact The UMA1 holds the four or five step ASTM E797 spec ultrasonic calibration artefact. NOTE: The precision of the artefact affects the system performance. The artefact should be made from the same material grade and be subjected to the same processes (e.g. heat treatments, forging, shot peening) as the part being measured.
-
Page 16: Environmental Specification
0% to 80% (non-condensing) Electrical specification The REVO-2 head and probe electronics are powered from the UCC S5. The RCP TC-3 is powered by a separate power supply that is supplied by Renishaw. No other additional power supplies are required. Probe specification... -
Page 17: Application Features
RUP1 installation and user's guide www.renishaw.com Application features Product feature Calculating bore diameters from thicknesses Measure the outside diameter and the thickness allows the internal diameter to be calculated. Internal diameter must exceed 100 mm. Measuring internal distances to square shoulders Start at the small diameter, take a series of points into the large diameter. - Page 18 RUP1 installation and user's guide www.renishaw.com RUP1 dimensions RUP1 NOTE: Dimensions in mm (in). Issued 11 2023...
- Page 19 RUP1 installation and user's guide www.renishaw.com RUP1 probe change system The RUP1 system requires 182 mm (7.17 in) of MRS rail length to mount the calibration and probe holder. NOTE: Dimensions in mm (in). Issued 11 2023...
- Page 20 RUP1 installation and user's guide www.renishaw.com RCP TC-3 The RCP TC-3 is a thermally controlled port for changing RSP3-6, SFP2 and RUP1 probes. NOTE: Dimensions in mm (in). Issued 11 2023...
- Page 21 To manually mount or remove the probe from the REVO-2 head you need to: 1. Align the front of the head with the probe (look at the "Renishaw" engraving on the front of probe or alignment marks as applicable). 2. Carefully align the probe to the head, allowing the magnetic attraction to gently connect the kinematic joints.
- Page 22 RUP1 installation and user's guide www.renishaw.com Assembling the elastomer balls into the end 1. Unscrew the end cap from the RUP1. 2. Remove the elastomer ball. Issued 11 2023...
- Page 23 3. Open the bag containing the new elastomer ball. Without touching it tip the new ball in to the end cap. 4. Screw the end cap back on to the RUP1. WARNING: Try not to touch the elastomer ball by hand.
- Page 24 RUP1 installation and user's guide www.renishaw.com RUP1 artefact assembly The following sections outline the assembly of the various RUP1 artefacts: Attaching the UCP, UPA and ULA assembly to an MRS2 rail UMA1 assembly and step block Issued 11 2023...
- Page 25 RUP1 installation and user's guide www.renishaw.com Attaching the UCP, UPA and ULA assembly to an MRS2 rail 1. Insert the D-nut into the groove on the underside of the MRS2 rail by rolling into place. 2. Align the ULA base plate assembly and the screw with the threaded hole in the D-nut.
- Page 26 RUP1 installation and user's guide www.renishaw.com 3. Screw in to place and tighten fully. Issued 11 2023...
- Page 27 RUP1 installation and user's guide www.renishaw.com UMA1 assembly and step block Attaching the UMA1 assembly to the rail 1. Insert the D-nut into the grove on the underside of the MRS2 rail by rolling into place. 2. Align the UMA1 assembly and the screw with the threaded hole in the D-nut.
- Page 28 RUP1 installation and user's guide www.renishaw.com Installing a step block into a UMA1 1. Loosen the screw and slide the clamp back towards the rail. 2. Insert the step block into the UMA1 with the steps facing the rail. Issued 11 2023...
- Page 29 RUP1 installation and user's guide www.renishaw.com 3. Slide the clamp forwards until it is pressing against the step block. Retighten the screw whilst holding the clamp firmly in place. Issued 11 2023...
- Page 30 The REVO-2 probe change system is designed to allow automatic REVO-2 probe and accessory changing on a CMM. For optimum metrology, RUP1 should be changed automatically using REVO-2 change port (RCP TC-3). These ports are mounted on the modular rack system (MRS or MRS2).
- Page 31 RUP1 installation and user's guide www.renishaw.com RCP TC-3 The RCP TC-3 is a thermally controlled port for changing RSP3-6, SFP2 and RUP1 probes. Issued 11 2023...
- Page 32 A cleaning kit for the precision ball seating and permanent magnet is available from your Renishaw supplier (part number A-1085-0016). It comprises strips of yellow tack material. Use the yellow tack to clean the areas indicated with arrows on the image below.
- Page 33 RUP1 installation and user's guide www.renishaw.com Electrical contacts The electrical contacts, indicated with arrows in the image below, should be carefully cleaned with an alcohol-based cleaner (e.g. IPA) and a lint-free cloth. Rack port maintenance CAUTION: Always refer to the 'Safety' and 'Warnings' sections of this guide. Failure to do so could lead to personal injury.
- Page 34 Renishaw plc +44 (0)1453 524524 New Mills, Wotton-under-Edge +44 (0)1453 524901 Gloucestershire, GL12 8JR United Kingdom www.renishaw.com/cmmsupport For worldwide contact details, please visit our main website at www.renishaw.com/contact Issued 11 2023...
Need help?
Do you have a question about the RUP1 and is the answer not in the manual?
Questions and answers