Table of Contents
Advertisement
Quick Links
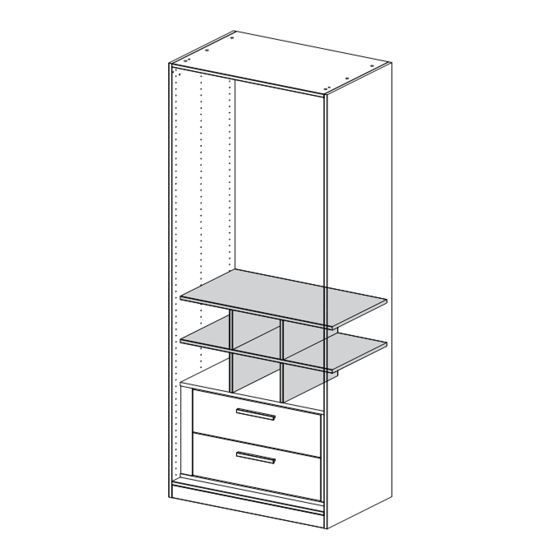
Fitted Bedrooms: Pigeon Hole
Dimensions
Height - 43.6cm
Width - 86.4cm
Depth - 49.0cm
Important
– Please read these instructions fully before starting assembly
If you need help or have damaged or missing parts, please return to your local store.
Produced for
HHGL Limited, MK9 1BA; HHGL (ROI) Limited, D02 X576
- Please keep for future reference
IM........
Advertisement
Table of Contents

Related Manuals for House Beautiful Fitted Bedrooms: Pigeon Hole


Summary of Contents for House Beautiful Fitted Bedrooms: Pigeon Hole
- Page 1 Fitted Bedrooms: Pigeon Hole Assembly Instructions - Please keep for future reference Dimensions Height - 43.6cm Width - 86.4cm Depth - 49.0cm Important – Please read these instructions fully before starting assembly If you need help or have damaged or missing parts, please return to your local store.
- Page 2 Safety and Care Advice Important – Please read these instructions fully before starting assembly • Check you have all the • During assembly do not stand • To reduce the components and tools listed on or put weight on the product, likelihood of damaging this could cause damage.
- Page 3 Components - Panels If you have damaged or missing components, please return to your local store. Please check you have all the panels listed below Top panel x 1 Shelf (holes on both sides) x 1 (86.4 x 49cm) (86.4 x 49cm) Lower divisions x 2 Upper divisions (holes on both sides) x 2 (20 x 49cm)
- Page 4 Components - Fittings Please check you have all the fittings listed below Note: The quantities below are the correct amount to complete the assembly. In some cases more fittings may be supplied than are required. Wooden dowels Wooden dowels L30mm x 4 L60mm x 4 Ruler - Use this ruler to help correctly identify the screws 95 100...
- Page 5 Assembly Instructions Step Step 1 Note: Preparing lower You can choose to assemble this division panels unit directly inside the wardrobe, or separately and then place it. Insert 2 wooden dowels into each lower division panel Step 2 Fixing lower divisions to shelf Connect the shelf with...
- Page 6 Assembly Instructions Step Step 3 Preparing upper division panels Insert 2 wooden dowels into each upper division panel Step 4 Fixing upper divisions to shelf Connect the shelf with the upper divisions using the dowels.
- Page 7 Assembly Instructions Step Step 5 Connecting top panel Connect the top panel to the rest of the structure. The structure can then be placed into the wardrobe. Take care when moving: Lift the structure via the lower divisions.
- Page 8 Assembly Instructions Step Step 6 Insert the structure into the wardrobe Carefully insert the structure into the wardrobe: Note: You can place it on top of an internal chest, or over a shelf.
Need help?
Do you have a question about the Fitted Bedrooms: Pigeon Hole and is the answer not in the manual?
Questions and answers