Table of Contents
Advertisement
Quick Links
Advertisement
Table of Contents

Related Manuals for BullFrog SWIM Series


Summary of Contents for BullFrog SWIM Series
- Page 1 SWIM SERIES OWNERS MANUAL...
-
Page 2: Quick Reference
QUICK REFERENCE To assist you with the installation and maintenance Electrician service of your new spa, please ll out the following 1. Name: information and keep it on hand for future reference. Telephone: 2. Name: Telephone: My Spa Information Model: Concrete, Decking, and Masonry Serial Number: 1. -
Page 3: Table Of Contents
TABLE OF CONTENTS Quick Reference: Table of Contents: Important Overview: Safety Instructions & Warnings: Getting to Know Your Spa: Filling Your Spa: Start-up, Controls & Functions: JetPaks & Jets: Water Care: Spa Maintenance: Fitness & Relaxation Accessories: Site Preparation, Installation, & Delivery: Hardware Setup &... -
Page 4: Important Overview
Other patents pending worldwide Carefully read this Owner’s Manual before you install your Swim Series spa. Your Swim Series Limited Warranty may be voided if Bullfrog Spas reserves the right to change features, damage is caused by failure to install, maintain, and operate your speci cations &... -
Page 5: Safety Instructions & Warnings
SAFETY INSTRUCTIONS & WARNINGS Safety Instructions High temperatures could have a potential for causing fetal damage during pregnancy. Pregnant women or women that could be pregnant should consult a physician and When installing and using this electrical equipment, basic safety possibly limit spa usage when temperatures are in excess precautions should always be followed, including the following: of 100˚... - Page 6 No. CAUTION: 6 AWG. Non-Approved Accessories. Using accessories not approved by Bullfrog International, LC could void your warranty or cause other problems. Please consult your authorized Bullfrog Spas Dealer. CAUTION: Spa Location. Locate your spa on a...
- Page 7 For free additional copies, contact your Authorized Swim Series Dealership. * Final warning sticker is included with spa for installation by owner. REDUCE THE RISK OF ELECTROCUTION 1.
- Page 8 REDUCE THE RISK OF ELECTROCUTION 1. NEVER PLACE AN ELECTRIC APPLIANCE WITHIN 5 FEET OF SPA 2. DO NOT INSTALL UNDER SPA SKIRT OR WITHIN AN ENCLOSURE THAT WOULD RESTRICT VENTILATION. 3. IF BLOWER IS INCLUDED, INSTALL AT LEAST 1 FOOT ABOVE MAXIMUM WATER LEVEL. REDUCE THE RISK OF CHILD DROWNING 1.
-
Page 9: Getting To Know Your Spa
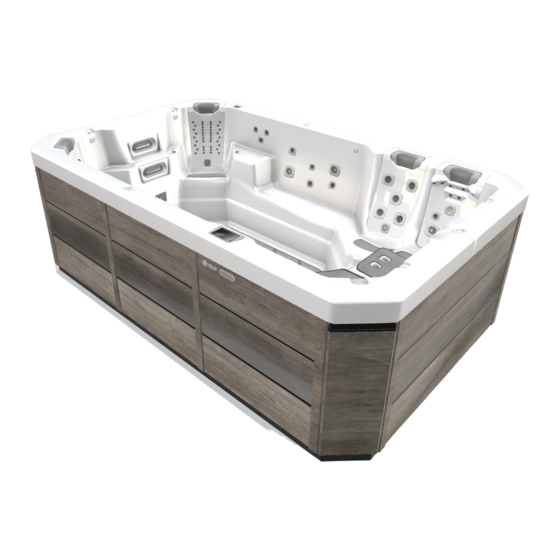
GETTING TO KNOW YOUR SPA Spa Overview Swim Series [S150 pictured with optional Premium Aquatic Surface Package] 7a 7b 1. Main touch-screen control 2. Simplicity spa lter (located behind JetPak) 3. Multi-function auxiliary control 4. Accessory anchors (4a, 4b, 4c, 4d, 4e, & 4f ) 5. - Page 10 Spa Equipment Compartment Swim Series [S150 pictured, shown with equipment access panel removed] 1. Jet pump 1 2. Jet pump 2 3. Filtration pump 4. Control box 5. Water heater 6. Electronic valve control system 7. Clear Comfort AOP system 8.
-
Page 11: Filling Your Spa
Never ll the spa with soft water unless an leak persists contact your authorized Bullfrog Spas Dealer. appropriate mineral supplement is immediately added (see your authorized Bullfrog Spas Dealer). If your water is extremely hard, Step 5: Install Cover: e spa cover comes with tie down it is preferable to either dilute the water’s hardness by blending... -
Page 12: Start-Up, Controls & Functions
Pumps must be primed directly after lling to ensure correct operation of your spa. After initial start up, verify that the home status screen appears on the panel. Ensure that your Swim Series spa is in Spa mode. Prime each of the pumps. Begin by pressing “Jets 1”... - Page 13 External Air Bleeder Instructions ese instructions should be followed at initial and subsequent Step 3: Using caution, carefully remove the air bleeder screw draining and re lling to prevent pump cavitation caused by from the external air bleeder tting with a standard athead trapped air within the pump and plumbing system.
- Page 14 Mode icon e electronic valve will actuate.* Swim Mode functions will become operational. To switch to Spa Mode Your Swim Series spa is equipped with several features and touch the Spa Mode icon . icon and the electronic valve will functions allowing you to pursue your tness goals.
- Page 15 Preparation Time menu. Pressing the personalized drill menu. (pause/standby) icon will temporarily suspend timer operation, Your Swim Series spa allows you to create your own personalized while pressing the (stop) icon will stop the drill and revert to swim drills to acommodate your training needs.
- Page 16 Filter cycle start times: 8:00 AM, duration 3 hours and 8:00 the previous setup screen. PM, duration 3 hours. Spa Settings e settings on the Swim Series main control are navigated by Vacation the use of the (Settings) button. One press gives you access to...
- Page 17 Electrical Configuration Maintenance Reminders e Swim Series main control can be set up to remind you of IMPORTANT: Please do not make changes in this section several types of maintenance required on your spa, including unless you are a quali ed electrician.
- Page 18 Connect Bluetooth: e rst time you use your Bluetooth device with a Swim Series Audio system you must rst “pair” or connect your device to the spa audio system according to the standard functionality of your speci c device.* Each device must be...
-
Page 19: Jetpaks & Jets
JETPAKS & JETS Interchanging JetPaks Step 2: At the front of the snap cap, grasp light blue wedge and pull up. Remove completely. Step 1: Place the spa in Standby mode by pressing the (pause/ standby) icon, located in the setting screen. is will prevent the pump(s) from activating while JetPak are being moved. - Page 20 NOTE: Not all jets are adjustable. Certain jets throughout your Swim Series spa may be xed in the on position by design and will not be able to be adjusted. Attempting to turn or manipulate these jets may cause damage to the jet itself or the spa.
-
Page 21: Water Care
Test and adjust the pH. e pH should measure 7.4 to 7.6. any water care questions or concerns to your local Authorized Swim Series Dealership. Your Dealer can recommend the correct Step 5: Add the appropriate sanitizer. If you applied water products and procedures for safely sanitizing and maintaining clari er, allow water to circulate for one hour before sanitizing. - Page 22 Bullfrog Spas does not recommend the use of bromine High CH (hard water) can cause cloudy water as well as rough in Swim Series spas as, over time, it may damage the Non-slip scale build-up on the spa surface and equipment. If the spa water Aquatic Surface coverings.
- Page 23 Water Filtration Your Swim Series spa features the Simplicity ltration system for maintaining clean and clear water with a minimum of e ort. Replacing the Filter To ensure proper cleaning and function of your Swim Series spa your Simplicity at lters will need to be replaced regularly.
- Page 24 In Swim Series spas this is recommended every 6 months or as needed. When changing water, remove all JetPaks.
- Page 25 To Drain Your Spa : Step 1: Turn-o main electrical breaker to spa. Step 2: Locate drain below equipment compartment door. Step 3: Pull the drain out toward you with a slight clockwise turn. Use pliers for an adequate grip if needed. NOTE: Depending on the size of your model and the capacity of your hose, the spa will drain about 5-10 gallons (20-40 liters)
-
Page 26: Spa Maintenance
IMPORTANT: Do not stand, sit, or place any item on Authorized Swim Series Dealer for service. A blue light on the the cover that could dent or damage it. Gently remove snow cartridge indicates normal operation at full capacity. When the... - Page 27 Authorized Bullfrog Spas Dealership. Other Clear Comfort cartridges are not con gured for and will not function correctly in a Clear Comfort for Bullfrog Spas unit. For proper recycling, please return your used cartridge with the...
- Page 28 Winterization Step 6: Remove lter cartridge(s). You may either replace with new lters during dewinterization or allow to air dry, and WARNING: Prior to winterizing your spa, it will be necessary reinstall. to super sanitize the spa water as per the instructions in the Step 7: Secure the cover to the spa utilizing the locking system.
- Page 29 Removing & Installing the Door Installation Step 1: Slip the upper lip of the door into the top behind the lip Equipment Door of the spa. Lower the door while gently pushing on it until you feel the snap channel line up with the snap features in the support Door Removal studs.
-
Page 30: Fitness & Relaxation Accessories
FITNESS & RELAXATION ACCESSORIES Accessory Instructions Your Swim Series spa comes ready to accept a variety of Swim Series brand tness and therapy accessories (optional). include the Strength & Stretch Fitness Kit, Zero Gravity Spa Hammock, and Swim Tether Kit. As these accessories may be ordered and shipped with your spa, an overview of their function is provided here. - Page 31 INSTRUCTIONS FOR USING YOUR SWIM SERIES™ FITNESS KIT Strength & Stretch Fitness Kit: 1 - EXPANDABLE ROW BAR 1 - FITNESS BAND STRAP 1 - LARGE FITNESS BAND 2 - FITNESS BAND HANDLES 4 - MEDIUM FITNESS BANDS 2 - FITNESS ANKLE CUFFS...
- Page 32 Step 2: Attach each of the remaining ends of fitness bands to an anchor point (A) on the lounge end of the Swim Series spa. Step 3: Sit in exercise seat (D) and press handles forward for a shoulder and upper body workout.
- Page 33 INSTRUCTIONS FOR USING YOUR SWIM SERIES™ ZERO GRAVITY SPA HAMMOCK Zero Gravity Spa Hammock: 1 - HAMMOCK 2 - CARABINERS 2 - SHORT FITNESS BAND (YELLOW STRIPE) 2 - TETHER PIN MOUNTS 2 - MEDIUM FITNESS BANDS (BLUE STRIPE) 1 - SWIM ACCESSORY BAG...
- Page 34 INSTRUCTIONS FOR USING YOUR SWIM SERIES™ SWIM TETHER Swim Tether Kit: 1 - SWIMMING TETHER POLE (collapsable into two pieces) 1 - FITNESS BAND 1 - CARABINER 1 - SWIM BELT 1 - FITNESS BAND STRAP 1 - STRETCH RESISTANCE BAND...
-
Page 35: Site Preparation, Installation, & Delivery
Carefully consider where and how you plan to install your Swim Series spa. Although your Indoor Installation Considerations Authorized Swim Series Dealer may be helpful in evaluating... - Page 36 Some Electrical Outlets, Switches and Devices: Based upon people choose to install their Swim Series spas partially in the the national regional, and local wiring rules that apply to your ground or to install stone, landscaping, tile, or custom decking area, you must install your spa at the required minimum distance around their spas.
- Page 37 Spa Technical that use the spa (for the weight bearing load requirements as Speci cations or contact an authorized Swim Series Dealer. well as the maximum lled weight of your spa, refer to the Swim...
- Page 38 In most cases, due to the dimensions and weight, a crane will be Wiring Connection: Appliance must be permanently required to install your Swim Series spa by lifting it to its nal connected to xed wiring. installation location. A quali ed crane operator can lift your spa...
- Page 39 It is not recommended to move your Swim Series is guide will assist in solving simple problems with the spa.
-
Page 40: Hardware Setup & Wiring Diagrams
HARDWARE SETUP & WIRING (North America 60 Hz) WARNING / AVERTISSEMENT 120V 240V - USE ONLY #4 AWG TO #12 AWG GREEN COPPER CONDUCTORS. 240V - NOT FOR USE WITH COMPACT IN.YE-6-AMP-V3 STRAND WIRE. 17519-01C P30 P31 P24 P25 P26 - UTILISER SEULEMENT DES CONDUCTEURS EN CUIVRE #4 AWG À... -
Page 41: Electrical Chaseway & Stub-Up Diagrams
ELECTRICAL CHASEWAYS & STUB-UP LOCATIONS S150 88.7 From bottom of base ELECTRICAL INSTALL TO BE DRILLED WITHIN THE INSTALL ZONE (NO CHASEWAYS) INTERNAL ELECTRICAL STUB-UP PLACED ON INDICATED 3" HOLE. 146.7 From bottom of base 64.4 Elec. install 52.2 zone 40.0 27.8 S180... -
Page 42: Gfci Wiring Diagrams
GFCI WIRING OPTIONAL IN.MIX PCB X Y G IN.MIX CONNECTIONS 20A/600VAC TIME-DELAY CLASS G ZONE 2 ZONE 3 IN.YT-9-AMP- V2FLX-BG ZONE 1 ZONE 1 MAS-MAGNETIC CONNECT. P3 AND P4 (BOTH ARE REQUIRED) - IMPORTANT NOTICE: FOR PROPER GROUNDING, WIRES MUST BE CONNECTED P108 P113 TO A... -
Page 43: Display And Error Messages
DISPLAY MESSAGES & ERROR MESSAGES Code Message High Limit circuit has tripped! FLO - L01 FLO - L02 FLO FLO condition - Check filter, pump, blockage, air lock and water level NO FLO Persistent NO FLO, all off - Check filter, pump, blockage, air lock and water level A hardware error was detected (Relay stuck) Spa temperature is too high Temp probes or detection circuit are defective... -
Page 44: Troubleshooting Guide
Solution: Consult with a quali ed Electrician. Cause #2: ere is a defective component on the spa. Solution: Contact your authorized Bullfrog Spas Dealer. Spa pump turns o during operation: Cause #1: Automatic timer has completed its 30 or 60 minute cycle. -
Page 45: Limited Warranty
Bullfrog International, LC (“Bullfrog”) extends warranty coverage solely to the original retail purchaser or end-user (“Owner”) of any Swim Series spa manufactured by Bullfrog on or after January, 2022 for 2022 and later models at the original location where first installed for residential use in the United States or Canada. - Page 46 Swim Series spa is installed. If Bullfrog or its the Swim Series Owner’s Manual or any other official printed or authorized agent determines that onsite repair of the defect or digitally published instructions, notice or bulletin from Bullfrog.
- Page 47 Bullfrog International, LC 668 W. 14600 S. Blu dale, UT 84065 T: 801.565.8111 F: 801.565.8333 E: info@bullfrogspas.com v 2.5 Register your spa online by visiting: bullfrogspas.com/warranty-registration North America 2024 Bullfrog International LC...
Need help?
Do you have a question about the SWIM Series and is the answer not in the manual?
Questions and answers