
Related Manuals for UTStarcom GPRS1229


Summary of Contents for UTStarcom GPRS1229
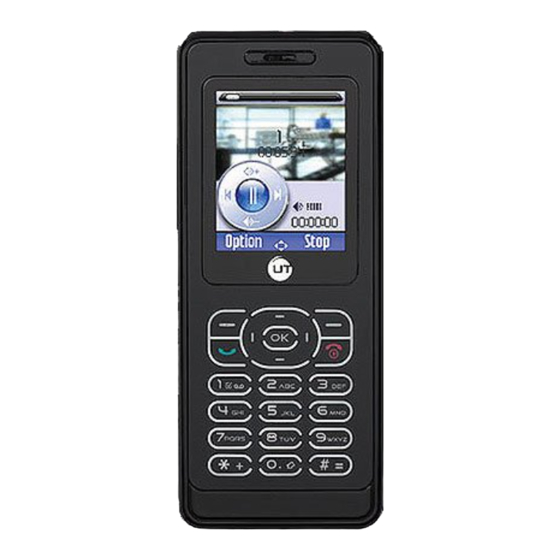
- Page 1 Left softkey Pick up key Your Phone’s Parts Earpiece Screen Navigation key & OK key Right softkey Red key/Hang up key Alphanumeric keypad...
- Page 2 Microphone Side up key Side down key Charging Connector MP3 key...
- Page 3 Camera Lens...
-
Page 4: Table Of Contents
MAIN MENU...10 GETTING STARTING ...11 2.1. Inserting the SIM Card ... 11 2.2. Switching on the phone... 12 2.3. Switching off the phone ... 13 2.4. Charging the Battery... 13 CALL FUNCTIONS ...13 3.1. Making a call in Idle mode... 13 3.2. - Page 5 ENTERTAINMENT...22 7.1. MP3 Player ... 22 7.2. Camera ... 22 7.2.1 Picture List... 23 7.2.2 Color mode ... 23 7.2.3 Environment ... 23 7.2.4 Self-Timer ... 23 7.2.5 Resolution... 24 7.2.6 Picture quality ... 24 7.2.7 Shutter Sound... 24 7.2.8 Reset settings...
- Page 6 9.4. Services... 33 10 - SETTINGS...34 10.1. Sounds ... 34 10.1.1 Ringer volume... 34 10.1.2 Ringtone ... 34 10.1.3 Messages ringer ... 34 10.1.4 Equalizer... 34 10.1.5 Key tones... 34 10.1.6 Sounds alerts... 34 10.1.7 Vibra alert ... 35 10.1.8 Silent...
- Page 7 11 - CONTACTS...42 11.1. Settings ... 42 11.1.1 Delete all... 42 11.1.2 Contacts select ... 42 11.1.3 Copy to phone ... 42 11.1.4 Groups setting ... 42 11.2. Names list ... 43 11.2.1 Adding contacts to the SIM phonebook... 43 11.2.2 Adding contacts in the phone phonebook ...
- Page 8 16.7. Your battery seems to over heat ... 50 16.8. You can’t send text messages... 51 16.9. You can’t receive and / or store JPEG pictures ... 51 16.10. The display shows SIM failure ... 51 16.11. The display shows INSERT YOUR SIM CARD... 51 16.12.
-
Page 9: Your Phone Overview
Your phone overview Technology Size Volume Display Camera Basic Driver Memory Battery Autonomy Vocoders Slim bar type MP3 ringer, player T-flash slot Motion JPEG High capacity phonebook storage End User Features High capacity SMS storage Handsfree Recorder Alarm clock, calculator T9 input Mini USB GPRS Class 10, Class B... -
Page 10: Main Menu
Switch the phone on/off Enter your PIN code Make a call Answer a call End a call Reject a call Adjust the earpiece volume Access to [Names List] Access to [Call List] Access to [Main Menu] Access to [Profiles] Access to [Messages] Access to [Camera] Access to [Organizer] Softkeys... -
Page 11: Getting Starting
GETTING STARTING 2.1. Inserting the SIM Card Please read the safety instructions in the "Precautions" section before use. To use your phone, you must insert a valid SIM card supplied by a GSM operator or retailer. The SIM card contains your subscription information, your mobile telephone number, and a memory card in which you can store phone numbers and messages. -
Page 12: Switching On The Phone
4. Inserting the SIM card Insert the SIM card into the SIM card socket. Make sure that the notched corner is at the top right and the golden contact area on the card is facing downward. 5. Reinstalling the battery. Place the battery so that the tabs on its end align to the slots at the top of the phone. -
Page 13: Switching Off The Phone
2.3. Switching off the phone To switch off the phone, press and hold Red key/Hang-up key. 2.4. Charging the Battery 1. To Charge the battery with the Travel Adapter, with the battery in position on the phone, plug the connector of the travel adapter into the connector slot on the right side of the phone. -
Page 14: Making An International Call
3.3. Making an international call 1. Press and hold the [*]key for the international prefix. 2. Enter the Country code, area code, and phone number, and then press the Pick up key to dial. 3.4. Ending a call End a call by pressing Red key/Hang-up key. 3.5. -
Page 15: Mute Or Unmute
Mute or Unmute 3.6.2 Allows you to mute or unmute the microphone so that your caller cannot hear you. Record dialogue 3.6.3 In most countries, recording telephone conversations is subject to legislation. We advise you to notify the caller if you intend to record your conversation and only do so if they agree. -
Page 16: Text Entry
Press [OK] or Left softkey [Options] This service is limited to two current communications (one active and one on hold). TEXT ENTRY Text can be entered in editing screens in two different ways: by using T9® Predictive Text Input or basic text input. The techniques for using these two methods are discussed below. -
Page 17: Basic Text Input
4.2. Basic text input Press to switch from T9® to basic text input. This method requires multiple key presses to reach the desired character: the letter "h" is the second letter on the 4 key, so you must press it twice to enter "h". Short press Right softkey [Cancel] to clear one entry, press and hold to clear all text. -
Page 18: Toolbox
TOOLBOX This menu contains features and options designed to help you keep you organized and informed while on the move. 5.1. Calculator Your phone has a built-in calculator that you can use to perform basic calculations, such as addition, subtraction, multiplication, division. 1. -
Page 19: Deleting A Single Event
Deleting a single event 5.2.2 Select the event of your choice and press [OK] twice. Then select Delete and press [OK] to confirm. Deleting a repeated event 5.2.3 1. By selecting a past occurrence: select a past occurrence of an event and press [OK]. When the event details appear, press [OK], then select Delete and press [OK] to confirm: only the past occurrences of the selected event are deleted. -
Page 20: My Stuff
MY STUFF This menu and its sub-menus contain options related to the multimedia features of your mobile phone. 6.1. Memory status This menu allows you to display the percentage of memory available in your phone. Various features share the memory capacity: pictures, sounds, recorded memos, stored messages, phonebook and organizer entries, etc. -
Page 21: Sound Recording
View all To access all your image files in a single list. My photos To access the photos taken with the phone’s embedded camera. My images To access the images you have downloaded. Protected images To access the list of copyright protected sample images. Icons To access the list of icons you have downloaded. -
Page 22: Entertainment
ENTERTAINMENT 7.1. MP3 Player When you enter the MP3 function, the main play screen will appear and music can be played anytime, anywhere. MP3 Player options include: 1. You can select the next song by pressing ►, or the previous one by pressing◄. 2. -
Page 23: Picture List
The number of pictures you can save varies according to the settings: the higher the resolution, the bigger the file size. A message will warn you if there isn’t enough memory left. In this case, you must delete data before storing a new picture. Picture List 7.2.1 When you take a picture and save it, the file is stored in your Picture List. -
Page 24: Resolution
as well. To use the Self-Timer, select On in this menu, return to the view-finder mode, frame your picture, and then press [OK]. Resolution 7.2.5 Use this menu option to choose the size of the photos you take. The options are: •128 x 96 •128 x128 •Medium (320 x 240) -
Page 25: Picture Location
Picture location 7.2.11 •Local •T-flash 7.3. Continuously shoot 1. Activating this menu option allows you to take a "burst" of 5 photos with one press of the button. To use the Continuous shoots, the resolution must be set to Screen size. 2. -
Page 26: Homepage
Change name. 2. Select [Main Menu]: →WAP →Settings →Select profile→Select Not Used→Note2 → Network →Proxy address/ Proxy port / Network access → Select foresaid figured account. Note 2: Not Used here is not pre-figured profile, name can be changed in submenu Rename profile. -
Page 27: Settings
8.5. Settings Select profile 8.5.1 In order to access WAP sites, you must first configure a WAP connection profile. Select one of the available profiles, then define the connection settings for each of them. All connection settings described below apply to the selected profile. Browser options 8.5.2 To activate or deactivate the downloading of images attached to WAP pages. -
Page 28: Push Inbox
Security: to display the list of installed security Certificates (then display its details or delete it), the Session info or the Current certificate. 8.6. Push inbox This menu allows you to read and manage messages automatically sent to you by the network and/or by your operator. -
Page 29: Message
MESSAGE 9.1. Broadcast SMS This menu allows you to manage the reception of SMS broadcasts regularly transmitted to all subscribers on the network. It gives you access to the following options: 1. District code: To select the type of messages you want to be permanently displayed on the idle screen (in this case, enter the type in both District code and Topics menus). -
Page 30: Settings
Settings 9.2.2 This menu allows you to configure the SMS settings. The options are: To select your default SMS centre. If not available on your SIM card, SMS centre you must enter your SMS centre number. When On, allows you to add a signature at the end of your Signature message. -
Page 31: Mms
number is included in double quotes (several numbers can be included and extracted). This option menu is only visible if there is a number to extract. Store melody To save the melody that was sent with the SMS. This menu is only visible if there is a melody to extract. -
Page 32: Inbox
1. Select [Main Menu]: →Messages →MMS →Create MMS→select a recipient or select “New” to edit one. It could be a cell phone number or an Email address; 2. In editor Create MMS, select and validate “Add pict.” or “Add text” or “Add sound” or “Attach”, can add pic. -
Page 33: Drafts
Do NOT delete notifications before you have retrieved the MMS, or you will not be able to retrieve the MMS. Notifications are automatically deleted once you have received the full MMS. Drafts 9.3.5 Lists all messages saved as drafts, or automatically saved if you quit the MMS menu before saving or sending your MMS. -
Page 34: Settings
10 - SETTINGS This menu allows you to change the settings related to each available option (sounds, time and date, security, etc.) and to customize your phone. 10.1. Sounds Ringer volume 10.1.1 This option allows you to adjust the volume of your ringer. Press the side key [+] to increase the volume or [-]to decrease the volume. -
Page 35: Vibra Alert
Vibra alert 10.1.7 Allows you to set the vibra alert On or Off when receiving a call, when an event set in the organizer is due, when you receive a message and when the alarm rings. The vibra alert is always Off when you connect the charger. Silent 10.1.8 When this mode is On, all alerts are deactivated and the vibra alert is active. -
Page 36: Public Names
Public names 10.2.4 Allows you to manage Public Names list, and restricts calls to this list via the Call restriction option. This feature is subscription dependent and requires a PIN2 code. Public names: Allows you to review, edit and modify your Public Names list via a PIN2 code. -
Page 37: Gprs Attach
•GPRS settings: To change the GPRS settings, •Login, •Password, •Inactivity time, •The APN menu allows you to enter the address of the external data network you want to connect to, a text string used to establish the connection. GPRS attach 10.3.2 This menu allows you to define how your mobile phone connects to the GPRS service. -
Page 38: Call Setting
Ringtone Backlight Outdoors Ringtone Vibra alert Meeting Ringtone Key tones 10.5. Call setting This menu allows you to set all the options related to call: call forwarding, call waiting, etc. Info at call ending 10.5.1 When activated, the length and / or cost of each call will appear when you end a call. Any key answer 10.5.2 When On, this options allows you to accept a call by pressing any key, except Red... -
Page 39: Mailboxes
Before activating this option, you must enter your voice mailbox number (see next section). This feature is subscription dependent, and different from the call transfer, which takes place when one/several calls are in progress. Mailboxes 10.5.6 To enter your voice mailbox numbers (if not available on your SIM card). In some cases, you might have to enter two numbers: one to listen to your mailbox, the other one to forward calls. -
Page 40: Language
clock, Record, Sound recording, WAP, To voice mail, Brick game, MP3 Player, Contacts Select, Picture album and Sound album. Language 10.6.3 This menu allows you to select a language for all menu texts. Use ▲or ▼to browse the list and select a language by pressing [OK] or Left softkey. Display 10.6.4 This menu allows you to configure how the menus are displayed on screen. -
Page 41: Daylight Saving
within that time zone. 10.6.5.4 Daylight Saving Allows you to set daylight saving to On (in summer time) or Off (in winter time). If daylight saving is On and you set the time to 12:00, it will automatically switch to 11:00 when switching the option to Off. -
Page 42: Contacts
11 - CONTACTS Contacts are stored in one of the two available phonebooks: in your SIM card (number of entries depending on capacity) or in your phone (up to 990 names). When entering new names, they will only be added to the phonebook you have selected. 11.1. -
Page 43: Names List
11.2. Names list It is in this menu that you can manage the names and telephone numbers of your contacts. You can also access the Names list directly from the home screen by pressing Right softkey. Adding contacts to the SIM phonebook 11.2.1 ·Select <New>... -
Page 44: In The Onboard Phonebook
In the onboard phonebook 11.2.5 Choose a contact in your onboard phonebook and press [OK] or Options to access the following options: Call handsfree, Send SMS, Send MMS, Call, Show, Delete, Change name, Select group. Select <Show> to access the list of numbers or fields saved for this contact. Select <New> to create a new field or select one of the numbers and press[OK], to access a second set of additional options, among which are: The first number you enter becomes the default number which is... -
Page 45: Call Info
12 - CALL INFO The menus described in this section are used for managing how your mobile phone handles calls and their related costs. 12.1. Counters This menu allows you to track the cost and duration of your calls. Most options mentioned below are subscription dependent. -
Page 46: Call List
12.2. Call list This menu provides you with the list of outgoing and incoming calls, attempts at auto redialing and call details. The different types of calls - calls made, calls missed and calls received - are represented by different icons. They are displayed in chronological order with the most recent on top. -
Page 47: Precautions
15 - PRECAUTIONS 15.1. adio waving Your cellular mobile phone is a Low Power Radio transmitter and receiver. When it is operating, it sends and receives radio waves. The radio waves carry your voice or data signal to a base station that is connected to the telephone network. The network controls the power at which the phone transmits. -
Page 48: Pacemakers
rules. In areas where you are requested to turn off radio transmitting devices, such as quarries or other areas where blasting operations are in progress. Check with the vehicle manufacturer that electronic equipment used in your vehicle will not be affected by radio energy. -
Page 49: Your Mobile Phone And Your Car
•Do not deform or open the battery. •Do not allow metal objects (such as keys in your pocket) to short circuit the battery contacts. •Avoid exposure to excessive heat (>60°C or140°F), moisture or caustic environments. You should only use Philips Authentic Accessories, as the use of any other accessories may damage your phone and will make all guarantees for your Philips phone null and void. -
Page 50: Troubleshooting
16 - TROUBLESHOOTING 16.1. The phone does not switch on Removing / reinstalling the battery. Then charge the phone until the battery icon stops scrolling. Unplug from charger and try to switch the mobile on. 16.2. The display shows BLOCKED when you switch on Somebody tried to use your phone but didn’t know the PIN code nor the unblocking code (PUK). -
Page 51: You Can't Send Text Messages
16.8. You can’t send text messages Some networks don’t allow message exchanges with other networks. First check that you entered the number of your SMS centre, or contact your operator for detailed information on this subject. 16.9. You can’t receive and / or store JPEG pictures A picture may not be accepted by your mobile phone if it is too large, if its name is too long, or if it doesn’t have the correct file format.
Need help?
Do you have a question about the GPRS1229 and is the answer not in the manual?
Questions and answers