Table of Contents
Advertisement
Available languages
Available languages
Advertisement
Chapters
Table of Contents

Related Manuals for Hisense HRM260N6TSE


Summary of Contents for Hisense HRM260N6TSE
- Page 1 USER’S OPERATION MANUAL Before operating this unit, please read this manual thoroughly, and retain for future reference HRM260N6TSE English For questions about features, operation/performance, parts or service, call: 1-877-465-3566...
-
Page 2: Table Of Contents
Disposal of the appliance............................ Brief Introduction instructions and be sure that they remain Thank you for choosing Hisense. We are with the appliance if it is moved or sold, sure you will find your new refrigerator a so that anyone using it throughout its life, pleasure to use. -
Page 3: Safety And Warning Information
Safety and warning information General safety When positioning the appliance, ensure the supply cord is not trapped or This appliance is intended to be used in damaged. household and similar applications such Do not locate multiple portable socket- 1.staff kitchen areas in shops, offices and outlets or portable power supplies at the other working environments;... - Page 4 Electrical safety Do not place hot items near the plastic components of this appliance. The power cord must not be lengthened. This refrigerating appliance is not Make sure that the power plug is not intended to be used as a built-in crushed or damaged.
- Page 5 Do not remove nor touch items from the It is advisable to wait at least four hours freezer compartment if your hands are before connecting the appliance to allow damp/wet,as this could cause skin the oil to flow back in the compressor. abrasions or frost/freezer burns.
-
Page 6: Installing Your New Appliance
Installing your new appliance Before using the appliance for the first time, you should be aware of the following tips. Warning For proper installation, this refrigerator must be placed on a level surface of hard material that is the same height as the rest of the flooring. - Page 7 Adjusting Door Height And Leveling of appliance Door Gap For sufficient leveling and air circulating in the lower rear section of the The height of a door can be adjusted using appliance, the bottom feet may need to the provided Snap Rings. Tools you will be adjusted.
- Page 8 Door Removal In case your home access door is too narrow for the refrigerator to pass through, remove the refrigerator doors and drawers. If you do not need to remove the appliance doors, proceed to "Installing Water Lines" on page 10. If you need to remove the doors, continue below.
- Page 9 7 . Pull the middle door fully open. 10 . Take out the middle door. 8 . Take out upper drawer. 11 . Pull the freezer door and the freezer drawer fully open. 12 . Take out the middle drawer. 9.Remove the two screws that secure the support frame.
- Page 10 13 . Take out the lower drawer. Installing the water lines Ice & water dispenser with a filter is one of the helpful features on your new appliance. To help promote better health, the water filter removes unwanted particles from your water. Please follow the below instructions carefully for correct installation.
- Page 11 3.Connect 1/4" extension tubing to shut off What you need to have before you begin valve outlet. 1. Power drill and 1/4" drill bit. 2. 1/2" or adjustable wrench. 3.lat blade and Philips head screwdrivers. Saddle-Type Compression Nut Shutoff Valve 1/4"...
- Page 12 6. Turn the water on and check for 1/4" Water Line leakage. 1/4" Compression Nut Ferrule (Sleeve) Brass Fitting Water Inlet 7. Comfirm 1/4" water line is secure by gently pulling on it. 8. Turn on water supply and check for Connect Water Line leaks.
-
Page 13: Description Of The Appliance
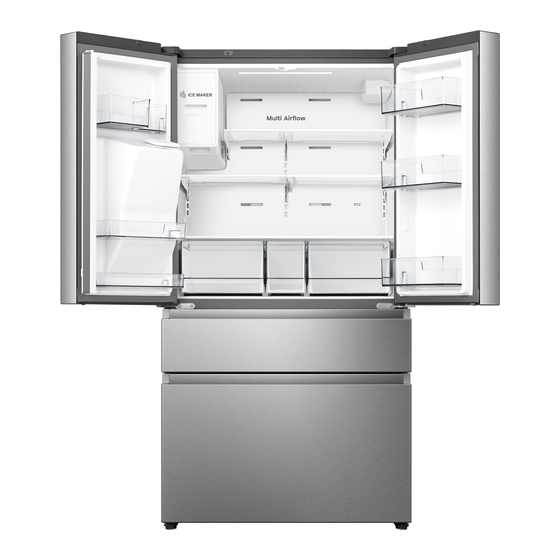
Description of the appliance View of the appliance 07 . Glass Shelf 01. Wi-Fi Module 13. Freezer Lower Drawer 08. Refrigerator Side Light 02. Refrigerator LED Light 14. Fridge Door Left 09 . Storage Drawer 03. Water Filter 15. Fridge Door Right 10. -
Page 14: Display Controls
Display controls Your product has one control panel which is installed on the refrigerator door. Use your appliance according to the following control guidelines. The display will illuminate when the 8 minutes. In case of alarm, you can refrigerator is first plugged in. However touch the Alarm button to cancel door the lights will automatically turn off alarm, then the icon "... - Page 15 7°F 6°F 5°F ..“Fridge Temperature -11°F -10°F -9°F Control” ..-14°C -15°C -16°C When you touch the button -24°C -23°C -22°C Press and hold the button for 3 seconds, continuously, the temperature will be the icon " " will be illuminated, the set in the following sequence.
- Page 16 Crushed the " " icon will be refrigerator or the Hisense after-sales illuminated, and the " " icon will be service system. Make sure that the new illuminated when Water function is filter is the same filter type that came...
-
Page 17: Connecting Your Refrigerator To Wi-Fi
the refrigerator may seem like it is working but it will not make cool air. The indicators on the control panel will show "0F". To cancel this mode, touch and hold "Alarm" and "°F/°C" buttons at the same time for 3 seconds until the buzzer beep a long sound. - Page 18 Connecting your refrigerator Locate "Refrigerator" in the device list and select it. After installing the Connectlife app, sign in or create an account and Follow the instructions in the app follow these steps: to connect your refrigerator. Once the setup is complete, your 1.
-
Page 19: Using Your Appliance
Using your appliance Using your fridge compartment Note The refrigerator compartment is suitable for storage of vegetables Before closing the left-hand door, and fruit. Food inside should be make sure the mullion is folded sealed for storage in order to avoid inward. - Page 20 Note Unscrew the drawer before taking it out. 1. Pull out drawer to maximum extension. Adjustable Shelves 2. Lift up to remove the drawer. The height of the shelves can be 3. Reverse steps 1 and 2 to replace adjusted to fit your storage needs. the drawer.
- Page 21 ice using a plastic utensil and discard. Do not use a sharp tool to break up the ice. This can cause damage to the ice container. Do not store any items other than ice in the ice storage container. If the ice sticks to the wall, break the ice cubes with plastic utensils and discard.
- Page 22 2. Gently lift the ice bucket up, and operating. Don't reach deep inside then pull it out slowly while holding the ice bucket. This may cause the bottom of the bucket with one physical injury or product damage. hand and the side with the other hand.
- Page 23 Note Turn the water supply back on. After that, you should check the leaks. If leaks occur, repeat the above operation steps 1-5. If leaks persisit, please stop using it and call your supporting dealers. 3. Insert the new water filter into the hole, and at the same time turn it about 90°clockwise until it stops.
- Page 24 Reverse osmosis water supply Note is important The pressure of the water supply Be sure to flush the dispenser coming out of a reverse osmosis thoroughly, otherwise water may system going to the water inlet valve drip from the dispenser. of the refrigerator needs to be a This means that there is still air in minimum of 40 to 60 psi (276 to 414...
-
Page 25: Cleaning And Care
Cleaning and care For hygienic reasons the appliance Warning (including exterior and interior accessories) should be cleaned Do not use sharp objects as they regularly (at least every two months). are likely to scratch the surface. Do not use Thinner, Car detergent Warning Clorox, ethereal oil, abrasive cleansers or organic solvent such... - Page 26 Although this appliance automatically defrosts, a layer of frost may occur on the freezer compartment's interior walls if the freezer door is opened frequently or kept open too long. If the frost is too thick, choose a time when the freezer is nearly empty and proceed as follow: Replacing the LED light 1.
-
Page 27: Helpful Hints And Tips
Helpful hints and tips Energy saving tips Hints for refrigeration We recommend that you follow the Meat (AIl Types) Wrap in polythene tips to save energy. food: wrap and place on the glass Try to avoid keeping the door open shelf above the vegetable drawer. -
Page 28: Troubleshooting
Switching off your appliance It is recommended to label and date If the appliance needs to be each frozen package in order to switched off for an extended period, keep track of the storage time. the following steps should be taken to prevent mould on the appliance. - Page 29 Problem Possible cause & Solution The ambient temperature is too low. Try setting the chamber temperature to a colder level to solve this Appliance is not problem. working correctly It is normal that the refrigerator is not operating during the automatic defrost cycle, or for a short time after the appliance is switched on to protect the compressor.
- Page 30 Problem Possible cause & Solution Check that the air outlets are not blocked by food and ensure food is placed within the appliance to allow A layer of frost sufficient ventilation. occurs in the Ensure the door can be fully closed . To remove the frost, compartment please refer to the cleaning and care chapter.
- Page 31 Problem Possible cause & Solution Did you wait for 10 hours after installation of the water supply line before making ice? if it is not sufficiently cool, it may take longer to make ice, such as when first installed. Is the water line connected and the water valve open? Did you manually stop the ice making function? Make Ice is not sure you have set the Cubed or Crushed mode on.
-
Page 32: Disposal Of The Appliance
Disposal of the appliance It is prohibited to dispose of this appliance as household waste. Packaging materials Packaging materials with the recycle symbol are recyclable. Dispose of the packaging into a suitable waste collection container to recycle it. Before disposal of the appliance 1. - Page 34 MANUAL DE OPERACIONES DEL USSARIO Antes de operar este dispositivo, lea cuidadosamente este manual y Guárdalo para futuras referencias. HRM260N6TSE Español Para preguntas sobre funciones, operación / rendimiento, componentes o servicios, llame al: 1-877-465-3566...
- Page 35 Resolución de problemas........................... Eliminación del aparato............................Introducción al español accidentes innecesarios. Guarde estas Gracias por elegir Hisense. Estamos seguros instrucciones y asegúrese de que de que disfrutará utilizar el nuevo permanezcan junto con el aparato en refrigerador. Sin embargo, antes de utilizar...
-
Page 36: Información De Seguridad Y Advertencias
Información de seguridad y advertencias Al momento de colocar el aparato, Seguridad general asegúrese de que el cable de alimentación no esté atrapado ni dañado. Este aparato está diseñado para ser utilizado en el hogar y las aplicaciones No coloque múltiples conectores similares tales como portátiles ni fuentes de alimentación 1.áreas de cocinas de personal en... - Page 37 No coloque objetos calientes cerca de Seguridad eléctrica los componentes de plástico de este aparato. No se debe alargar el cable de alimentación. Este aparato refrigerante no está diseñado para usar como aparato Asegúrese de que el enchufe de integrado. alimentación no esté...
- Page 38 Se aconseja esperar al menos cuatro No quite ni toque los artículos del horas antes de conectar el aparato para congelador con las manos mojadas/ permitir que el aceite fluya hacia el húmedas, ya que podrían causar compresor. abrasiones en la piel o quemaduras de frío.
-
Page 39: Instalación Del Nuevo Aparato
Instalación del nuevo aparato Antes de utilizar el aparato por primera vez, debe tener en cuenta los siguientes consejos. Advertencia Para realizar una instalación adecuada, se debe colocar el refrigerador sobre una superficie nivelada de material duro que esté a la misma altura que el resto del suelo. - Page 40 Estabilización del aparato Ajuste de la Altura y el Espacio Para una estabilización y una de la Puerta circulación de aire suficientes en la La altura de la puerta puede ajustarse sección trasera inferior del aparato, es utilizando los Anillos de Retención posible que sea necesari ajustar las provistos.
- Page 41 Retirada de las Puertas Si la puerta de acceso a su hogar es demasiado estrecha para que pase el refrigerador, retire las puertas y los cajones Gancho del refrigerador. Si no necesita retirar las puertas del aparato, consulte "Instalación de las tuberías de agua" en la página 10. Si necesita retirarlas, siga leyendo.
- Page 42 10. Saque la puerta del medio. 7. Abra completamente la puerta central. 8. Saque el cajón superior. 11. Tire de la puerta y el cajón del congelador para abrirlos completamente. 9. Retire los dos tornillos que fijan el marco 12. Saque el cajón del medio. de soporte.
- Page 43 13. Saque el cajón inferior. Instalación de las tuberías de agua El dispensador de hielo y agua con filtro es una de las características más útiles de su nuevo aparato. Para ayudar a fomentar una mejor salud, el filtro de agua elimina las partículas no deseadas del agua.
- Page 44 3. Conecte la tubería de extensión de 1/4" a Qué necesita tener antes deempezar la salida de la válvula de cierre. 1. Taladro eléctrico y broca de 1/4". 2. Llave de 1/2" o ajustable. 3. Destornilladores de punta plana o Philips Válvula de Cierre de Tuerca de...
- Page 45 Tuberías de agua de 1/4" 6. Abra el agua y compruebe si hay fugas. Tuerca de compresión de 1/4" Virola (Casquillo) Conector de Latón Entrada de Agua 7. Compruebe que la tubería de agua de 1/4" esté asegurada tirando suavemente de Conexión de la Tubería de Agua ella.
-
Page 46: Descripción Del Aparato
Descripción del aparato Vista del aparato 13. Cajón Inferior del 01. Módulo Wi-Fi (si lo tiene) 07. Estante de Cristal 02. Luz LED del Refrigerador 08. Luz Lateral del Refrigerador Congelador 14. Puerta Izquierda del 03. Filtro de Agua 09. Cajón de Almacenamiento 04. -
Page 47: Controles De La Pantalla
Controles de la pantalla El producto dispone de un panel de control en la puerta del refrigerador. Utilice el aparato siguiendo estas pautas de control. se detendrá después de 8 minutos. En La pantalla se iluminará cuando se conecte el refrigerador por primera vez. caso de alarma, usted puede tocar el botón Alarm para cancelarla, luego, el Sin embargo, las luces se apagarán... - Page 48 "Control de Temperatura del Frigorífico" Si toca el botón de forma continua, la Mantenga presionado el botón durante temperatura se configurará con la 3 segundos, el ícono " " se iluminará y siguiente secuencia. la configuración de temperatura del congelador mostrará -11°F (-24°C). Súper Congelación puede bajar rápidamente la temperatura del congelador y congelar la comida mucho más rápido...
- Page 49 " se iluminará, si selecciona la refrigerador o en el sistema de servicio función de Triturado, el ícono " " se de posventa de Hisense. Asegúrese de iluminará y el ícono " " permanecerá que el filtro nuevo es del mismo tipo iluminado cuando se elija la función...
-
Page 50: Conexión De Su Refrigerador A Wi-Fi
funcionando, pero no genera aire frío. Los indicadores en el panel de control mostrarán "OF". Para cancelar este modo, mantenga presionando los botones "Alarm" y "°F/°C" al mismo tiempo durante 3 segundos y el timbre hará un sonido largo. Conexión de su refrigerador a Wi-Fi Nota Aplicación ConnectLife ConnectLife es una aplicación para el... - Page 51 Conexión del refrigerador 5. Localice "Refrigerador" en la lista de aparatos y selecciónalo. Una vez que haya instalado la aplicación Connectlife, inicie sesión o 6. Siga las instrucciones de la cree una cuenta y sigue los pasos aplicación para conectar su que se indican a continuación: refrigerador.
-
Page 52: Uso Del Aparato
Uso del aparato Uso del compartimiento frigorífico Nota El compartimento frigorífico es apto para almacenar verduras y fruta. Antes de cerrar la puerta Debe sellar los alimentos para izquierda, asegúrese de que el evitar la pérdida de humedad o parteluz esté plegado hacia para que los sabores se impregnen dentro. - Page 53 Nota Desatornille el cajón antes de sacarlo. 1. Estire del cajón hasta su máxima extensión. 2. Levante el cajón para retirarlo. Estantes Ajustables 3. Siga los pasos 1 y 2 en orden inverso para volver a colocar el Es posible ajustar la altura de los estantes para adaptarse a sus cajón.
- Page 54 Posición rompa el hielo utilizando un utensilio Sugerida de plástico y elimínelo. No utilice Unas 2 pulgadas herramientas filosas para romper el (50mm) hielo. Esto puede dañar el recipiente de hielo. No almacene otros artículos que no Posición Sugerida sea hielo en el recipiente. Unas 2 pulgadas Si el hielo se pega a la pared, rompa (50mm)
- Page 55 2. Levántela suavemente la cubitera de la cubitera. Puede provocar daños físicos o daños en el de hielo y tire de ella lentamente producto. mientras sujeta el parte de abajo de la cubitera con una mano y el lateral con la otra. Reemplazo del filtro de agua Consulte el manual del propietario para un mantenimiento y...
- Page 56 Nota Vuelva a abrir el suministro de agua. Después de eso, debe comprobar las fugas. Si hay, repita los pasos 1 a 5 de la operación anterior. Si todavía hay fugas, deje de utilizarlo y llame a su distribuidor. 3. Introduzca el nuevo filtro de agua en el orificio y, al mismo tiempo, gírelo unos 90°...
- Page 57 El suministro de agua por ósmosis Nota inversa es importante La presión del suministro de agua Asegúrese de purgar todo el que sale por el sistema de ósmosis dispensador; de lo contrario, el inversa hacia la entrada de la agua puede gotear desde el válvula del refrigerador debe ser de dispensador.
-
Page 58: Limpieza Y Cuidado
Limpieza y cuidado Por motivos de higiene, se debe Por motivos de higiene, se debe Advertencia Advertencia limpiar periódicamente (al menos limpiar periódicamente (al menos cada dos meses) el aparato (así cada dos meses) el aparato (así No utilice objetos afilados, ya que No utilice objetos afilados, ya que como los accesorios exteriores e como los accesorios exteriores e... - Page 59 Aunque esta unidad se descongela automáticamente, puede producirse una capa de escarcha en las paredes interiores del congelador si la puerta del congelador se abre con frecuencia o se mantiene abierta durante demasiado tiempo. Si la escarcha es demasiado gruesa, elija un momento en el que el congelador esté...
-
Page 60: Sugerencias Y Consejos Útiles
Sugerencias y consejos útiles Consejos de ahorro de energía Sugerencias de refrigeración Le recomendamos que siga los Carne (Todo Tipo) envuelto en consejos de ahorro de energía. bolsas de polietileno: envuélvala y Intente evitar mantener la puerta colóquela en el estante de cristal abierta durante mucho rato para que hay sobre el cajón de las ahorrar energía. - Page 61 Se recomienda etiquetar y fechar Apagado del aparato cada paquete congelado para Si tiene que apagar el aparato mantener un registro de su tiempo durante un largo periodo de de almacenamiento. tiempo, debe seguir los siguientes pasos para evitar que le salga Sugerencias para refrigerar moho.
- Page 62 Problema Causa posible y Solución La temperatura ambiental es demasiado baja. Intente establecer la temperatura de la cámara en un nivel más frío para solucionar este problema. El aparato no funciona Es normal que el refrigerador no funcione durante el ciclo de correctamente descongelación automática, o durante un breve tiempo después de encender el aparato para proteger el...
- Page 63 Problema Causa posible y Solución Compruebe que las salidas de aire no estén bloqueadas con alimentos y asegúrese de que la comida esté colocada Hay una capa dentro del aparato de forma que permita una ventilación de escarcha en suficiente. Asegúrese de que la puerta esté...
- Page 64 Problema Causa posible y Solución ¿Ha esperado 10 horas después de la instalación de la línea de agua antes de empezar a producir hielo? Si no está lo suficientemente frío, el hielo tardará más tiempo en producirse como durante la primera instalación. ¿Está...
-
Page 65: Eliminación Del Aparato
Eliminación del aparato Está prohibido eliminar este aparato con los residuos domésticos. Materiales de embalaje Los materiales de embalaje con el símbolo de reciclaje son reciclables. Deseche el embalaje a un contenedor de recogida de residuos adecuado para reciclarlo. Antes de eliminar el aparato 1.
Need help?
Do you have a question about the HRM260N6TSE and is the answer not in the manual?
Questions and answers
What is the model number of the Water Filter? Where can you purchase it?
The model number of the water filter for Hisense HRM260N6TSE is HX2019F-A or HX2019FR-A.
This answer is automatically generated
Is the water supply plumbed in?
Yes, the water supply for the Hisense HRM260N6TSE is plumbed in. It connects to a waterline tube fitting and requires proper insertion and securing of the water pipe.
This answer is automatically generated
How to get the water filter out a to change it
To remove the water filter from the Hisense HRM260N6TSE:
1. Pull the water filter downward.
2. Turn it about 90° counterclockwise.
3. Carefully take it out while keeping the filter head tilted upward to prevent water from leaking.
This answer is automatically generated
Showing EB code on the door.