Advertisement
Quick Links
• "
CAUTION" messages in this Guide contain information that we ask you to follow in
order to avoid the possibility of physical injury to you or others.
• "NOTICE" messages in this Guide contain information that we ask you to follow in order
to avoid the possibility of malfunction/damage to the product, damage to data, or
damage to other property.
• "NOTE" messages in this Guide contain instructions and additional information that
might be helpful.
• All illustrations included in this user guide are for the purpose of explaining operation.
• Windows is a registered trademark of Microsoft® Corporation in the United States and
other countries.
• macOS and App Store are trademarks of Apple Inc., registered in the U.S. and other
countries.
• IOS is a trademark or registered trademark of Cisco in the U.S. and other countries and is
used under license.
• Android and Google Play are trademarks of Google LLC.
• The company names and product names in this guide are the trademarks or registered
trademarks of their respective companies.
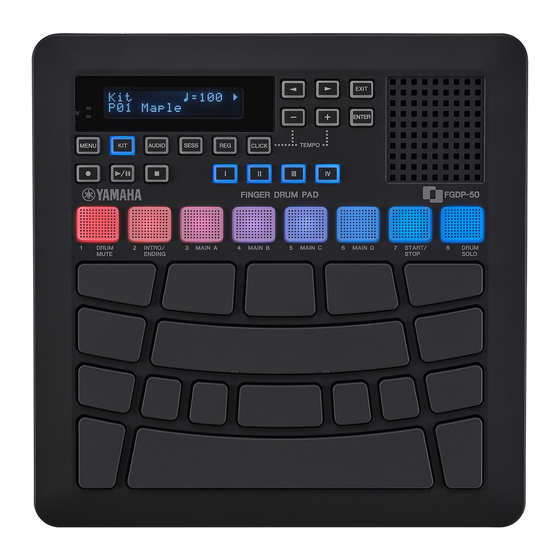
Finger Drum Pad
FGDP-50 User Guide
FGDP-50 User Guide
1
Advertisement

Related Manuals for Yamaha FGDP-50


Summary of Contents for Yamaha FGDP-50
- Page 1 Finger Drum Pad FGDP-50 User Guide • " CAUTION" messages in this Guide contain information that we ask you to follow in order to avoid the possibility of physical injury to you or others. • "NOTICE" messages in this Guide contain information that we ask you to follow in order to avoid the possibility of malfunction/damage to the product, damage to data, or damage to other property.
- Page 2 “Precautions” at the beginning of this booklet, product package) which can also be obtained from the Yamaha website. On the following site, enter “FGDP” in the Model Name box, and then execute the Search.
- Page 3 This button lets you select Menu Mode. See this page for details. Kit button (with LED) This button lets you select Kit Mode. See this page for details. Audio button (with LED) This button lets you select Audio Mode. See this page for details. FGDP-50 User Guide...
- Page 4 See this page for details. Enter button This button lets you move down one menu level from the current display on the LCD screen, or execute functions such as loading or saving. See this page for details. FGDP-50 User Guide...
- Page 5 This button lets you start playback of an audio file in the root directory of a USB flash drive connected to the [USB TO DEVICE] terminal, or pauses the audio file at the current playback position. Stop button This button lets you stop the playback of an audio file. FGDP-50 User Guide...
- Page 6 Voices that are assigned for the currently selected Kit. When the [SESS] button is on, they function as Pads for the Session Creator Mode. See this page for details. In addition, these Pads glow colorfully in response to your performance. See this page for details. FGDP-50 User Guide...
- Page 7 This micro-USB B terminal is used to charge the battery with a USB Power Adapter, to input/output audio signals, and to transmit/receive MIDI messages from/to a computer or smart device. See this page details about how to charge the battery. See this page for details about the other functions. FGDP-50 User Guide...
- Page 8 This is a stereo mini jack. By connecting a device like headphones or a live streaming device (mixer), you can output the sound of this product, including your Pad performance, and the audio signal input via the [AUX IN] jack. See this page for details. FGDP-50 User Guide...
- Page 9 B. USB power adapter (commercially available) Charging with a USB mobile battery (commercially available) Connect the USB mobile battery in the order of the numbers shown in the figure below. A. USB cable (included in the package) FGDP-50 User Guide...
- Page 10 Yamaha service personnel. NOTE When connected to a computer USB port or a USB power adapter with output current less than 1.5 A, the remaining battery power might decrease even while charging (with the Standby/On indicator (red) lit). FGDP-50 User Guide...
- Page 11 (“Battery xxx%”) is displayed on the LCD screen and the bottom (blue) Standby/On indicator flashes to indicate the battery level. Four flashes for 100–90%, three flashes for 80–60%, two flashes for 50–30%, and one flash for 20–0%. FGDP-50 User Guide...
- Page 12 To disable Auto Power Off, press and hold the [CLICK] button and the Standby/On button at the same time to turn on the power. “AutoPowerOff” is displayed on the LCD screen, then the product starts up with the Auto Power Off disabled ([MENU]→Utility→ AutoPowerOff=“Disabled”). FGDP-50 User Guide...
- Page 13 By default, the built-in speaker is automatically disabled when headphones or an external device is connected to the [PHONES/OUTPUT] jack. For details, see “ MENU→Utility→SpeakerOut.” Connecting Headphones CAUTION • Do not use headphones for a long period of time at a high volume level. Doing so could FGDP-50 User Guide...
- Page 14 Connecting a live streaming device A. Live streaming device B. Streaming [AUX IN] jack By using this jack, the built-in speaker can output the audio signal from an audio device such as a smart device or computer. FGDP-50 User Guide...
- Page 15 • See the “Charging” section in this guide for details about connecting a charging device. • Depending on the model of the computer/smart device and the OS, a USB connection might cause noise or might not work well. FGDP-50 User Guide...
- Page 16 B. USB conversion adapter (Type A females–Micro B male) sold separately C. USB conversion adapter (Type A females–Micro C male) sold separately Connecting to a smart device (iOS) Use the following items to make connections in the order of the numbers shown in the figure below. FGDP-50 User Guide...
- Page 17 Connecting to a computer (Windows) Install the Yamaha Steinberg USB Driver on your computer. The Yamaha Steinberg USB Driver can be downloaded from the following URL: https://download.yamaha.com/. Connect your computer to the [USB TO HOST] terminal via the included USB cable.
- Page 18 On your computer, open “Yamaha Steinberg USB Driver Control Panel,” and then set “Device:” to “Finger Drum Pad.” [USB TO DEVICE] terminal This product is equipped with a [USB TO DEVICE] terminal. When connecting a USB device to the [USB TO DEVICE] terminal, pay careful attention to the following points.
- Page 19 Turning off the power when a USB flash drive is connected Do not turn off the power if the USB flash drive is being accessed for playback/recording or file operations (save/load/format, etc.). Doing so could damage the USB flash drive or data. FGDP-50 User Guide...
- Page 20 There are two ways to set Pad operations: setting the Kit data in Kit Mode (for all Pads) or configuring the settings in Session Creator Mode (for A1 and A8 only). “NoteFunc” (function for Note On) and “ATFunc” (function for Aftertouch) are set in both modes. FGDP-50 User Guide...
- Page 21 When playing primarily with your left hand When [MENU] Utility PadLayout is set to “Left,” the Pad numbers are assigned as illustrated below. This setting is easiest when playing the Pads primarily with your left hand. FGDP-50 User Guide...
- Page 22 Menu Mode When the [MENU] button is lit, you can use the item selection buttons ([<][>] buttons) to make the following settings. • Mixer • Click • Trigger • Utility • File • FactoryReset • Version FGDP-50 User Guide...
- Page 23 Registration Memory can be saved in the User Registration Memory Bank (U01–U50). See this page details. You can use the item selection buttons ([<][>] buttons) to make the following settings. • LoadSetting FGDP-50 User Guide...
- Page 24 These operations are possible when the item name displayed on the LCD screen begins or ends with the marks shown below. Using the [ENTER] button to move down one menu level Using the [EXIT] button to move up one menu level FGDP-50 User Guide...
- Page 25 USB flash drive. Edit a name by using the [<][>] buttons to move the cursor and then using the [+][-] buttons to select a character at the cursor position. FGDP-50 User Guide...
- Page 26 See the following links for details. • Editing the name of a Kit this page for details about how to edit a name when saving user data. See this FGDP-50 User Guide...
- Page 27 This product has a “Sequencer” function that operates according to tempo values. The following four functions operate according to the Sequencer. • Click • Session Creator • Note Repeat for Pads • [MENU]→Utility→LEDPatAutoBar (LED Pattern Auto Bar) Data handled by this product FGDP-50 User Guide...
- Page 28 • Volume of sound output from the built-in speakers (See this page for details.) • Volume of sound output from the [PHONES/OUTPUT] jack (See this page for details.) • Settings in [MENU]→Mixer • Settings in [MENU]→Click • Settings in [MENU]→Trigger • Settings in [MENU]→Utility FGDP-50 User Guide...
- Page 29 If no cable is connected to the [PHONES/OUTPUT] jack, the volume output from the built-in speaker can be adjusted in the range 0–32. If a cable is connected to the [PHONES/OUTPUT] jack, the volume output from that jack FGDP-50 User Guide...
- Page 30 NOTE • You can change the Click volume, beat, and other settings in [MENU]→Click. • The Click sound does not start/stop when you press the [CLICK] button down. It starts/stops when you release the button. FGDP-50 User Guide...
- Page 31 Selecting a Kit (changing all Pad sounds at once) The collection of sounds assigned to all Pads is called a “Kit.” This product includes Kits for a wide variety of music genres. Select a Kit that best fits your style of playing. FGDP-50 User Guide...
- Page 32 A kit suitable for house performances, featuring a tight, machine- HouseRose like sound. The perfect kit for playing R&B, featuring samples from classic R&B drum machines. DubStepSun This dubstep-oriented kit adds a distinctive bass to the toms. FGDP-50 User Guide...
- Page 33 An EDM kit with a reverb reminiscent of stadium performances. EDM Blue A kit with lively toms that make it great for playing EDM. The tight, machine-like sound makes EDM Green a good choice for EDM Green EDM performances. FGDP-50 User Guide...
- Page 34 Intended for BeatBox performances, BeatBoxPeach has a light feel BeatBoxPeach thanks to its overall focus on mids and highs. A kit recorded using sound from Yamaha's legendary RX Series digital drum machines. Recorded using sounds from classic analog drum machines, this kit can be used for a wide range of genres from the 80s to modern music.
- Page 35 Pads H1 and H3 are set to “Send,” which mutes another Pad sound in the Group, while Pad H2 is set to “Receive,” which is muted by another Pad in the Group. Trying the Note Repeat function After selecting “P02 EDM Red,” press Pad K further. FGDP-50 User Guide...
- Page 36 You can play the Pads along with audio files (WAV) in the root directory of a USB flash drive. See this page for details about how to play audio files. If you want to balance the volume of the audio files with the sounds from the Pads, use FGDP-50 User Guide...
- Page 37 At the top screen of any mode other than Menu Mode, press and hold the [EXIT] button to enable the Panel Lock function. When the Panel Lock function is enabled, an “L” appears in the top row of the LCD screen. FGDP-50 User Guide...
- Page 38 Execute the same operation again to disable the Panel Lock function. NOTE • Even when the Panel Lock function is enabled, the power can still be turned off with the Standby/On button. FGDP-50 User Guide...
- Page 39 - VoiceEdit: Settings related to the voices assigned to Pads Interlock Edit: Linking the settings for each Pad After editing the settings, return to the top screen of Kit Mode and press the [ENTER] button to go to the User Kit save screen. FGDP-50 User Guide...
- Page 40 After editing the Kit Name, press the [ENTER] button to display the confirmation screen before saving. You can press the [EXIT] button here to cancel this operation. Press the [ENTER] button again to save the User Kit. FGDP-50 User Guide...
- Page 41 Adjust the amount of reverb applied to the Kit (send 0–127 amount). The amount applied to each Pad Voice is multiplied by the value set for VoiceEdit→ReverbSend. ChorusType Select the type of chorus to be applied to the Kit. See the Chorus Type List details. FGDP-50 User Guide...
- Page 42 Gate Reverb 1 GateReverb2 Gate Reverb 2 ReverseGate Reverse Gate Chorus Type List Chorus Type (Display) Full Name of Effect NoEffect No Effect Distortion Distortion Overdrive Overdrive AmpSim Amp Simulator Chorus1 Chorus1 Chorus2 Chorus2 Flanger Flanger Phaser Phaser FGDP-50 User Guide...
- Page 43 DynPhaser Dynamic Phaser GM Flanger GM Flanger DynFlanger Dynamic Flanger RingModulator Ring Modulator DynRingMod Dynamic RingMod AutoWah Auto Wah TouchWah Touch Wah DynFilter Dynamic Filter PadEdit This detailed explanation corresponds with Step 2 of the “Basic procedure.” FGDP-50 User Guide...
- Page 44 1/4 repeats on the “and” of all beats, 1/8 repeats on the “and” of each eighth-note, 1/16 repeats on the “and” of each sixteenth-note, and 1/32 repeats on the “and” of each thirty-second-note. If the value ends with a FGDP-50 User Guide...
- Page 45 This is used to mute (On) or not mute (Off) the Voice when a Pad that is being played back is sending Note Off. (If HoldMode=Off, do not press the Pad further. If HoldMode=On, hit the Pad one more time.) FGDP-50 User Guide...
- Page 46 If this item is set to a value less than that for Velocity Limit Low, playback will occur when the velocity is between 1 and the value set for Velocity Limit High and between the value set for Velocity Limit Low and 127. FGDP-50 User Guide...
- Page 47 The number of the designated Pad appears in the upper right corner of the LCD screen. Use the [+] and [-] buttons to set the value for that item. Default values are unique to each Kit. Selecting a Voice Item (Display) Description Setting Range FGDP-50 User Guide...
- Page 48 Press the [>] button to move to “Number.” Press the [+] and [-] buttons to select a Voice. Each time a selection is made, the corresponding Voice is generated (auditioned). See this page for the Voice List. FGDP-50 User Guide...
- Page 49 Adjusts the volume of the designated Pad Voice. 0–127 Sets the pan (stereo orientation) of the designated Pad Voice. L63–C–R63 Tuning Sets the pitch of the designated Pad Voice (1.0 = 100cent = -24.0–0.0–+24.0 semitone). For example, a larger value for a snare drum FGDP-50 User Guide...
- Page 50 T5, T3 and T4) are flipped. If you switch this item from Off to On, these symmetrical Pad pairs will have the same settings, as shown in the figure below. • If [MENU]→Utility→PadLayout is set to “Right,” the settings for the Pads on the right are applied to the Pads on the left. FGDP-50 User Guide...
- Page 51 • If [MENU]→Utility→PadLayout is set to “Left,” the settings for the Pads on the left are applied to the Pads on the right. FGDP-50 User Guide...
- Page 52 [USB TO DEVICE] terminal. Playback and recording settings Press the [>] button on the top screen of Audio Mode ([AUDIO] button on) to display the setting screens for playback and recording. Playback settings Item Description Setting Range Default (Display) Setting FGDP-50 User Guide...
- Page 53 USB flash drive are recorded. Audio input from the [AUX IN] jack will always be recorded regardless of this setting. When set to “On,” an Audio Loopback configured. FGDP-50 User Guide...
- Page 54 Playback of WAV files in the root directory of a USB flash drive* Audio input via the [USB TO HOST] terminal* Audio input via [AUX IN] jack * This source must be configured in Step 3 in order to be recorded. Configure the settings for recording. FGDP-50 User Guide...
- Page 55 If you want to record the playback of an audio file in the root directory of the USB flash drive, you can start playback of the file at this point. To start recording, press the Record button again. Start the performance to be recorded. You can play back/stop an audio file while recording. FGDP-50 User Guide...
- Page 56 “On” and save the same file to the root directory of the USB flash drive. →Audio Use the [+] and [-] buttons on the top screen of Audio Mode to select a file to play back. FGDP-50 User Guide...
- Page 57 • Max. time: Up to approx. 20 seconds per file, approx. 300 seconds (stereo)/600 seconds (mono) in total Importing a single audio file Press the [MENU] button to enter Menu Mode, and then press the [>] button a few times to move to “File.” FGDP-50 User Guide...
- Page 58 [ENTER] button again to load the file. “Completed” is displayed to indicate that the file has been loaded. Importing multiple audio files in one operation All files in the root directory of a USB flash drive can be imported together in one operation. FGDP-50 User Guide...
- Page 59 “Completed” is displayed to indicate that the files have been loaded. Assigning User Samples to Pads You can assign User Samples (Voice Category 017) that have been loaded into the User Sample Memory to Pads to use during performance. FGDP-50 User Guide...
- Page 60 Press the [>] button to go to the Voice selection screen and then select the User Sample number (001–100) you want to assign. The User Sample is now assigned to the designated Pad. Save the Kit as a User Kit (U01–U50), if necessary. this page for details. FGDP-50 User Guide...
- Page 61 Selecting a session for your performance On the top screen of Session Creator Mode, press the [+] and [-] buttons to select a session. this page for the Session List. Hit the [7 START/STOP] RGB Square Pad to start playback. FGDP-50 User Guide...
- Page 62 Creator Mode. To stop the session, return to Session Creator Mode and hit the [7 START/STOP] RGB Square Pad. Session List Session Name Full Name of Tempo Kit Number Kit Name (display) (Display) Session SynthPop Synth Pop Maple ElectroPop Electro Pop HouseRose RockFast Rock Fast GaragePunk FGDP-50 User Guide...
- Page 63 Set the section you want to play back. In the example shown in the following figure, playback is set to start with the Intro section and then switch to the Main A section when Intro playback ends. The [2 FGDP-50 User Guide...
- Page 64 If you hit the Pad for a section that is playing, it immediately returns to the beginning of that section and continues playing. To end playback of the session, hit the [2 INTRO/ENDING] RGB Square Pad. When playback of the Ending section ends, the session stops playing. FGDP-50 User Guide...
- Page 65 • Switching to the Main section while the Intro section is playing (Main A in the figure below) The [2 INTRO/ENDING] RGB Square Pad is on and the Main RGB Square Pad to be switched to is blinking. FGDP-50 User Guide...
- Page 66 • Switching to a Main section when playback of the Ending section ends (switching to Main A in the figure below) The [2 INTRO/ENDING] RGB Square Pad is on and the Main RGB Square Pad to be switched to is blinking. FGDP-50 User Guide...
- Page 67 Operates as configured in “PartOnOff.” Mute Mutes the drums regardless of the setting for “PartOnOff.” All parts other than the drum part operate as configured in “PartOnOff.” Solo Plays only the drums regardless of the setting for “PartOnOff.” FGDP-50 User Guide...
- Page 68 No setting is configured. When a Pad (except the RGB Square Pads when in Session Creator Mode) is hit, the session will start playing. Settings related to the timing for switching sections Item (Display) Description and Setting Range Default Setting FGDP-50 User Guide...
- Page 69 [+] and [-] buttons to set them. Lock Target Setting Range Default Setting (Display) Reset, Hold, Lock Reset Tempo Reset, Hold, Lock Reset Section Reset, Hold, Lock Reset PartOnOff Reset, Hold, Lock Reset Lock Target FGDP-50 User Guide...
- Page 70 These settings are related to the functions when operating Pad A1 or Pad A8 in Session Creator Mode. They include the following two settings. • [SESS]→PadSetting→NoteFunc ⇒ See this page for details. • [SESS]→PadSetting→ATFunc ⇒ See this page for details. FGDP-50 User Guide...
- Page 71 • Red: A setting is registered for this button, and it was the last button registered/triggered. Red, blinking temporarily: A setting has just been registered for this button. Registering the current settings in Registration Memory Press and hold a button ([I]–[IV]) until the LCD screen indicates that registration is complete. FGDP-50 User Guide...
- Page 72 Use the [<] and [>] buttons to move the cursor and then use the [+] and [-] buttons to select a character at the cursor position. Repeat these steps to finish the name. See this page for details. FGDP-50 User Guide...
- Page 73 User Registration Memory Bank. See this page for details about which items have their settings maintained even when the power is turned off. Recalling a Registration Memory Press the [REG] button to enter Registration Memory Bank Mode. FGDP-50 User Guide...
- Page 74 • Be careful not to hold down the [I]–[IV] buttons for too long. Pressing and holding down the [I]–[IV] buttons will overwrite the registered settings with the current settings. Registration Memory Bank List Bank Name Memor Description KitIdea With the effect preset kit “P01 Maple” selected, [KIT] KitEdit FGDP-50 User Guide...
- Page 75 (AllSoundOff), and A2 can be used to choke the sound of the Kit (KitChoke). With preset kit “P25 EDM Yellow” selected, the functions when the Pads are pressed further ([KIT]→PadEdit→ATFunc) are set for an appropriate effect. Various expressions can be FGDP-50 User Guide...
- Page 76 This bank allows you to recall the Kit you want to use during your performance with one touch. The following Kits are registered, starting with [I]. • P01 Maple • P10 ModernJazz • P14 GaragePunk • P16 Vintage70s Empty There is no data, so the button lamp is off. FGDP-50 User Guide...
- Page 77 Settings in Session Creator Mode (including section selection state). See this page for details. Mixer Settings in [MENU]→Mixer Click Settings in [MENU]→Click Trigger Settings in [MENU]→Trigger Utility Settings in [MENU]→Utility Tempo Tempo settings. See this page for details. FGDP-50 User Guide...
- Page 78 Trigger Name (Display) Description Normal Tx For all Pads, “VelCurve” and “ATCurve” are set to “Normal.” In addition, “MIDINote” for all Pads is set based on the GM (General MIDI) Drum Map. These settings are for controlling FGDP-50 User Guide...
- Page 79 For all Pads, “MIDINote” is set so that the numbers are ordered sequentially. These settings are for controlling the built-in tone generator from an external device via MIDI. Hard2 Rx For all Pads, “VelCurve” and “ATCurve” are set to “Hard2.” FGDP-50 User Guide...
- Page 80 Note On/Aftertouch settings, Note On related settings, MIDI Aftertouch for details about the items. Press the [<] button to return to the Trigger Select screen, and then press the [ENTER] button to move to “Save to.” FGDP-50 User Guide...
- Page 81 After editing the Trigger Name, press the [ENTER] button to display the confirmation screen before saving. You can press the [EXIT] button here to cancel this operation. Press the [ENTER] button again to save the User Trigger. FGDP-50 User Guide...
- Page 82 (On) or not (Off) when a MIDI message with the MIDI note number and MIDI channel for that Pad is received. Note On/Aftertouch settings This detailed explanation corresponds with Step 2 of the “Basic procedure.” Default values are unique to each Trigger. Item Description Setting Range FGDP-50 User Guide...
- Page 83 Offset1–5 VelMin Abbreviation for Velocity Minimum. 1–127 Sets the lower limit of the MIDI Velocity for the designated Pad. No matter how softly the Pad is hit, the MIDI Velocity generated will not drop below this value. FGDP-50 User Guide...
- Page 84 The relationship between how hard the Pad is pressed further and the Aftertouch will be determined by “ATCurve” (the next item). ATCurve Abbreviation for After Touch Curve. Loud2, Loud1, Normal, Hard1, Select an Aftertouch Curve for the designated Pad. Hard2, Fix1–5, Spline11–15, Spline21–25, FGDP-50 User Guide...
- Page 85 ATMax Abbreviation for After Touch Maximum. 1–127 Sets the upper limit of the Aftertouch for the designated Pad. No matter how strongly the Pad is pressed further, the Aftertouch generated will not rise above this value. FGDP-50 User Guide...
- Page 86 All User Registration Memory Banks (U01–U50) OneSample Abbreviation for One User Sample. Selected audio file (WAV or AIFF) in the root directory of a USB flash drive, and selected User Sample in the User Sample Memory on this product FGDP-50 User Guide...
- Page 87 Use this function to delete User Samples that have been imported into the User Sample Memory on this product. This function appears on the screen only when a User Sample (OneSample or AllSample) is selected as the target data. See this page for the operation procedure. FGDP-50 User Guide...
- Page 88 Use the [<] and [>] buttons to move the cursor and then use the [+] and [-] buttons to select a character at the cursor position. Repeat these steps to finish the file name. this page for details. FGDP-50 User Guide...
- Page 89 On the [MENU]→File screen, press the [ENTER] button to move to the Data Select screen. Use the [<] and [>] buttons to select Data. As data beginning with “One,” select either “OneKit,” “OneTrigger,” or “OneRegist.” Press the [ENTER] button to display the save screen. FGDP-50 User Guide...
- Page 90 Press the [ENTER] button again to save the file. If there is a file with the same name in the root directory of the USB flash drive, the confirmation message “Overwrite?” is displayed. To overwrite the existing file, press the [ENTER] button again. FGDP-50 User Guide...
- Page 91 Press the [ENTER] button. When “Save” is displayed, use the [<] and [>] buttons to select “Load.” If the file to be loaded is not stored in the root directory of the USB flash drive, “No File” will be displayed. FGDP-50 User Guide...
- Page 92 Use the [<] and [>] buttons to select Data. As data beginning with “One,” select either “OneKit,” “OneTrigger,” or “OneRegist.” Press the [ENTER] button. When “Save” is displayed, use the [<] and [>] buttons to select “Load.” FGDP-50 User Guide...
- Page 93 Press the [ENTER] button again to load the file. “Completed” is displayed to indicate that the file has been loaded. Renaming a file name On the [MENU]→File screen, press the [ENTER] button to move to the Data Select screen. FGDP-50 User Guide...
- Page 94 Press the [ENTER] button to display the confirmation screen for renaming the file. Press the [ENTER] button again to rename the file. If there is a file with the same name in the root directory of the USB flash drive, the FGDP-50 User Guide...
- Page 95 If the file to be deleted is not stored in the root directory of the USB flash drive, “No File” will be displayed. Use the [+] and [-] buttons to select the file to delete. Press the [ENTER] button to display the confirmation screen for deleting the file. FGDP-50 User Guide...
- Page 96 On the [MENU]→File screen, press the [ENTER] button to move to the Data Select screen. Use the [<] and [>] buttons to select “AllSample.” Press the [ENTER] button. When “Load” is displayed, use the [<] and [>] buttons to select “DeleteIntMem.” FGDP-50 User Guide...
- Page 97 Use the [<] and [>] buttons to select “OneSample.” Press the [ENTER] button. When “Load” is displayed, use the [<] and [>] buttons to select “DeleteIntMem.” Use the [+] and [-] buttons to select the User Sample to delete. FGDP-50 User Guide...
- Page 98 Make sure the USB flash drive does not contain any necessary data before formatting it. NOTE If a formatted USB flash drive is connected to the [USB TO DEVICE] terminal, the second line of this screen indicates the memory usage (used FGDP-50 User Guide...
- Page 99 Optimizing the memory might increase the amount of contiguous memory space available. Press the [ENTER] button on this screen to optimize the memory. NOTE The second line of this screen indicates the memory usage for User Samples (used capacity/total capacity). FGDP-50 User Guide...
- Page 100 T (Triplet), the Click will be generated on triplets of each of these settings. For SonClave and RumbaClave, a Click is generated in the pattern of a clave in Latin music. NOTE [MENU]→Utility→Swing setting generates a swing feel. FGDP-50 User Guide...
- Page 101 This setting emphasizes high frequencies. It creates a very bright sound. Mild This setting attenuates high frequencies. It creates a gentle listening experience. Powerful This setting uses a strong compressor. It creates a sense of sound pressure. FGDP-50 User Guide...
- Page 102 The larger the value in the positive direction, the greater the sense of swing. The larger the value in the negative direction, the greater the swing feeling with the down and up beats reversed. FGDP-50 User Guide...
- Page 103 1, 2, 5, 10, 15, 30, To prevent unnecessary power consumption, the 60, 120 min RGB Square Pad LED lights will enter sleep mode after a certain period of inactivity. Here you can set the time until sleep mode is activated. FGDP-50 User Guide...
- Page 104 Use this to reset all settings of this product to the factory defaults. NOTICE A factory reset will erase all data and return this product to its factory settings. Be sure to save important data to a USB flash drive before executing a factory reset. See this page FGDP-50 User Guide...
- Page 105 You can also execute a factory reset when turning the power on. If you press the Standby/On button while simultaneously holding down the [+] and [-] buttons, “FactoryReset” will be displayed on the LCD screen and the product will start up with all items reset to their factory settings. FGDP-50 User Guide...
- Page 106 Checking the firmware version You can check the firmware version of this product on the [MENU]→Version screen. FGDP-50 User Guide...
- Page 107 Number of Voices 1500 Note Repeat Each Pad Humanize Each Pad User Samples Number of User Samples (max.) Sample Format WAV, AIFF (44.1 kHz, 16-bit, mono/stereo) Sample Time (max.) approx. 600 seconds (mono), approx. 300 seconds (stereo), FGDP-50 User Guide...
- Page 108 Stereo mini jack USB TO HOST Micro B USB TO DEVICE Type A Sound System Amplifiers 2.5 W Built-in speaker 4 cm Power Supply Power Supply USB power adaptor 5 V/1.5 A or greater USB BC specification compatible products FGDP-50 User Guide...
- Page 109 *The contents of this manual apply to the latest specifications as of the publishing date. To obtain the latest manual, access the Yamaha website then download the manual file. Since specifications, equipment or separately sold accessories may not be the same in every locale, please check with your Yamaha dealer.
- Page 110 Aftertouch, and there are 25 types to choose from. Curves can be selected on the following screens as a Trigger item. • To select as a Velocity curve: [MENU]→Trigger→Note→VelCurve • To select as an Aftertouch curve: [MENU]→Trigger→AfterTouch→ATCurve Settings Velocity Curve/Aftertouch Curve Loud2 Loud1 Normal Hard1 Hard2 Fix1 Fix2 Fix3 Fix4 Fix5 FGDP-50 User Guide...
- Page 111 Note On/Aftertouch for Pads can be assigned for functions other than generating sounds and playing the Pads. Although settings are configured for each Kit, in Session Creator Mode they can also be assigned to A1 and A8 on the RGB Square Pads as common FGDP-50 User Guide...
- Page 112 On messages. The Control Change number is set in “Setting.” This value is the Velocity that is applied when the Pad is hit. The MIDI channel is set in [MENU]→Trigger. Default settings • Kit Mode: Varies by Kit FGDP-50 User Guide...
- Page 113 Naturally fades out the sound generated by the designated Pad. KitChoke Naturally fades out the sound generated by the Kit. AllSoundOff Fades out all sounds generated by this product. Volume* Changes the volume of all parts of the sound output from the product. FGDP-50 User Guide...
- Page 114 MIDI Control Change messages are output instead of Aftertouch messages. The Control Change number is set in “Setting,” and the Aftertouch value is applied. The MIDI channel is set in [MENU]→Trigger. * This setting must be configured on the “Setting” screen. FGDP-50 User Guide...
- Page 115 Part in a session When Function is set to a value Bass Part in a session other than Pan: Other1 Part in a session Off, Down, Up Other2 Part in a session Other3 Part in a session FGDP-50 User Guide...
- Page 116 Session List • Registration Memory Bank List • Trigger List The materials listed above, except for the Trigger List, can be downloaded from the Yamaha website. On the Yamaha Downloads site, enter “FGDP” in the Model Name box, FGDP-50 User Guide...
- Page 117 Yamaha Downloads https://download.yamaha.com/ Block Diagram MIDI MIDI is a protocol for communication between digital instruments. By connecting MIDI instruments to each other, your music performance on one MIDI instrument can be heard via another MIDI tone generator. FGDP-50 User Guide...
- Page 118 • MIDI Channel Message • MIDI System Exclusive Message The MIDI Reference materials can be downloaded from the Yamaha website. On the Yamaha Downloads site, enter “FGDP” in the Model Name box, and then execute the Search. Yamaha Downloads https://download.yamaha.com/...
- Page 119 Pads. hit the Pads. The current Trigger is set so Increase the value for the that no sound is generated by [MENU]→Trigger→ADGain. any Pads. [MENU]→Trigger→Note→NoteOut to “On.” [MENU]→Trigger→Note→VelFixVal to “Off” or a high value. FGDP-50 User Guide...
- Page 120 Set the smart device to airplane mode. near the product. The Pad settings InterlockEdit is set to “On.” Set InterlockEdit to “Off.” for the current Kit have been inadvertently changed. Sequencers this page for details about Sequencers. FGDP-50 User Guide...
- Page 121 Pad is hit the Pad. • “Velocity Fixed Value” and “Velocity strongly (softly). Curve” for each Pad • “Velocity Minimum” and “Velocity Maximim” for each Pad • “ADGain” for each Pad Other Problem Cause Solution FGDP-50 User Guide...
- Page 122 “Off,” or the [KIT]→PadEdit→NoteRepRat the LEDs on the value other than “Off,” and to “Off.” RGB Square Pads [KIT]→PadEdit→NoteRepRat changes when a for the Pad that is hit is set to Pad is hit. a value other than “Off.” FGDP-50 User Guide...
- Page 123 The selected audio file is in a format that is not supported by this product. Unsupported Please convert the file to a format that is supported by this product before Audio File selecting it. See this page for details about formats. FGDP-50 User Guide...
- Page 124 Write protection is enabled on the USB flash drive. USB Device Write Protect Disable the write protection on the USB flash drive. User Sample The memory for User Samples has been cleared. Clear © 2023 Yamaha Corporation Published 09/2023 YJ-A0 FGDP-50 User Guide...
Need help?
Do you have a question about the FGDP-50 and is the answer not in the manual?
Questions and answers