
Related Manuals for Yamaha DTXTREME


Summary of Contents for Yamaha DTXTREME
- Page 1 DRUM TRIGGER MODULE Owner’s Manual Owner’s Manual — Basic Section — — Basic Section —...
- Page 3 This product should be used only with the components supplied or; a cart, rack, or stand that is recommended by Yamaha. If a cart, etc., is used, please observe all safety markings and instructions that accompany the accessory product.
- Page 4 1. IMPORTANT NOTICE: DO NOT MODIFY THIS UNIT! This product, when installed as indicated in the instructions contained in this manual, meets FCC requirements. Modifications not expressly approved by Yamaha may void your authority, granted by the FCC, to use the product. 2. IMPORTANT: When connecting this product to accessories and/or another product use only high quality shielded cables.
- Page 5 • Save all data to an external device such as the Yamaha MIDI Data Filer MDF3, in order to help prevent the loss of important data due to a malfunction or user operating error.
-
Page 6: Introduction
Section. For you to get better informed about the DTXTREME, each manual is intended as follows: Basic Section Introduces how to set up the DTXTREME and its basic operations, as well as how to use the main features of the instrument. Reference Section Gives detailed explanations of how the DTXTREME is configured as a system and how to... -
Page 7: Features
A set of trigger-to-voice configurations can be stored as a “drum kit.” The DTXTREME stores up to 40 drum kits internally and up to 99 externally on Memory Card. Also, the DTXTREME comes with 60 preset drum kits. -
Page 8: Music Sequencer
MIDI channels (1 to 16). Since the DTXTREME can sync with an external sequencer, you can start recording by simply hitting a drum pad or the Start button on the DTXTREME or an external sequencer. The sequencer also offers step recording so that you can create or edit a song step-by-step while watching the displayed information on the DTXTREME. -
Page 9: Table Of Contents
Connecting to MIDI Equipment ...22 Connecting to a Personal Computer ...24 Power ...26 DTXTREME Basics ... 28 This is the DTXTREME! ... 28 Playing drum voices (Select and play drum kit) ... 30 Trigger Set Settings ... 30 Selecting and Playing a Drum Kit ... 31 Playing Along to a Song ... -
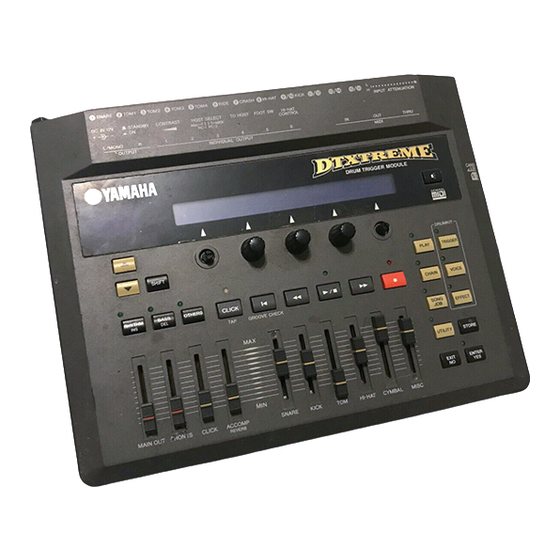
Page 10: Panel Descriptions
Shows information and data when operating the DTXTREME. ^ MAIN OUT slider Adjusts the final output volume from the DTXTREME as well as the output level from the OUTPUT L (MONO) and R jacks. & PHONES slider Adjusts the output volume level from the PHONES jack. - Page 11 3 Sound button You can press this button to audition a target voice while editing in Trigger Edit mode or Drum Kit Voice Edit mode, just like hitting a pad for the target voice. HI-HAT KICK 11 12 13 14 15 16 INPUT ATTENUATION HI-HAT...
-
Page 12: Rear Panel
MIDI THRU can output (redirect) the same MIDI messages received at MIDI IN. MIDI OUT can output MIDI messages generated in the DTXTREME, such as a drum kit performance or operations using panel controls, to an external MIDI device. Using these MIDI jacks, you can configure a large MIDI system including the DTXTREME, other MIDI tone generators, sequencers, and so on. - Page 13 DTXTREME can appropriately transfer MIDI messages to/from the computer. FOOT SW jack Connect a footswitch (Yamaha FC4 or FC5) to this jack. You can specify the footswitch function in Drum Trigger Edit mode. OUTPUT L/MONO and R jacks Outputs mixed audio signals from the DTXTREME to other audio equipment (amp, mixer, or so on).
- Page 14 CARD slot Insert the Memory Card (3.3-volt SmartMedia) to store or read DTXTREME data or files. AUX IN VOL control Adjusts the output volume of an audio source connected to the AUX IN jack.
-
Page 15: Connections
Connections To avoid risking electric shock and/or damage to your equipment, turn off the DTXTREME and devices before making connections. Connecting to Trigger Inputs Using Drum Pads It is recommended to first set up the drum pads in the rack to avoid misconnections (like connecting a tom pad to the SNARE input), and then connect each pad to the appropriate trigger input jack on the DTXTREME rear panel. - Page 16 Example 2 CRASH TOM1 PCY80S RHP80 RS95 KP120 TP80S HI-HAT RHP120SD SNARE HI-HAT CONTROL Example 3 CRASH TOM1 PCY80S TP80S RS80 KP60 HI-HAT TP80S RHP120SD SNARE HI-HAT CONTROL TOM2 KICK PCY10 PCY80S RHP80 RHP80 TOM2 KICK PCY10 PCY80S TP80S TP80S RIDE TOM3 RIDE...
- Page 17 After connecting pads, go to the [UT 6] TrgSet and set the pad type (page 73, Reference Section). Inputs 1 to 8 are all stereo inputs. You can connect the TP80S, RHP80/100/120(SD) and other pads which have a rim. Inputs 9/10, 11/12, 13/14 and 15/16 are all stereo jacks with separate trigger inputs for each jack’s left and right channels.
- Page 18 Optional Yamaha DT-series drum triggers are ideal for connecting acoustic drums to the DTXTREME as triggering devices. Combining these triggers with drum pads, you can set up a hybrid set of electronic and acoustic drums. First set up the drum pads and acoustic drums equipped with DT triggers, and then connect each pad or trigger to the appropriate trigger input jack on the DTXTREME rear panel.
-
Page 19: Attaching A Drum Trigger Pickup
Attaching a Drum Trigger Pickup To use acoustic drum as a triggering device, a Yamaha DT-series drum trigger needs to be attached. Attach it properly as described below. To the Bass Drum Attach the sensor portion of the trigger near the rim on the batter head. Ensure that the sensor does not touch the rim. -
Page 20: Detaching A Drum Trigger Pickup
Simply connect the master output jacks (OUTPUT L (MONO) and R) on the DTXTREME rear panel to the audio equipment. You can then play the DTXTREME sounds from speakers or record them to a recorder. - Page 21 When connecting the master output to a mono audio device, connect only to the OUTPUT L (MONO) jack. Powered Speaker (L) Powered Speaker (R) INPUT INPUT OUTPUT L / OUTPUT R jack MONO jack DTXTREME PHONES Headphones MD or Tape INPUT INPUT OUTPUT L / OUTPUT R jack...
-
Page 22: Connecting To Midi Equipment
(play) the DTXTREME tone generator. Here are several MIDI connection examples. n Each example described below needs the HOST SELECT switch on the DTXTREME rear panel to be set to “MIDI” to enable the outputting of performance information generated on the DTXTREME. - Page 23 Example 2: Controlling a MIDI Keyboard or Sequencer from the DTXTREME MIDI PC-2 PC-1 HOST SELECT DTXTREME (master) Example 3: Playing the DTXTREME tone generator from a MIDI Sequencer and Recording a DTXTREME Performance onto a MIDI Sequencer MIDI PC-2 PC-1 HOST SELECT...
-
Page 24: Connecting To A Personal Computer
Connecting to a Personal Computer Since the DTXTREME’s TO HOST port can directly connect to the computer’s serial port, the DTXTREME can transfer MIDI data to/from the computer while working as a MIDI interface for other MIDI devices. You can connect the DTXTREME to the computer in two ways: DTXTREME’s TO HOST directly connected to the computer’s serial port. - Page 25 You need appropriate MIDI application software designed for your computer. n If your computer has a USB port instead of a serial port, you cannot directly connect the DTXTREME’s TO HOST port to the computer. A USB-to-MIDI interface such as the Yamaha UX256 will let you connect the DTXTREME’s MIDI IN and OUT.
-
Page 26: Power
Always use the supplied AC power adapter (PA-5C or PA-D12). Power adapters other than this may cause malfunction or damage to the DTXTREME. Also, unplug the power adapter from the AC outlet if the DTXTREME is not used for an extended period. - Page 27 Turning on the DTXTREME n Before turning the system on or off, always turn down all volume controls for the DTXTREME and other audio equipment to avoid stressing (pop noises) speakers. Press the POWER switch on the rear panel to turn on the DTXTREME.
-
Page 28: Dtxtreme Basics
DTXTREME Basics This section contains simple explanations covering the basics of the DTXTREME by way of worked examples. For more in-depth coverage, refer to the appropriate pages in the separate, Reference Section Manual. This is the DTXTREME! Rear Panel L MONO... - Page 29 5 Return the song to the starting point. If you press this while holding down GROOVE CHECK the SHIFT button, you can use the Groove Check function. 6 Move the song position back by one measure. 7 Start/Stop song playback. 8 Move the song position forward by one measure.
-
Page 30: Playing Drum Voices (Select And Play Drum Kit)
Drum Kit List in the Reference Section manual for more details about each Drum Kit. Trigger Set Settings Before playing the DTXTREME, you need to apply the Trigger Set settings for the connected pads. 1. Go to the [UT 6] SYSTEM 2 page in Utility mode UTILITY 2. -
Page 31: Selecting And Playing A Drum Kit
Selecting and Playing a Drum Kit 1. Go to the Drum Kit/Song selection page PLAY n This page always appears when you power up the DTXTREME. 2. Select a Drum Kit number Drum Kit number Drum Kit name 3. Play the drums... - Page 32 (center to edge) of the head. This feature is usable when the RHP120SD pad is connected to the SNARE input on the DTXTREME rear panel. Special Snare Drum Some of the preset drum kits (e.g., P14, P15, etc.) offer the special snare drum for which you can select the shell material, head, muting method and so on, like a real acoustic drum.
-
Page 33: Playing Along To A Song
1. Go to the Drum Kit/Song selection page PLAY n This page always appears when you power up the DTXTREME. 2. Select a Song number n If you insert a memory card to the CARD slot which has a standard MIDI file (.mid) saved in format 0 in the root directory, you can select that MIDI file shown as “C***”... - Page 34 5. Adjust the volume level of the Song 1 Adjust the total volume. 2 Adjust the headphone volume. 3 Adjust the accompaniment and melody volume. 6. Select a Drum Kit number n When you select a Preset Song, the Drum Kit for that Song is selected automatically. However, you can then select a different Drum Kit if necessary.
- Page 35 8. Adjust individual volume levels of drum/percussion sounds Adjust individual volume levels: 1 Snare 2 Kick 3 Toms 4 Hi-hats 5 Cymbal 6 Other drum/percussion sounds 9. Change the tempo n Each Song has its own default tempo. When you select another Song, the tempo will automatically switch to the default tempo for the Song.
-
Page 36: Playing To A Click (Metronome)
Playing to a Click (Metronome) You can set the metronome to click at a certain tempo. This is useful when practicing your playing technique. 1. Start the click 2. Adjust the volume level of the click 3. Change the tempo of the click PLAY The Drum Kit/Song page is displayed when PLAY button is pressed. - Page 37 4. If necessary, change the beat of the click 5. Stop the click Setting and Changing the Click Sound You can change the voice used for the click in Utility mode pages [UT13] to [UT16] (page 77, Reference Section). You can also change the accent settings. CLICK...
-
Page 38: The Mute/Solo Feature
The Mute/Solo Feature As well as the rhythm part, each Song also has parts for bass, chords, melody and so on. During playback, you can selectively mute any parts. As mentioned earlier, for example, you can mute just the rhythm part and practice your playing technique. You can also control the volume levels of individual drum/percussion sounds in the rhythm part, allowing you to listen to just one drum sound in solo. -
Page 39: Checking The Groove Of The Rhythm (Groove Check Feature)
Checking the Groove of the Rhythm (Groove Check feature) When playing along to a song, you can check the timing of your performance. There are two ways of doing this, as explained below. Single shot timing: Measure the timing accuracy for each hit of the pad. This is useful when checking the groove of a particular instrument in the drum kit, such as the snare or kick drum. -
Page 40: Creating A Drum Kit
Creating a Drum Kit You can create your own original drum kits by choosing the drum voices to be included, then applying tuning, attack, decay, reverb level and other settings. You can then store your drum kit as one of up to 40 User Drum Kits. A further 99 drum kits can be stored on the Memory Card. - Page 41 You can also monitor the sound assigned to the pad by pressing the sound button on the front panel. Playing a GM Sound The DTXTREME’s tone generator is GM-compatible so it is also possible to assign GM sounds, as explained below.
- Page 42 6. Adjust the tuning (pitch) A value of “+1” raises the pitch by one semitone. You can adjust the pitch in the range “-24” to “+24.” 7. Use Page buttons to go to the [Voice3] page 8. Adjust the pan (stereo position) You can adjust the stereo position of each drum voice in the range L64 (far left) to R63 (far right).
- Page 43 10. Adjust the tone using the filter 1 Filter (Cutoff frequency) 2 Q (Quantity) By raising the cutoff frequency, the tone of the drum voice becomes brighter. By adjusting the Q (Quantity) parameter, the frequencies around the cutoff frequency are boosted. 11.
- Page 44 14. Select an output and set the effect path When set to “stereo,” the sound will be output in stereo from the OUTPUT jacks. If you select “InsFx1” or “InsFx2,” the sound will be output via the insertion effects (effects that can be applied to specific voices).
- Page 45 16. Enter Drum Kit Trigger Edit mode and enter a name for the drum kit PLAY TRIGGER 1 Move the cursor to the input position 2 Set the character at that position The drum kit you have created will initially have the same name as the existing kit you selected.
-
Page 46: The Chain Feature
The Chain Feature A Chain is a series of Drum Kits and Songs arranged in the order in which you want to use them. For example, you can arrange in order a series of Drum Kits for use in a live performance or a series of Songs for use during practice sessions. -
Page 47: Let's Try Recording (Real-Time Recording)
This section gives simple explanations on how to record your real-time performance. 1. Go to the Drum Kit/Song selection page n This page always appears when you power up the DTXTREME. 2. Select an empty User Song number n You cannot select a Preset Song or a song that is fully recorded. - Page 48 4. Enter Recording Standby state 5. Select the recording mode Replace: Your performance overwrites any existing data. n If the track to which you want to record already contains some data, you will not be able to record unless you select another (empty) track or clear your selected track in Song Job mode. OverDub: Your performance is added to any existing data.
- Page 49 8. Set the quantization level n Quantization is used to correct timing inaccuracies and the note length specified here is the resolution to which the notes will be corrected during recording. In general, this is usually set to the minimum note length in the performance.
-
Page 50: More Useful Features
More Useful Features! The DTXTREME has many more features. Let’s take a brief look at how to make even better use of the DTXTREME. n Each cross-reference (description of the page number) in this section is found in the separate Reference Section manual. - Page 51 To use it as a MIDI controller [FootSW1] Func, MIDI, Type, [FootSW2] OnValue, OffValue in Drum Kit Trigger Edit mode (page 39) You can set the DTXTREME to temporarily ignore trigger signals from the connected pads and controllers. [UT6] TrgByps in Utility mode (page 73) The above features can also be switched on/off via the pads.
- Page 52 [MIDI EG] in Drum Kit Trigger Edit mode (page 37) Effects Settings The DTXTREME has reverb and chorus effects that apply to the entire sounds, and also two Insertion Effects that apply to individual drum voices. Three-demensional (3D) effects from Localizer can be used to give added realism to the sound when heard through headphones.
- Page 53 MIDI devices. Using the MIDI connectors, you can use the DTXTREME’s pads to play sounds on an external synthesizer, or use a computer or sequencer to control the DTXTREME. Therefore, you can use the DTXTREME as one part of a much larger music setup.
- Page 54 Transmission and Reception of Bulk Data You can output the DTXTREME’s internal settings as bulk data to an external MIDI device or computer. For example, you can create data backups by sending data to an external MIDI storage device such as the Yamaha MDF3 MIDI Data Filer. You can also send data back from such a device to the DTXTREME.
- Page 55 For details of products, please contact your nearest Yamaha or the authorized distributor listed below. Pour plus de détails sur les produits, veuillez-vous adresser à Yamaha ou au distributeur le plus proche de vous figurant dans la liste suivante. Die Einzelheiten zu Produkten sind bei Ihrer unten aufgeführten Niederlassung und bei Yamaha Vertragshändlern in den jeweiligen...
- Page 56 String, Guitar & Percussion Division, Yamaha Corporation © 2000 Yamaha Corporation Printed in Taiwan...
Need help?
Do you have a question about the DTXTREME and is the answer not in the manual?
Questions and answers