Table of Contents
Advertisement
Quick Links
Advertisement
Table of Contents

Related Manuals for suprema BioStation 3


Summary of Contents for suprema BioStation 3
- Page 1 BioStation 3 USER GUIDE Version 1.04 English EN 102.00.BS3 V1.04...
-
Page 2: Table Of Contents
CONTENTS Safety Instructions Authentication Instructional Icons Auth Mode Registering Auth Mode Modifying Auth Mode Introduction Delete Auth Mode Operation Components Face Name and Function of Each Part T&A Mode Cables and Connectors Correct Face Enrollment and Authentication Method Settings Note for QR Code Usage and Device License Display &... - Page 3 CONTENTS Event Logs Appendices Search Event Logs Disclaimers Delete All Logs Copyright Notice View Log Usage Open Source License GNU General Public License GNU Lesser General Public License Troubleshooting OpenSSL License Original SSLeay License Product Specifications Dimensions Regulatory Information Regulatory & Licenses FCC Compliance Information EU Declaration of Conformity (CE)
-
Page 4: Safety Instructions
Safety Instructions Please read this safety instructions before you use the product to prevent injury to yourself and others and to prevent property damage. The term ‘product’ in this manual refers to the product and any items provided with the product. Instructional Icons Warning: This symbol indicates situations that could result in death or severe injury. - Page 5 The product may be affected by radio frequencies emitted by other products and the product may malfunction. Use the IEC/EN 62368-1 approved power adapter that supports higher power consumption than the product. It is highly recommended to use the power adapter sold by Suprema. •...
- Page 6 Safety Instructions Caution Operation Do not drop the product or cause impacts to the product. • The product may malfunction. Do not disconnect the power supply while upgrading the firmware of the product. • The product may malfunction. Do not disclose the password to others and change it regularly. •...
-
Page 7: Introduction
When assembling the product with the bracket, you can use the included bracket fixing screw (Star Shaped) instead of the product fixing screw for enhanced security. • For more details regarding the product installation, visit the Suprema website (https://www.supremainc. com) and refer to the installation guide. -
Page 8: Name And Function Of Each Part
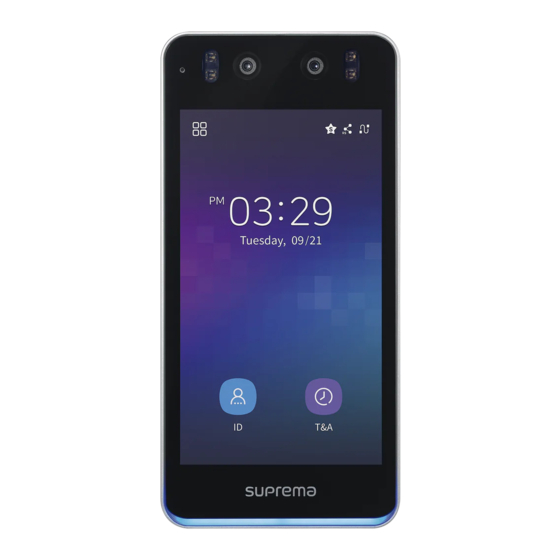
Introduction Name and Function of Each Part Infrared Camera Visual Camera LCD Screen RF card and mobile access card authentication unit LED Indicator Speaker Ethernet TTL Input (5-pin) USB Expansion Port (5-pin) Wiegand Output (4-pin) RS-485 (4-pin) Wiegand Input (4-pin) Relay (3-pin) Power Supply (2-pin) USB (Type-C) Memory Slot... - Page 9 Introduction Name Description Indicates the operational status of the device with the color of the LED. • Green: Authentication success. • Red: Authentication failure. • Blue: Normal operation. • LED Indicator Blue/Green blinking: ‒ Fails to receive an IP address when DHCP is enabled. ‒...
-
Page 10: Cables And Connectors
Introduction Cables and Connectors Power supply Name Color PWR +VDC Red (White stripe) PWR GND Black (White stripe) Relay Name Color RLY NO White RLY COM Blue RLY NC Orange RS-485 Name Color 485 TRXP Blue 485 TRXN Yellow 485 GND Black SH GND Gray... - Page 11 Introduction TTL Input Name Color TTL IN0 TTL IN1 Yellow TTL IN2 Orange TTL GND Black SH GND Gray Wiegand Input Name Color WG D0 Green WG D1 White WG GND Black SH GND Gray Wiegand Output Name Color WG D0 Green WG D1 White...
-
Page 12: Correct Face Enrollment And Authentication Method
Introduction Correct Face Enrollment and Authentication Method Cautions for enrolling a faces • When enrolling a face, maintain a distance of 60–100 cm between the device and the face. • Do not change your face expression. • Do not wear masks, hats, or eye patches. •... -
Page 13: Note For Qr Code Usage And Device License
Introduction Note for QR Code Usage and Device License How to scan a QR code You can issue a QR code to a user and use it as an authentication method. Scan the QR code properly by following the instructions on the screen to increase the recognition rate. •... -
Page 14: Admin Menu
Admin Menu DASHBOARD Press and authenticate with the Admin level credential. Check current device usage and information on the DASHBOARD. Or select the Enroll Wizard to immediately register a user. To Enroll a user or set up a device, select the desired menu from the bottom of the dashboard. If the administrator has not been designated, the DASHBOARD screen will be displayed when you press... -
Page 15: User
User Registering User Information The user information including credentials can be registered. Press and authenticate with the Admin level credential. → Select USER , and choose a credential you want to enroll. There are two steps for the user registration. Some options are available after the credential has been registered. •... - Page 16 • You can enroll visual face not only directly from BioStation 3 but from the BioStar 2 by uploading photos or importing CSV files. You can also enroll visual face with your smartphone via a link sent from BioStar 2.
-
Page 17: Modifying User Information
User Modifying User Information User Management or Administrator can modify the registered user information. A card or face can be added, and PIN and level can be modified. Press and authenticate with the Admin level credential. → Select USER Select your search terms. You can search for a user by All, User ID, Name, Face and Card. Select the user to modify. -
Page 18: View User Usage
User View User Usage You can see the number of registered users, faces, and cards at a glance. Press and authenticate with the Admin level credential. → Select USER . User usage information appears. -
Page 19: Authentication
Authentication Auth Mode Set the authentication mode. You can make a combination of Face, PIN, Card / QR Code, or ID and you can also set a schedule for each authentication mode. Registering Auth Mode Press and authenticate with the Admin level credential. →... -
Page 20: Modifying Auth Mode
Authentication Set the authentication mode as desired and configure the Schedule. Category Description • : Mode to use a face only Face • : Mode to authenticate with a face and then enter PIN • : Mode to use a card / QR code only •... -
Page 21: Delete Auth Mode
Authentication Delete Auth Mode Press and authenticate with the Admin level credential. → Select AUTHENTICATION Auth Mode. Press and select the authentication mode to delete. You can select multiple options. To delete the selected option, press OK. Operation Server Matching You can set up server matching. - Page 22 Authentication QR Authentication You can activate QR code authentication. Press and authenticate with the Admin level credential. Select AUTHENTICATION and activate QR Authentication in Operation. • QR Authentication: Set whether to use QR Code authentication through the device's camera. • Use QR as Card: Allows authentication with a QR code of the same data as the issued CSN card or Wiegand card.
-
Page 23: Face
Authentication Face You can change the configuration for facial authentication. Press and authenticate with the Admin level credential. → Select AUTHENTICATION Face. Select and set the desired item. • Motion Sensor: Set the sensitivity for detecting motion near the device. If Motion Sensor is set to Off, tap the screen to authenticate the face. - Page 24 Authentication • ToM Enrollment: Enabling ToM Enrollment can be enrolled the Template on Mobile issued by BioStar 2. Template on Mobile is a Mobile Access card in which the user’s biometric templates can be stored so you can still use biometric authentication although your biometric information is not stored in BioStar 2 server, Airfob Portal, or device.
-
Page 25: T&A Mode
Authentication T&A Mode You can set how to register T&A mode. Press and authenticate with the Admin level credential. → Select AUTHENTICATION T&A. Select and set the desired item. • T&A Mode: Set the method to use T&A mode. → •... -
Page 26: Settings
Server Private Msg. is enabled on the device. For more detailed information about the BioStar 2 Device SDK, visit the BioStar 2 Device SDK web page on the Suprema Knowledge Base (kb.supremainc.com/bs2sdk/). •... -
Page 27: Network
Settings • Message Timeout: Set the time (sec) for a setting complete message or information message to disappear automatically. • Backlight Timeout: Set the time (second) to turn off the lighting of LCD screen. • Voice Instruction: Set to use the voice instruction instead of alarm sounds. •... -
Page 28: Wireless
Settings Wireless Press and authenticate with the Admin level credential. → → Select SETTINGS NETWORK Wireless. The list of networks available to connect will be displayed. Select the network you wish to connect to and enter the password. When you press OK, the connection to the wireless network will be made. -
Page 29: Server
Settings Server Press and authenticate with the Admin level credential. → → Select SETTINGS NETWORK Server. Change the desired item. → • Device Server: You can send a connection signal from the device to a server with the input information →... -
Page 30: Devices
Settings Devices Intercom Set the account and extensions of intercom. Press and authenticate with the Admin level credential. → → Press SETTINGS DEVICE Intercom. When enable is set for Intercom, you can set the SIP Account and the Extensions. Ensure to set each item correctly. -
Page 31: License
Settings License You can activate device licenses or view Licenses in Slave Devices and Activated Licenses in Device. Press and authenticate with the Admin level credential. → → Press SETTINGS DEVICE License. To activate the device license, connect the USB with the license to the device and select Licenses that can be activated appear on the screen. -
Page 32: Relay
Settings Relay You can set the Open Time and the input port of the Exit Button in the device. Press and authenticate with the Admin level credential. → → Select SETTINGS DEVICE Relay. • Relay: You can set whether relay is enabled or not. To set the Open Time and the input port of the Exit Button, activate this option. -
Page 33: Date & Time
Settings Date & Time You can set date and time. Set the date and time accurately in order to collect accurate log data. Press and authenticate with the Admin level credential. → → Select SETTINGS DEVICE Date & Time. Change the desired item. •... -
Page 34: Daylight Saving Time
Settings Daylight Saving Time You can use the device by applying daylight saving time. Set the start and end time correctly. Press and authenticate with the Admin level credential. → → Select SETTINGS DEVICE Daylight Saving Time and then press to add additional daylight-saving time. -
Page 35: Device Information
Settings Device Information You can view the model name, device ID, serial number, device and firmware version, kernel, and MAC address. Press and authenticate with the Admin level credential. → → Select SETTINGS DEVICE Device Info. You can view the information including Model Name, Device ID, Serial No., HW, FW, Kernel and MAC. -
Page 36: Memory Information
Settings Memory Information View the status of memory usage. Press and authenticate with the Admin level credential. → → Select SETTINGS DEVICE Memory Info. You can view the memory usage status of the device. USB Memory Connect USB Memory and import user information to the device or export log and user information from the device. You can also upgrade the firmware. -
Page 37: Secure Tamper
‒ Transcend: JetFlash 760 32GB The supported USB flash drives listed above were all tested with USB Type-A. To connect these USB flash drives to BioStation 3, a separate USB Type-C gender is required. Secure Tamper When the tamper is turned on, you can set to delete the entire user, the entire log, and the security key. -
Page 38: Rtsp
Settings RTSP A video management system (VMS) of another brand may be connected to monitor videos filmed with the BioStation 3 visual camera. Press and authenticate with the Admin level credential. → → Select SETTINGS DEVICE RTSP. Select the desired item and change the setting. •... -
Page 39: Restore Default
Settings Restore Default Device settings, network settings, and operator levels will be reset. Press and authenticate with the Admin level credential. → → Select SETTINGS DEVICE Restore Default. • All settings: Reset all settings stored on the device. To reset all device settings, press OK. To return to the previous screen, press Cancel. -
Page 40: Event Logs
Event Logs Search Event Logs Set conditions to search logs. Press and authenticate with the Admin level credential. On the DASHBOARD, select . All event logs appear. Press to search a specific log and change the condition. Set the condition and press OK to log that matches the condition will be displayed on the screen. Delete All Logs You can delete all saved logs. -
Page 41: View Log Usage
Event Logs View Log Usage You can check the status of log usage. Press and authenticate with the Admin level credential. → On the DASHBOARD, select . Check the device's event log and image log usage. -
Page 42: Troubleshooting
I close the the installation company. door. • BioStation 3 is equipped with a built-in battery but if power is not Suddenly the time has supplied for a long time, the built-in battery may die, causing the time Time become incorrect. -
Page 43: Product Specifications
Product Specifications Category Feature Specifications Biometric Face • BS3-DB: 125kHz EM & 13.56MHz MIFARE, MIFARE Plus, DESFire, DESFire EV1/EV2/EV3 , FeliCa RF Card • BS3-APWB: 125kHz EM, HID Prox & 13.56MHz MIFARE, MIFARE Plus, DESFire, DESFire EV1/EV2/EV3 , FeliCa, iCLASS SE/SR/Seos Credentials RF Read Range EM/HID Prox/MIFARE/DESFire/HID iCLASS: 30 mm, FeliCa: 15 mm... - Page 44 1 A @ 30 VDC Inductive load DESFire EV2/EV3 cards are supported by having backward compatibility of DESFire EV1 cards. CSN and smart card functions are compatible with BioStation 3. RF read range will vary depending on installation environment. Supports QR/Barcodes composed of up to 32 ASCII code strings.
-
Page 45: Dimensions
Product Specifications Dimensions (Unit: mm) 72.9 82.5 23.4... -
Page 46: Regulatory Information
Regulatory Information Regulatory & Licenses Licenses, Regulatory Information, certifications, and compliance marks specific to BioStation 3 are available from the device. • CE / UKCA / KC / FCC / IC / RCM / BIS / MIC / TELEC Press and authenticate with the Admin level credential. -
Page 47: Eu Declaration Of Conformity (Ce)
This product is CE marked according to the provisions of the Radio Equipment Directive (RED) 2014/53/EU. Hereby, Suprema Inc. declares that this product is in compliance with the essential requirements and other relevant provisions of Radio Equipment Directive (RED) 2014/53/EU. -
Page 48: Appendices
Information in this document is provided in connection with Suprema products. • The right to use is acknowledged only for Suprema products included in the terms and conditions of use or sale for such products guaranteed by Suprema. No license, express or implied, by estoppel or otherwise, to any intellectual property is granted by this document. -
Page 49: Copyright Notice
Appendices Copyright Notice The copyright of this document is vested in Suprema. The rights of other product names, trademarks and registered trademarks are vested in each individual or organization that owns such rights. Open Source License • The software of this product is based on “Linux Kernel 4.x”, which is licensed under GPL. As for GPL, please refer to GNU General Public License in this manual. -
Page 50: Gnu General Public License
Appendices GNU General Public License Version 3, 29 June 2007 Copyright © 2007 Free Software Foundation, Inc. <http://fsf.org/> Everyone is permitted to copy and distribute verbatim copies of this license document, but changing it is not allowed. Preamble The GNU General Public License is a free, copyleft license for software and other kinds of works. The licenses for most software and other practical works are designed to take away your freedom to share and change the works. - Page 51 Appendices TERMS AND CONDITIONS 0. Definitions. “This License” refers to version 3 of the GNU General Public License. “Copyright” also means copyright-like laws that apply to other kinds of works, such as semiconductor masks. “The Program” refers to any copyrightable work licensed under this License. Each licensee is addressed as “you”. “Licensees”...
- Page 52 Appendices 2. Basic Permissions. All rights granted under this License are granted for the term of copyright on the Program, and are irrevocable provided the stated conditions are met. This License explicitly affirms your unlimited permission to run the unmodified Program. The output from running a covered work is covered by this License only if the output, given its content, constitutes a covered work.
- Page 53 Appendices 6. Conveying Non-Source Forms. You may convey a covered work in object code form under the terms of sections 4 and 5, provided that you also convey the machine-readable Corresponding Source under the terms of this License, in one of these ways: a) Convey the object code in, or embodied in, a physical product (including a physical distribution medium), accompanied by the Corresponding Source fixed on a durable physical medium customarily used for software interchange.
- Page 54 Appendices The requirement to provide Installation Information does not include a requirement to continue to provide support service, warranty, or updates for a work that has been modified or installed by the recipient, or for the User Product in which it has been modified or installed. Access to a network may be denied when the modification itself materially and adversely affects the operation of the network or violates the rules and protocols for communication across the network.
- Page 55 Appendices 8. Termination. You may not propagate or modify a covered work except as expressly provided under this License. Any attempt otherwise to propagate or modify it is void, and will automatically terminate your rights under this License (including any patent licenses granted under the third paragraph of section 11). However, if you cease all violation of this License, then your license from a particular copyright holder is reinstated (a) provisionally, unless and until the copyright holder explicitly and finally terminates your license, and (b) permanently, if the copyright holder fails to notify you of the violation by some reasonable means prior to 60 days after the...
- Page 56 Appendices 11. Patents. A “contributor” is a copyright holder who authorizes use under this License of the Program or a work on which the Program is based. The work thus licensed is called the contributor's “contributor version”. A contributor's “essential patent claims” are all patent claims owned or controlled by the contributor, whether already acquired or hereafter acquired, that would be infringed by some manner, permitted by this License, of making, using, or selling its contributor version, but do not include claims that would be infringed only as a consequence of further modification of the contributor version.
- Page 57 Appendices 12. No Surrender of Others' Freedom. If conditions are imposed on you (whether by court order, agreement or otherwise) that contradict the conditions of this License, they do not excuse you from the conditions of this License. If you cannot convey a covered work so as to satisfy simultaneously your obligations under this License and any other pertinent obligations, then as a consequence you may not convey it at all.
-
Page 58: Gnu Lesser General Public License
Appendices 16. Limitation of Liability. IN NO EVENT UNLESS REQUIRED BY APPLICABLE LAW OR AGREED TO IN WRITING WILL ANY COPYRIGHT HOLDER, OR ANY OTHER PARTY WHO MODIFIES AND/OR CONVEYS THE PROGRAM AS PERMITTED ABOVE, BE LIABLE TO YOU FOR DAMAGES, INCLUDING ANY GENERAL, SPECIAL, INCIDENTAL OR CONSEQUENTIAL DAMAGES ARISING OUT OF THE USE OR INABILITY TO USE THE PROGRAM (INCLUDING BUT NOT LIMITED TO LOSS OF DATA OR DATA BEING RENDERED INACCURATE OR LOSSES SUSTAINED BY YOU OR THIRD PARTIES OR A FAILURE OF THE PROGRAM TO OPERATE WITH ANY OTHER PROGRAMS), EVEN IF SUCH HOLDER OR OTHER PARTY HAS BEEN ADVISED OF THE... - Page 59 Appendices 1. Exception to Section 3 of the GNU GPL. You may convey a covered work under sections 3 and 4 of this License without being bound by section 3 of the GNU GPL. 2. Conveying Modified Versions. If you modify a copy of the Library, and, in your modifications, a facility refers to a function or data to be supplied by an Application that uses the facility (other than as an argument passed when the facility is invoked), then you may convey a copy of the modified version: a) under this License, provided that you make a good faith effort to ensure that, in the event an Application does...
- Page 60 Appendices d) Do one of the following: 0) Convey the Minimal Corresponding Source under the terms of this License, and the Corresponding Application Code in a form suitable for, and under terms that permit, the user to recombine or relink the Application with a modified version of the Linked Version to produce a modified Combined Work, in the manner specified by section 6 of the GNU GPL for conveying Corresponding Source.
-
Page 61: Openssl License
Appendices OpenSSL License Copyright (c) 1998-2017 The OpenSSL Project. All rights reserved. Redistribution and use in source and binary forms, with or without modification, are permitted provided that the following conditions are met: 1. Redistributions of source code must retain the above copyright notice, this list of conditions and the following disclaimer. -
Page 62: Original Ssleay License
Appendices Original SSLeay License Copyright (C) 1995-1998 Eric Young (eay@cryptsoft.com) All rights reserved. This package is an SSL implementation written by Eric Young (eay@cryptsoft.com). The implementation was written so as to conform with Netscapes SSL. This library is free for commercial and non-commercial use as long as the following conditions are adhered to. The following conditions apply to all code found in this distribution, be it the RC4, RSA, lhash, DES, etc., code;... - Page 63 QR code. https://supremainc.com/en/about/global-office.asp © 2024 Suprema Inc. Suprema and identifying product names and numbers herein are registered trade marks of Suprema, Inc. All non-Suprema brands and product names are trademarks or registered trademarks of their respective companies.
Need help?
Do you have a question about the BioStation 3 and is the answer not in the manual?
Questions and answers