
Related Manuals for Samoa NOVA 10:1


Summary of Contents for Samoa NOVA 10:1
- Page 1 NOVA 10:1 Pneumatic piston transfer pump https://cdn.larius.com/wp-content/uploads/NOVA_10_1_IT.pdf https://cdn.larius.com/wp-content/uploads/NOVA_10_1_EN.pdf...
- Page 2 This manual is to be considered as an English language translation of the original manual in Italian. The manufacturer shall bear no responsibility for any damages or inconveniences that may arise due to the incorrect translation of the instructions contained within the original manual in Italian. Due to a constant product improvement program, the factory reserves the right to modify technical details mentioned in this manual without prior notice.
-
Page 3: Table Of Contents
WE ADVISE THE USE OF THIS EQUIPMENT ONLY BY PROFESSIONAL OPERATORS. ONLY USE THIS MACHINE FOR USAGE SPECIFICALLY MENTIONED IN THIS MANUAL. Thank you for choosing a SAMOA product. As well as the product purchased, you will receive a range of support services enabling you to achieve the results desired, quickly and professionally. -
Page 4: Awarnings
IT EN NOVA 10:1 WARNINGS The table below provides the meaning of the symbols used in this manual in relation to using, earthing, operating, maintaining, and repairing of this equipment. • Read this operator’s manual carefully before using the equipment. -
Page 5: Btransport And Unpacking
IT EN NOVA 10:1 TRANSPORT AND UNPACKING • THE EMPLOYER SHALL TRAIN ITS EMPLOYEES ABOUT ALL THOSE RISKS STEMMING FROM ACCIDENTS, ABOUT THE USE OF SAFETY DEVICES FOR THEIR OWN SAFE- • Observe the orientation of the packaging indicated TY AND ABOUT THE GENERAL RULES FOR ACCIDENT... -
Page 6: Dconditions Of Guarantee
PRINCIPLE OF OPERATION The NOVA 10:1 pump is a pneumatic piston pump; with its solid structure it is available in stainless steel material to reach a long-lasting performance. The proven performance of self-priming piston transfer pump allows accurate handling and transfer of a wide range of fluids, guaranteeing efficient operation, maximum productivity and the possibility of supplying multiple workstations simultaneously. - Page 7 IT EN NOVA 10:1 The Nova 10:1 advantages: • Atex certified Ex II 2 G c IIB T6 • Low starting pressure Pump supply air input • Fast priming product flow • Adjustable material flow • High quality material gaskets •...
-
Page 8: Ftechnical Data
CODE DESCRIPTION 95704 NOVA 10:1 95704/1 NOVA 10:1 wash pump Fig. 1 ED. 01 - 09/2023 - Cod. 150209... -
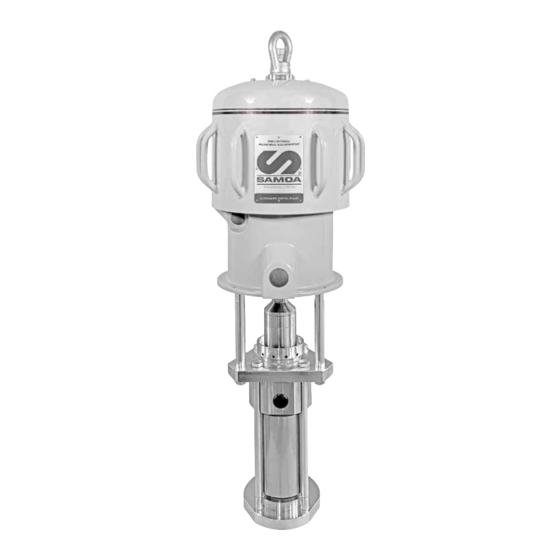
Page 9: Gdescription Of The Machine
IT EN NOVA 10:1 DESCRIPTION OF THE MACHINE Fig. 1 Pos. Description Pos. Description Pump supply air inlet Material pumping unit Pneumatic motor Gasket pressing ring nut Material outlet Conjunction sleeve Material input ED. 01 - 09/2023 - Cod. 150209... -
Page 10: Hantifreee System
IT EN NOVA 10:1 ANTIFREEZE SYSTEM The machine is equipped with an anti-freeze system that allows it to work even at very low temperatures. However, after a few minutes of operation, the upper metal outer surface cools dramatically. Avoid touching the area indicated. -
Page 11: Itypical Installation
IT EN NOVA 10:1 TYPICAL INSTALLATION Air supply shut-off valve The figure (1) shows a typical installation with all the recommended accessories for the pump to operate correctly. It is recommended to install an air supply shut-off valve (to be closed at the end of the work). -
Page 12: Koperation
IT EN NOVA 10:1 OPERATION Check all connection fittings on the different components (pump, flexible hose, etc.) before using the machine. • Immerse the material pumping hose in the product tank (if the pump is secured on the pneumatic extrusion ram, follow the procedure described in the pneumatic extrusion ram use and maintenance manual). -
Page 13: Lend Of Work Cleaning
IT EN NOVA 10:1 END OF WORK CLEANING End of work cleaning is intended as the cleaning to be carried out whenever you wish to use a different product or when a long period of machine inactivity is foreseen. • Close the air supply to the pump. -
Page 14: Ntroubleshooting
IT EN NOVA 10:1 TROUBLESHOOTING Problem Possible cause Solution The pump does not start Feeding air is not enough; Check the air supply. Increase the diameter of the feeding hose; Outlet product line clogged; Clean. Disconnect the outlet product pipe. Feed pump at minimum pressure and check if the pump starts without the outlet pipe;... -
Page 15: Odisassembly Of The Pneumatic Motor
IT EN NOVA 10:1 DISASSEMBLY OF THE PNEUMATIC MOTOR Always close compressed air supply and dischargepressure before dismantling the pneumatic motor from the pump. • Unscrew the joint sleeve to remove the pumping unit from the motor. • Disconnect the air supply hose from the pump. - Page 16 IT EN NOVA 10:1 • Unscrew the two ring nuts (9) from the support (1O). Turn counterclockwise the screws (11) take care to the washers (12) and remove the support (10) together with the rollers (13) and the pins (14).
- Page 17 IT EN NOVA 10:1 • Unscrew the counter-nut (24)[being careful of the washer (25)] and keeping the bush locked with a wrench (26). • Remove the housing (20) from the rod (27). • Unscrew the bush (26) (if necessary, keep the rod (27) locked on the threaded part with pliers whose grippers are wrapped in a rag to avoid damaging threading).
- Page 18 IT EN NOVA 10:1 • Unscrew the rod guide screw (34)[pay attention to the washer (35)] and make sure that the sealing gasket inside the screw (34) has not become ruined. • Remove the screws (36) [careful of the washers (37)]...
- Page 19 IT EN NOVA 10:1 • Check the conditions of the sealing ring inside the motor support (39). • Verify the conditions and exact position of the gasket (40). • Spread a thin layer of Vaseline grease on the inner walls of the cylinder (38).
- Page 20 IT EN NOVA 10:1 • Insert the springs (15) and the valves (21) in the housing (20), position the housing on the pump support and rest the collector against the housing (30) [remember the gasket (31)]. • Fasten the collector (30) with screws (28) (do not tighten for now) ensuring it is perfectly parallel to the other collector and that the distance between the two collectors is 46 mm(see figure).
-
Page 21: Pdisassembly Of The Pumping Group
IT EN NOVA 10:1 DISASSEMBLY OF THE PUMPING GROUP Always close the compressed air supply and release the pressure in the plant before disassembling the pumping group. • Unscrew the 3 nuts M16 (1). Fig. 1 • Unscrew the sleeve (2) holding the nut (3) with a counter wrench (4). - Page 22 IT EN NOVA 10:1 • Remove the sleeve (2) from the rest of the pump. • Remove the ring nut (5). Fig. 3 • Loosen the four tie rods (6) with a wrench and remove them. • Check the integrity and clean the disassembled elements. In case of wear, it is necessary to replace them.
- Page 23 IT EN NOVA 10:1 • Remove the upper flange (7) from the rest of the pump. • Remove the gasket housing (8). • Remove the cylinder (9). • Remove the piston (10). Fig. 5 The disassembled pumping group is now composed of the following components: •...
- Page 24 IT EN NOVA 10:1 UPPER GASKETS REPLACEMENTS • Using a screwdriver, extract the gaskets (12), (13), (14) and (15) from the upper gasket housing (8) and replace them with new ones. • Check and clean the gasket housing (8). In case of wear, it is necessary to replace it.
- Page 25 IT EN NOVA 10:1 LOWER GASKETS REPLACEMENTS • Unscrew the four nuts (16). • Remove the two lower piston gaskets (17) and replace them with new ones. Fig.7 • Remove the two copper gasket (18) and (19) and replace them with new ones.
-
Page 26: Qmotor Group Spare Parts
IT EN NOVA 10:1 MOTOR GROUP SPARE PARTS WARNING: always indicate code and quantity for each part required. Fig. 1 ED. 01 - 09/2023 - Cod. 150209... - Page 27 IT EN NOVA 10:1 Pos. Code Description Q.ty Pos. Code Description Q.ty 95062 Screw 95070 Collector 95063 Washer 95072 Collector gasket 95061 Eyebolt 95068 Screw 95064 Cover 95067 Cap 3/4” 95065 Screw 95094 Nipple 95066 Washer 95944 Sleeve 3/4” 95109...
-
Page 28: Rmotor Group Spare Parts Kit
IT EN NOVA 10:1 MOTOR GROUP SPARE PARTS KIT WARNING: always indicate code and quantity for each part required. ED. 01 - 09/2023 - Cod. 150209... - Page 29 IT EN NOVA 10:1 Code Position x (q.ty) Description 40065 1; 2; 3; 4 x (2); 5 x (2); 6 x (2); 7; 8; 9; 10; 11 Motor gaskets kit Code Position x (q.ty) Description 40066 4 x (2); 5 x (2); 6 x (2); 12 x (2); 13 x (2); 14 x (2) Motor movement inversion device ED.
-
Page 30: Spumping Group Spare Parts
IT EN NOVA 10:1 PUMPING GROUP SPARE PARTS WARNING: always indicate code and quantity for each part required. ED. 01 - 09/2023 - Cod. 150209... - Page 31 Pos. Code Description Q. ty 98100 Nova 10:1 pumping group 95654 Copper gasket 98100/1 Nova 10:1 wash pump pumping group 98118 Lower piston plug 95650 Gasket PTFE Tie rod - not included in pumping 95621 95027 Ball 1” 1/4 assembly...
-
Page 32: Tpumping Group Spare Parts Kit
IT EN NOVA 10:1 PUMPING GROUP SPARE PARTS KIT WARNING: always indicate code and quantity for each part required. ED. 01 - 09/2023 - Cod. 150209... -
Page 33: Wall Mounting Bracket
IT EN NOVA 10:1 Code Position x (q.ty) Description 40304 1 X (2); 2; 3 X (2); 4 X (2) Pump gaskets kit Code Position x (q.ty) Description 40305 3 x (2); 4 x (2); 5; 6; 10; 11 x (2); 12... -
Page 34: Vhandtruck
IT EN NOVA 10:1 HANDTRUCK COD. 65380 WARNING: always indicate code and quantity for each part required. ED. 01 - 09/2023 - Cod. 150209... -
Page 35: Watex Certificate
IT EN NOVA 10:1 ATEX CERTIFICATE DESCRIPTION These safety instructions refer to the installation, use and NOVA series pneumatic piston pumps are group maintenance of NOVA series pneumatic piston transfer II mechanical devices for use in areas where pumps in high risk environments where potentially gasses classified AS IIB (category 2 g) are pre- explosive gasses or vapours are present. - Page 36 IT EN NOVA 10:1 SAFETY INSTRUCTIONS FOR INSTALLATION IN HAZARDOUS AREAS Larius S.r.l. Read the indications provided in the user and Via Stoppani, 21 maintenance manual carefully prior to installa- 23801 Calolziocorte (LC) tion. All of the maintenance operations must be...
- Page 37 IT EN NOVA 10:1 ED. 01 - 09/2023 - Cod. 150209...
-
Page 39: Declaration Of Conformity
IT EN NOVA 10:1 CE DECLARATION OF CONFORMITY Company LARIUS srl Via Antonio Stoppani 21 - 23801 Calolziocorte (LC) ITALY Tel: +39 0341 621152 Fax: +39 0341 621243 E-mail: larius@larius.com Declares under his owns resonsibility that the product: NOVA 10:1... - Page 40 TEL. +1 (828) 645-2290 - FAX: +1 (828) 658 0840 TEL.: +44 1942 850600 - FAX: +44 1942 812160 ©Copyright, SAMOA INDUSTRIAL, S.A. SAMOA Industrial, S.A. is an ISO 9001, ISO 14001 and ISO 45001 certified company. Contact us today! Visit www.samoaindustrial.com for more information.
Need help?
Do you have a question about the NOVA 10:1 and is the answer not in the manual?
Questions and answers