Table of Contents
Advertisement
Quick Links
Advertisement
Table of Contents

Related Manuals for Durafly Auto-G2V2


Summary of Contents for Durafly Auto-G2V2
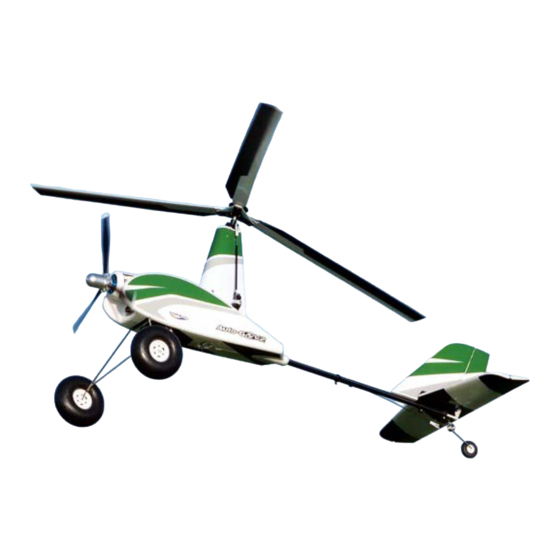
- Page 1 INSTRUCTION MANUAL Please read this manual carefully before operating this plane.
- Page 2 A WARNING: Read this instruction manual fully so as to become completely familiar with the features of this product before operating. Failure to operate this product correctly could result in damage to the product, personal property and cause serious injury. This is a sophisticated hobby product and is NOT a toy.
-
Page 3: Table Of Contents
CONTENTS Introduction -------------------------------------------------------------------- 1 Specifications ----------------------------------------------------------------- 1 Kit Contents ------------------------------------------------------------------- 2 Required to complete the model ----------------------------------------- 2 Assembly -------------------------------------------------------------------- 3-7 Setting up the Auto-G2 V2 ------------------------------------------------ 8 C of G location --------------------------------------------------------------- 9 Model flying precautions -------------------------------------------------- 9 Pre-flight checks ------------------------------------------------------------ 9 Flying the Auto-G2 V2 ----------------------------------------------------10 Spare parts list ------------------------------------------------------------- 11 Trouble shooting ----------------------------------------------------------- 12... -
Page 4: Introduction
It is still very simple to assemble, looks amazing, and is brilliant fun to fly, in fact, it is everything you have come to expect from the Durafly brand. Take-offs are very straightforward as the Auto-G2 V2 has an auto-start rotor run-up system. This system uses a small electric motor which you engage via a separate channel to spin up the rotors prior to take-off. -
Page 5: Kit Contents
REQUIRED TO COMPLETE MODEL: In its ‘Plug-N-Fly’ format the Auto-G2 V2 will still require some additional accessories to get it ‘flight ready’. Durafly recommends the products below for optimum performance and great value. All are available at HobbyKing.com Turnigy TGY-i6S Digital... -
Page 6: Assembly
ASSEMBLY (PNF): The first step in the assembly is to fit the landing gear, your ESC With a sharp knife, remove the to motor wires should be supplied disconnected. If not, then unplug covering over the rear landing the ESC from the motor and slide the ESC wires out of the way of gear slot as shown. - Page 7 Slide the tail assembly onto Using the M2 x 10mm nuts Check before fully tightening the tail boom, position the rear and bolts provided, clamp the the bolts that the assembly is in clamp so that it is flush with the tail assembly to the tail boom.
- Page 8 At this point it is best to install Most small receivers should Position your 1300mAh 3S as your receiver to set up your radio sit nicely at the rear of the battery shown in the battery compartment. and the servos. Don't forget to compartment, just in front of the Please note: The auto-start system check the direction of the motor.
- Page 9 We highly recommend that Before you fit the rotors, check Slide the rotor-head center plate that the 2 nuts at the top of onto the main shaft until it touches you balance the rotor-head as the two lock-nuts, rotor blades must the shaft are locked together.
- Page 10 Congratulations, assembly of your Auto-G2 V2 is now complete. Please perform a final check of all the screws, nuts, bolts and components, ensuring they are secure and firmly in place.
-
Page 11: Setting Up The Auto-G2 V2
SETTING UP THE AUTO-G2 V2: CONTROL THROWS Roll/Aileron Controls (Rates/Expo) Normal flying: 75% rates, 25% expo Initial Flights: 100% rates, 30% expo Elevator: 10mm low, 14mm high 10 - 14mm 10 - 14mm Rudder: 12mm low, 20mm high 12 - 20mm 12 - 20mm... -
Page 12: C Of G Location
CG LOCATION: With the recommended battery installed, lift the AutoG2 V2 by the head and the nose should drop to approximately 3-5 degree’s below the horizon. This indicates you are within the correct CG range. Add weight to the nose or tail 3-5°... -
Page 13: Flying The Auto-G2 V2
We hope you enjoyed your first flight with your Auto-G2 V2, and have many more enjoyable flights in the future. Don't forget to watch our flying demo video: https://www.youtube.com/watch?v=aNTVGCxbk3w Have fun, and happy flying. The Durafly team. -
Page 14: Spare Parts List
AUTO-G2 V2 SPARE PARTS LIST: FULL RANGE OF SPARES COMING SOON! -
Page 15: Trouble Shooting
TROUBLE SHOOTING: Problem Cause Solution Charge the batteries. Battery is not fully charged. Transmitter battery low. Install a full charged battery. Motors not connected. Check for connection between the ESC and motor. Motor does The motor is damaged. Replace motor. not turn Rec ver is not bound to Consult adio manual and... -
Page 16: Contacts
CONTACTS: Contact: Notes:... - Page 17 Made in China...
Need help?
Do you have a question about the Auto-G2V2 and is the answer not in the manual?
Questions and answers