Table of Contents
Advertisement
Quick Links
Advertisement
Table of Contents

Related Manuals for Durafly Micro Tundra PNF


Summary of Contents for Durafly Micro Tundra PNF
- Page 1 IN ST R UC T I ON M A N U A L...
- Page 2 Read this instruction manual fully so as to become completely familiar with the features of this product before operating. Failure to operate this product correctly could result in damage to the product, personal property and cause serious injury. This is a sophisticated hobby product and is NOT a toy.
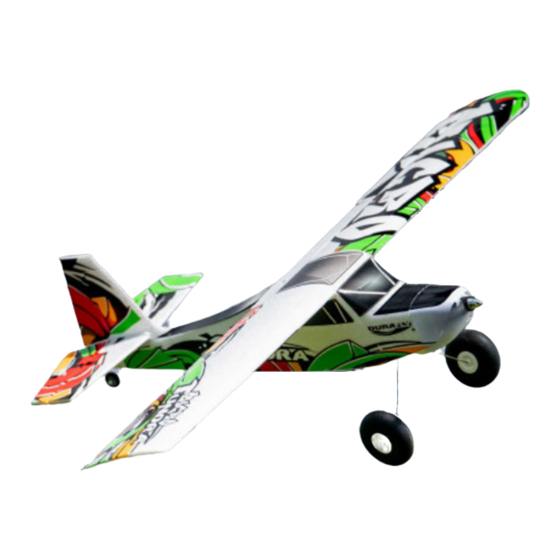
- Page 3 (Grafitti Version) SAFETY PRECAUTIONS Your Durafly Micro Tundra PNF should not be considered a toy, but rather a sophisticated, working model that functions very much like a full-size airplane. Because of its performance capabilities, the Micro Tundra PNF, if not assembled and operated correctly, could possibly cause injury to yourself or spectators and damage to property.
- Page 4 The Micro Tundra continues the lineage of the Tundra and Grand Tundra series of Durafly aircraft. It is available in 2 color schemes, either the "Classic Green" or the slightly more outrageous and colorful "Graffiti". Both look good and can be flown with either a standard wheel U/C or with floats and water rudder, both versions are supplied in the box.
- Page 5 Use a sharp modelling knife to carefully cut through the plastic. Ensure you leave a slight notch at the top as shown so that the locator on the front of the wing cannot move side to side when the wing is in position. Plug the servo and ESC connectors into the receiver, be careful to plug the connectors in correctly.
- Page 6 Insert the main landing gear into the slot marked "C" at the front of the fuselage. Squeeze the U/C legs together slightly and fit one side of the top into the slot, then push the other side in until it is fully home. Insert the tailwheel assembly into the socket in the bottom of the rudder.
- Page 7 If you wish to fly this model off of water at anytime then remove the main landing gear. The floats use 2 slightly shorter attachment wires and one goes in point "C" at the front and the other at point "D" towards the rear. The floats then just slot onto the bottom of these wires.
- Page 8 SUGGESTED CONTROL THROWS: These are a good place to start for initial flights, once you have flown the Micro Tundra a few times you can adjust as necessary to suit your own flying style. Control throws: *Elevator 'low rates' 8mm 'high rates' 10-12mm in either direction from neutral. *Rudder 'low rates' 6mm 'high rates' 10-15mm in either direction from neutral.
- Page 9 MODEL FLYING PRECAUTIONS • Select your flight area carefully. Always choose an open space that is unobstructed from trees and buildings and away from crowed areas. Avoid flying in area's with roads, electric/telephone poles/wires and water near by or within close proximity to full size air traffic. •...
- Page 10 All in all it is great fun to fly and is perfect for "Back Yard Bush" flying. Thanks again for purchasing the Durafly Micro Tundra. We hope you'll have many happy days of flying and look forward to bringing you more Durafly models in the near future.
- Page 11 MICRO TUNDRA SPARE PARTS Fuselage and Main Wing Horizontal Tail Cowling (Green) Rudder (Green) (Green) (Green) Part No. Part No. Part No. Part No. 9898000019-0 9898000016-0 9898000017-0 9898000018-0 Fuselage and Main Wing Horizontal Tail U/C Set Rudder (Grafitti) (Grafitti) (Grafitti) Part No.
- Page 12 RECOMMENDED ACCESSORIES Turnigy Bolt Turnigy nano-tech Turnigy nano-tech Turnigy nano-tech 500mAh 2S 300mAh 2S 460mAh 300mah 2S Part No. Part No. Part No. Part No. 9210000152-0 9210000020 N460.2S.25 9210000082 Turnigy TGY-i6 Mode Turnigy TGY-i6 Mode OrangeRx Tx6i Mode 2 OrangeRx Tx6i Mode 1 2 AFHDS Transmitter 1 AFHDS Transmitter EU Version...
- Page 13 trouble shooting: Problem Cause Solution 1. Charge the batteries. 1. Batteries is not fully charged. 2. Install a charged battery. 2. Transmitter battery low. 3. Check for connection 3. Motor not connected. between the ESC and motor. 4. Replace motor. Motor 4.
- Page 14 facebook.com/durafly...
Need help?
Do you have a question about the Micro Tundra PNF and is the answer not in the manual?
Questions and answers