Advertisement
Quick Links
Important Safety Instructions and Precautions
First of all, as the most basic principle: This product is a professional lighting set equipment
and should be used by professional lighting engineers or under the guidance of professionals.
Basic safety attentions must always be followed during use, as follows:
1.
Before use, please read and understand these instructions and attentions.
Professional lighting is prohibited for children. When children are near, parents or accompany-
2.
ing persons must supervise closely to prevent children from personal injury due to collision
with lamps or private use of lamps.
This lighting product is not ordinary lighting product and cannot be used for general lighting.
3.
Anyone who has suffered eye damage or has sensitive eyes should avoid using this product.
4.
When the lamp is on, it must be used with care. Do not touch high-temperature parts, such as
LED lamp beads, to avoid burns.
When the lamp is on, it is forbidden to look directly at the lamp beads under any circumstances.
5.
Strong light should be used under the guidance of professional lighting engineers. Avoid
prolonged exposure to strong light under any circumstances. If eye discomfort, please turn off
the lamp in time, suspend use, and see a doctor immediately.
6.
If the lamp bead is damaged or deformed by heat, stop using this equipment, and contact the
manufacturer, service agent or qualified maintenance personnel to replace the lamp bead in
time to avoid accidents.
7.
This product is only suitable for use in -20℃ to 45℃ operating environment and normal
humidity environment.
Do not use damaged equipment or accessories, and wait for professional maintenance
8.
personnel to check and repair to confirm being normal before use.
During using, if the casing of this product is broken due to being dropped, squeezed or
9.
subjected to strong impact, please do not use it, so as to avoid electric shock injury due to
contact with internal electronic components.
If an extension cord is required, please use an extension cord with a current rating greater than
10.
or equal to that of the equipment. If an extension cord is rated less than the equipment,
overheating may result.
Some products have long power cords, please place the power cords properly and keep them in
11.
a safe place. Avoid contacting the power cord with overheating surfaces, avoid improper
placement that could cause pulling damage, or trip on-site personnel. Please use the certified
power cord from the original manufacturer. If the product is damaged by using a non-certified
power cord, it will not be repaired by our factory.
12.
Be sure to unplug equipment from the power outlet before cleaning and repairing. When not in
use, do not pull the power cord to unplug the equipment. For normal power-off, please hold
both ends of the plug of the equipment with your hands and pull the plug out of power outlet.
This equipment needs to be connected to a grounded outlet.
Do not disassemble the product without permission. If the product fails, it must be checked
13.
and repaired by authorized maintenance personnel.
14.
Before storing, make sure that the equipment has cooled down completely. For storage, unplug
the power cord from the equipment. The equipment should be placed in the carrying case or in
a ventilated dry place.
Advertisement

Related Manuals for Godox MG2400Bi


Summary of Contents for Godox MG2400Bi
- Page 1 Important Safety Instructions and Precautions First of all, as the most basic principle: This product is a professional lighting set equipment and should be used by professional lighting engineers or under the guidance of professionals. Basic safety attentions must always be followed during use, as follows: Before use, please read and understand these instructions and attentions.
- Page 2 MG2400Bi is a brand new high power LED light, with the following powerful features and functions: When cleaning, do not wipe it with a damp cloth, please use a dry cloth or a soft cloth to wipe input power of 2900W, support 100V-240V~50/60Hz power supply which allows you to use it the dirt of the equipment.
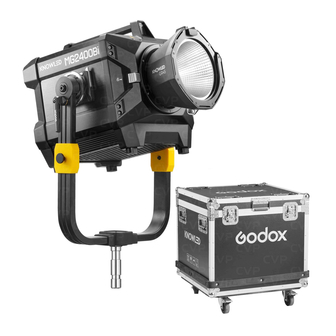
- Page 3 13. DMX IN Port 14. AC Input Port 15. Ethernet Port 1. Handle 1 2. Handle 2 3. Direction Adjustment H andle 4. DC Input Port 5. Lanyard Attachment 6. Yoke 7. Mount Locking Pusher 8. Godox G-Mount 9. Quick Install Device...
- Page 4 What’s Inside MG2400Bi What’s Inside MG2400Bi K1 Light Body × 1 Yoke × 1 Controller × 1 Light Body × 1 Yoke × 1 Controller × 1 Antenna × 1 Reflector × 1 Pipe Clamp × 1 Light Protection Safety Wire × 1 Antenna ×...
- Page 5 What’s Inside MG2400Bi K2 Optional Accessories Yoke G2400BY01 Reflector Kit GRK Light Body × 1 Yoke × 1 Controller × 1 Antenna × 1 Reflector × 1 Pipe Clamp × 1 Light Protection Safety Wire × 1 Cover × 1...
- Page 6 Installation and Disassembly 1. Installing the Yoke Projection GP19K Projection GP26K Projection GP36K 1.1 Place the light on a flat surface with 1.2 Press down the quick install device the heat dissipation side upward. button and remove the wrench. Soft Case SC18 Soft Case SC19 Flight Case FC02 1.3 Align both ends of the yoke with the...
- Page 7 2. Disassembling the Yoke 4. Installing/Disassembling the Reflector 4.1 Align the reflector with the mount, 4.2 Press and hold the mount locking insert and then rotate clockwise to install. pusher and rotate counterclockwise to remove the light protection cover. Note: Make sure to align the reflector with the mount of the lamp head.
- Page 8 8. Connect to Ethernet 7. Connect to DMX 512 Controller Connection 1 7.1 Wireless DMX Connection CRMX CRMX CRMX CRMX TX CRMX CRMX DMX512 Ethernet CRMX CRMX 7.2 Wired DMX Connection Connection 2 Connection Connection Connection Connection Connection Connection DMX 512 Ethernet Note: The DMX cable is sold separately.
- Page 9 In the color temperature setting interface, turn the adjust dial to adjust the color temperature Power Supply from 2800K to 6500K. Turning the adjust dial clockwise once will increase the value by 100 units, while turning it counterclockwise once will decrease the value by 100 units. FX Mode Briefly press the MODE button to switch to FX AC100V-240V...
- Page 10 3. Cloudy Effect 7. Fire Effect In the cloudy effect setting interface, turn the In the fire effect setting interface, turn the adjust Switch: Turn on/off the effect Switch: Turn on/off the effect adjust dial to select options among switch, dim, dial to select options among switch, dim, speed, Dim: 0%-100%...
- Page 11 DMX control signal until power down or a valid DMX control signal is received again. Black Out The light is off immediately. MG2400Bi Black Out After 2 Min After the DMX control signal is lost, continue to use the last received DMX control signal for 2 minutes then black out.
- Page 12 Briefly press the adjust dial to select the desired option then turn it to adjust settings. Finally, briefly press the adjust dial to exit the current setting, briefly press the Scan the QR code to download the "Godox MENU button to return to the previous menu.
- Page 13 Level 1 Option Level 2 Option Description Level 1 Option Level 2 Option Description Network Mode DHCP DHCP mode Art-Net&sACN Auto/Art-Net/sACN/Off Auto: Art-Net & sACN two protocols are accepted. Art-Net: Only Art-Net protocol. Art-Net 2.x To use 2.B.C.D network sACN: Only sACN protocol. Art-Net 10.x To use 10.B.C.D network Off:...
- Page 14 8. Dimming Curves 11. Language Language Briefly press the adjust dial to enter dimming Briefly press the adjust dial to enter language curves setting interface. Rotate and briefly press setting interface. Rotate and briefly press the the adjust dial to choose among linear, S-curve, adjust dial to select between Simplified Chinese exponential and logarithmic.
- Page 15 2.2 Turn off the device. Insert the U disk with new firmware into the USB Type-C port. 2.3 Turn on the device, and MG2400Bi lamp head will automatically enter the upgrading interface. Lock Setting 2.4 It will return to main interface after completion.
- Page 16 Photometric Data Technical Data Model MG2400Bi Testing Illuminance Condition Unit Power Supply 100V-240V~50/60Hz 30A(Max.) ≈8810 ≈3540 ≈2120 ≈1480 ≈1250 2800K Max. Power ≈2900W ≈818 ≈329 ≈197 ≈137 ≈116 2800-6500K ≈9700 ≈3950 ≈2360 ≈1640 ≈1380 3200K Brightness Range 0%-100% Dimming Curves linear, S-curve, exponential, logarithmic ≈901...
- Page 17 If maintenance service is needed, you can directly contact the product distributor or authorized service Warning institutions. You can also contact the Godox after-sale service call and we will offer you service. When Operating frequency: 2402MHz – 2480MHz (BT) applying for maintenance service, you should provide valid warranty card. If you cannot provide valid warranty card, we may offer you maintenance service once confirmed that the product or accessory is...
- Page 18 ⑧ Breakage or damage that could not be attributed to the product itself. Once met these situations above, you should seek solutions from the related responsible parties and Godox assumes no responsibility. The damage caused by parts, accessories and software that beyond the warranty period or scope is not included in our maintenance scope.
Need help?
Do you have a question about the MG2400Bi and is the answer not in the manual?
Questions and answers