Advertisement
24" Single Wall Oven
Distributed by:
Empava Appliances Inc.
15253 Don Julian Rd, City of Industry, CA 91745 USA
www.empava.com
Phone:+1(888)682 8882
Email:support@empava.com
IMPORTANT - PLEASE READ AND FOLLOW
• Before beginning, please read these instructions completely and carefully.
• Do not remove permanently affixed labels, warnings, or plates from the product. This may void
the warranty.
• Please observe all local and national codes and ordinances.
• Please ensure that this product is properly grounded.
• The installer should leave these instructions with the consumer who should retain for local
inspector's use and for future reference.
• The electrical plug should always be accessible.
INSTRUCTION MANUAL
Empava Item#: EMPV-24WOE40L
Advertisement

Related Manuals for Empava EMPV-24WOE40L


Summary of Contents for Empava EMPV-24WOE40L
- Page 1 INSTRUCTION MANUAL 24" Single Wall Oven Empava Item#: EMPV-24WOE40L Distributed by: Empava Appliances Inc. 15253 Don Julian Rd, City of Industry, CA 91745 USA www.empava.com Phone:+1(888)682 8882 Email:support@empava.com IMPORTANT - PLEASE READ AND FOLLOW • Before beginning, please read these instructions completely and carefully.
- Page 2 DEAR CUSTOMER The oven is exceptionally easy to use and extremely efficient. After reading the instruction manual. operating the oven will be easy. Before being packaged and leaving the manufacturer, the oven was thoroughly checked with regard to safety and functionality.
-
Page 3: Table Of Contents
TABLE OF CONTENTS Safety information ........................4 Description of the appliance.....................7 How to use the oven........................8 Cleaning and maintenance.......................10 Installation ..........................15 Make electrical connection.......................18... -
Page 4: Safety Information
IMPORTANT SAFETY INFORMATION READ ALL INSTRUCTIONS BEFORE USING THE APPLIANCE Read all safety instructions before using the product. Failure to follow these instructions may result in fire, electrical shock, serious injury or death. General safety instructions Use the appliance only for its intended purpose as described in this Owner’s Manual. Do not store items of interest to children in cabinets above an oven-children climbing on the oven to reach items could be seriously injured. - Page 5 In the event of a fire, take the following steps to prevent injury and fire spreading Do not use water on grease fires. Never pick up a flaming pan. If there is a fire in the oven during baking, smother the fire by closing the oven and turning the oven off or by using a multi-purpose dry or foam- type fire extinguisher.
- Page 6 Service Centers authorized by the manufacturer must be contacted in the following cases If in doubt about the soundness of the appliance after removing it from its packaging; If the power supply cable has been damaged or needs to be replaced; If the appliance breaks down or functions poorly;...
-
Page 7: Description Of The Appliance
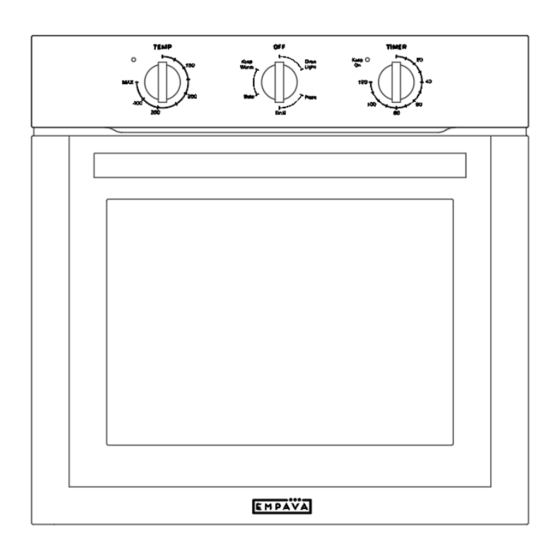
DESCRIPTION OF THE APPLIANCE 1. Control panel A. Temperature control knob 2. Seal B. Oven function selection knob 3. Rack C. Timer knob 4. Rotisserie(Some models) D. Temperature indicator light 5. Tray E. Time indicator light 6. Door 7. Oven light... -
Page 8: How To Use The Oven
HOW TO USE THE OVEN Place the dripping pan provided on the bottom shelf of the oven to prevent any sauce and/or grease from dripping onto the bottom of the oven only when grilling food or when using the rotisserie (only available on certain models). For all other types of cooking, never use the bottom shelf and never place anything on the bottom of the oven during operation as this could damage the enamel finishing. - Page 9 HOW TO USE THE ROTISSERIE (only available on certain models) 1. Insert the groove “B” into bend “C”; 2.Turn the plastic handle “D” anti clock wise and slide the rack into the oven runners ensuring that the rod “E” slots into the hole “F”; 3.The rotisserie rack must always be fitted in the middle of the oven (third position from bottom);...
-
Page 10: Cleaning And Maintenance
CLEANING AND MAINTENANCE NOTE: To extend the life of your oven, it must be cleaned frequently, keeping in mind that The enameled or stainless steel parts should be washed with lukewarm water without using any abrasive powders or corrosive substances which could ruin them; Stainless steel could get stained. If these stains are difficult to remove, use special products available on the market. - Page 11 5. Lift the inside glass upwards as shown in the figure. 6. Remove the inside glass and you can see the middle glass. REPLACING THE OVEN LIGHT Ensure that the appliance is switched off before replacing the lamp to avoid the possibility of electric shock 1.Disconnect the oven from the power supply by means of the omni polar switch used to connect the appliance to the electrical mains;...
- Page 12 PRACTICAL COOKING ADVICE Do not use any type of foil or oven liner to cover the oven bottom. These items can trap heat or melt, resulting in damage to the product and risk of shock, smoke or fire. Damage from improper use of these items is not covered by the product warranty.
- Page 13 Cooking Pizza For best results when cooking pizza, use the Bake or Conv Bake. · Preheat the oven for at least 10 minutes; · Use a light aluminum pizza pan, placing it on the grid supplied with the oven. If the dripping pan is used, this will extend the cooking time, making it difficult to get a crispy crust;...
- Page 14 Conv Broil Grilled chicken 55-60 Cuttlefish 30-35 With rotisserie (where prevent) Veal on the spit 70-80 Chicken on the spit 70-80 Chicken (on the spit )+potatoes 70-75 (roasted) 70-75 Lamb on the spit 70-80 Quick Preheat Tarts 20-30 Fruit cakes 40-45 Fruitcake 40-50...
-
Page 15: Installation
INSTALLATION Only a qualified person in compliance with the instructions provided must install the appliance. Appliance are fully assembled as in normal operation without any parts removed. The manufacturer declines all responsibility for improper installation, which may harm persons and animals and damage property. - Page 16 Oven dimensions: • width = 23.42” (59.5cm) • depth = 22.23” (56.7cm) • height = 23.42” (59.5cm) • oven frame depth = 0.78” (2cm) NOTE: These ovens are not approved for installations that stack one single wall oven above another single wall oven.
- Page 17 CUTOUT FOR SINGLE OVENS - UNDER COUNTER CUTOUT FOR SINGLE OVENS IN WALL CABINET...
-
Page 18: Make Electrical Connection
MAKE ELECTRIC CONNECTION Electrical installation must be in accordance with the current CSA C22.1 Canadian Electrical Codes Part 1 and/or local codes. This appliance must be properly grounded. To prevent fire or shock, do not use an extension cord with this appliance. To prevent shock, remove house fuse or open circuit breaker before beginning installation. - Page 19 This oven is manufactured with a neutral (white) power supply wire and a cabint-connected green (or bare) ground wire twisted together. 1. Disconnect power. 2. Feed the flexible conduit from the through the opening in the cabinet. 3. Remove junction box cover, if it is present. 4.
- Page 20 Electrical Connection Options Chart: A. Cable from home power supply B. Red wires C. Black wires D. UL list wire connectors E. 4-wire flexible conduit from oven F. Junction box G. White wires H. Green (or bare) ground wires UL listed or CSA approved conduit connector 1.
- Page 21 A. Cable from home power supply B. Red wires C. Black wires D. UL list wire connectors E. 4-wire flexible conduit from oven F. Junction box G. White wires H. Green (or bare) ground wires UL listed or CSA approved conduit connector 1.
Need help?
Do you have a question about the EMPV-24WOE40L and is the answer not in the manual?
Questions and answers