Table of Contents
Advertisement
Advertisement
Table of Contents

Related Manuals for Mingda MAGICIAN X2


Summary of Contents for Mingda MAGICIAN X2
- Page 1 3D PRINTING USER MANUAL FOR MINGDA MAGICIAN X2 3D PRINTER V2.0...
- Page 2 Mingda Magician X2: Official instructions Version 2.0 - Sept. 6th, 2023 The latest version of the Magician X2 handbook can always be found at https://3dmingdaofficial.com/pages/magician-firmware-driver-and-video Quick Guide to the First Print 1. Read the Safety Instructions carefully. 2. Place the printer on a flat and stable surface.
-
Page 3: Table Of Contents
---------------------------------------------------------------- 09 2.1. How to Move the Printer ----------------------------------------------------------------------- 09 2.2. Contents of the Package and Accessories --------------------------------------------------- 10 3. Magician X2 Overview and Glossary ------------------------------------------------------------- 11 3.1. Product Display ---------------------------------------------------------------------------------- 11 3.2. Connecting and Disconnecting the Power Cable ----------------------------------------- 12 4. - Page 4 6. Obtaining Printable Models ----------------------------------------------------------------------- 32 6.1. Create Your Own Model ------------------------------------------------------------------------ 33 6.2. What is a G-code File? -------------------------------------------------------------------------- 33 6.3. Mingda Cura slicer Interface Explained ----------------------------------------------------- 34 6.3.1. Initial Setup and General Workflow ------------------------------------------------ 34 6.3.2. Using Supports -------------------------------------------------------------------------- 35 6.3.3.
- Page 5 This device is intended for use in indoor environments only where it is protected against external influences. Warranty The Mingda Magician X2 3D printer is covered by a 12-month warranty for end customers and business customers. Consumables and parts subject to wear and tear are excluded from this warranty. The warranty period starts on the day the customer receives the goods.
- Page 6 As we cannot control the conditions under which the Mingda Magician X2 printer is used, we do not assume any responsibility and expressly disclaim any liability for losses, injuries, damages or expenses arising out of or in connection with the assembly, handling, storage, use or disposal of the product.
- Page 7 Electrical Safety l The printer should only be powered through a standard 230 VAC, 50 Hz or 110 VAC, 60 Hz outlet. Never use alternative power sources as they can cause problems or damage the printer. l Do not use the printer if the power cord is damaged in any way – damaged cords can lead to electric shock. l When disconnecting the power cord from the outlet, pull the plug, not the cord, to reduce the risk of damaging the plug or outlet.
- Page 8 Proper Use of Glass Printing Sheets Each type of print sheet requires slightly different maintenance. Improper handling and use can lead to damage to the print sheet, heatbed or other parts of the printer. Print sheets are consumable and subject to wear. l To degrease the sheet’s surface, use highly concentrated isopropyl alcohol (90% or higher).
-
Page 9: Introduction
2.1. How to Move the Printer If you want to move the Mingda Magician X2 printer, use the recommended method - grab the top of the printer frame and lift the printer. Never lift the printer by the cables, filament holders or X-axis. -
Page 10: Contents Of The Package And Accessories
2.2. Contents of the Package and Accessories The latest version of this handbook can be found at https://3dmingdaofficial.com/pages/magician-firmware-driver-and-video in PDF format. If you encounter any problems while using the printer, do not hesitate to contact us at support@3dmingda.com. We will be happy to answer your questions or hear your ideas for improvement. What’s in the box Extruder Gantry... -
Page 11: Magician X2 Overview And Glossary
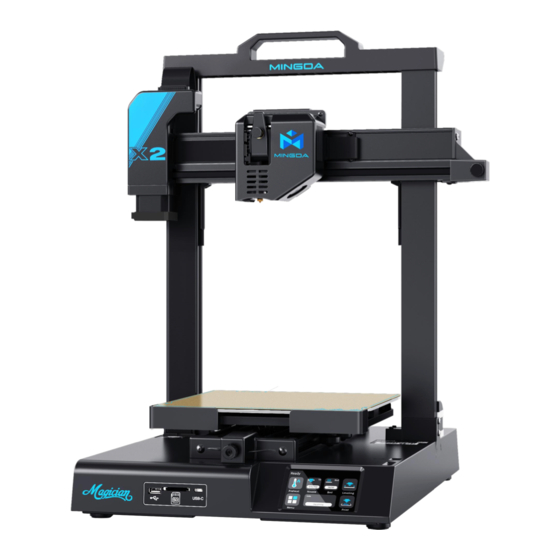
3. Magician X2 Overview and Glossary 3.1 Product Display Front View Filament Holder Filament Detector Aluminum Beam Belt Tensioner Printing Head Extruder PEI Plate Photoelectric Switch Power Socket Multi Connection Touch Screen (Via SD Card, U-disk,PC/Laptop) Back View Synchronous Belt... -
Page 12: Connecting And Disconnecting The Power Cable
3.2. Connecting and Disconnecting the Power Cable Always pull the connector, do not pull on the cable itself! Incorrect handling can lead to damage to the connector or cable. The power supply port is located on the left side of the printer. Before you plug or unplug the cable, turn the printer off using the physical switch on the power supply unit next to the power supply port. -
Page 13: Machine Operation
4.1. Machine Operation All configuration steps and overall control of the printer are done with touching screen. We will show you the operation interface of the printer and Glossary. In printing process main interface Primary interface Secondary interface and Explain Pause Pause the printing process Decrease ”-”... - Page 14 Pre-printing Main Interface Ready Primary interface Explain Preheat Pre-set nozzle & hotbed’s temperature, turn to page [15] Nozzle Pre-set nozzle’s temperature, turn to page [15] Pre-set hotbed’s temperature, turn to page [16] Leveling Autoleveling (No other operations shall be done during auto leveling) Menu Printer’s printing value adjustment,turn to page [17]...
- Page 15 Pre-heat Secondary interface Explain Pre-set temperature for PLA PETG Pre-set temperature for PETG Pre-set temperature for TPU Both Option Nozzle/hotbed only or Both Stop Stop the heating process Setting For customize Pre-set temperature for Nozzle and hotbed Back Back to last step Nozzle Secondary interface Explain...
- Page 16 Secondary interface Explain Decrease ”-” Decease the temperature Increase ”+” Increase the temperature Nozzle/Hotbed Option to change the nozzle and bed 1 ℃/5℃/10℃ for option ℃ Stop Stop heating the nozzle/bed Print Secondary interface Explain SD card Select SD card’s Gcode U Disk Select USB’s Gcode...
- Page 17 Menu Primary interface Explain Move Adjust X, Y, Z Axis’ Value, turn to page[18] Home Reset X, Y, Z Axis’ Value, unlock motor, turn to page[18] Extrude To unload or load filament, turn to page[19] Percentage Adjust Printing speed & flow Value, turn to page[19] Settings...
- Page 18 Move Secondary interface Explain X+,X- Adjust X axis (Right & Left) Y+,Y- Adjust Y axis (Forward & Backward) Z+,Z- Adjust Z axis (Up & Down) 0.1/1/10 Movement distance Home Secondary interface Explain Home Reset to 0 Set X to 0 Set Y to 0 Set Z to 0 Em.stop...
- Page 19 Extrude Secondary interface Explain Stop Stop feeding out filament Display the distance of feeding out Load Start feed out filament Nozzle Display nozzle temperature Normal Flow speed slow, normal, fast Distance of feeding out Percentage/ Speed Secondary interface Explain Decrease ”-” Decease the printing speed Increase ”+”...
- Page 20 Percentage/ Flow Secondary interface Explain Decrease ”-” Decease the flow rate Increase ”+” Increase the flow rate Flow Switch to Speed Adjust rate Reset Reset to initial speed Settings Secondary interface Explain English Switch to other language Silent ON Switch On/off buzz of printer Runout On Switch On/off filament detector Info...
- Page 21 Secondary interface Explain Decrease ”-” Decease the Fan rate Increase ”+” Increase the Fan rate Switch to Fan1 Full 100% Fan rate Stop Stop fan working Babystep Secondary interface Explain Decrease Decrease the distance between nozzle and plate Increase Increase the distance between nozzle and plate Save Save the current setting 0.01mm...
-
Page 22: Print Sheets
Mingda Magician X2 comes standard with a single-side PEI print sheet or Glass print sheet. If you have a different type, we recommend that you carefully study how to properly treat the surface in the Regular Maintenance chapter. -
Page 23: Inserting (Loading) Filament
4.3. Inserting (Loading) filament First, prepare a spool of filament - we strongly recommend using PLA because it's easy to work with. Take the spool, make sure the end of the filament is properly secured and place the spool onto the spool holder on top of the printer's frame. -
Page 24: Unloading (Removing) Filament
4.4. Unloading (Removing) Filament 1. Select Menu - Extrude-Unload 2. The printer will preheat automatically. As soon as it reaches the right temperature, the filament will be unloaded from the extruder in a few seconds. 3. Once the extruder stops unloading the filament, remove it from the extruder by hand. The filament needs to be wound up on the spool and secured carefully so that it does not tangle up. -
Page 25: Starting The First Print
- the temperature is lower to prevent the filament from dripping from the nozzle. Carefully observe the quality of the first layer. The Magician X2 is equipped with very accurate leveling sensor technology, which measures the distance between the nozzle and the bed with Perfect accuracy. -
Page 26: Removing A Printed Object From The Print Sheet
4.6. Removing a Printed Object from the Print Sheet Once the print job is finished, wait until the print sheet cools down. The print plate and heated bed may exceed 100 °C, depending on the settings - contact with unprotected skin can cause burns, so check the heatbed temperature in the footer of the LCD screen! Depending on the type of material, it may happen that the print will separate from the print sheet automatically by itself after cooling. -
Page 27: Nozzle Moves Too High/Low, Or Extrudes Plastic Outside The Print Area
4.7.2. Nozzle moves too high/low, or extrudes plastic outside the print area Solution: Make sure if the print plate is dislocation and that nothing is blocking the X/Y/Z axes. If the print sheet is not installed properly (e.g., it's not aligned with the heatbed), it may cause various printing issues. -
Page 28: The Nozzle Does Not Start Extruding, Even After Multiple Attempts
4.7.3. The nozzle does not start extruding, even after multiple attempts Solution: Make sure that the filament can reach the extruder gear inside the extruder and that the nozzle is not clogged. First of all, load the filament exactly as described in the Loading the Filament chapter. Once the loading procedure is completed, loose the knob screw, then flip the door open and see if the filament strand reached the large extruder gear. -
Page 29: Updating The Firmware
2. Copy the .bin file to a SD card formatted with FAT32 - you can use the SD card that comes with your Magician X2. 3. Insert the SD card into the printer and restart the device 4. -
Page 30: Sample Models
If your own custom print fails and the sample files are printed correctly, it means there's probably an issue with the way your files are sliced. Try reslicing them again with the default Mingda cura settings and check for the basic issues: l Incorrect printer/nozzle profile (the Magician X2 is equipped with a 0.4mm nozzle by default) -
Page 31: Printing Your Own Models
Our Magician X2 should be now fully calibrated and the first print was a success. And now, you want to print your own model - be it something you already modeled, or something you downloaded from the internet. -
Page 32: Obtaining Printable Models
6. Obtaining Printable Models The easiest way to start with 3D printing is to download models from the internet - they are usually in .3mf, .stl or .obj formats. Luckily, there are many enthusiasts in the 3D printing world, so a large number of 3D models are available for free. -
Page 33: Create Your Own Model
This is the format that 3D printers can understand. This file contains instructions about the movement of the nozzle, the amount of filament to be extruded, temperature settings, fan speeds and more. There are dozens of different slicers available, each with its own advantages and disadvantages. We suggest using our Mingda Cura slicer. -
Page 34: Mingda Cura Slicer Interface Explained
6.3. Mingda Cura slicer Interface Explained If you are the first time to download our Slicer, you need to select Mingda Magician X2 as your first profile. Then select the layer height, infill and the material you intend to use. If you are not sure about the layer height, stick with 0.2mm profiles as they give generally good results. -
Page 35: Using Supports
6.3.2. Using Supports Supports are printed structures resembling scaffolding. They are used for printing complex objects. After printing, they can be easily separated from the output. You can find a large number of objects that can be printed without supports - just place them in the right orientation on the bed, slice them and you can print. -
Page 36: Speed Vs Print Quality
The printing speed is affected by several factors. Primarily, it depends on the layer height. This can be set in Mingda Cura in the Print Settings drop-down menu in the upper right corner. 0.2mm is pre-set, but you can speed up the printing by choosing 0.30mm. -
Page 37: Infill
This makes sense especially if the model only touches the bed in a small area. This function can be enabled in Mingda Cura by checking the "Build plate adhension-type" in the menu in the right column. After... -
Page 38: Printing Objects Larger Than The Print Volume
6.3.6. Printing Objects Larger than the Print Volume The Magician X2 printer has a print volume of 230 × 230 × 260 mm. If this is not enough for your project, you can use Mingda Cura's built-in tools to find a solution. -
Page 39: Regular Maintenance
7. Regular Maintenance The Mingda Magician X2 was designed from the beginning as a true print "workhorse". Despite its high reliability, it is still a device with mechanical components that require more or less regular maintenance. Follow the instructions below to keep your printer in perfect condition for as long as possible. -
Page 40: Extruder Is Clogged Or Jammed
7.6. Extruder is Clogged or Jammed Clogged extruders can cause issues when printing or when loading a new filament. On the top of the extruder, there is a screw directly next to the filament insertion point. You can adjust the idler pressure by loosening or tightening these screws. -
Page 41: Troubleshooting Faulty Sensor Readings And Removing Errors
7.8. Troubleshooting Faulty Sensor Readings and Removing Errors If you encounter problems with the filament sensor, such as incorrect (or random) readings, make sure that everything in the extruder is correctly wired and that there is no debris in the filament path inside the extruder. If this doesn't help, please contact our tech support. - Page 42 © 2023 MINGDA Technology Co., Ltd. All rights reserved. Shenzhen MINGDA Technology Co.,LTD Email: info@3dmingda.com www.3dmingda.cc Youtube Channel Facebook Page Support request Mingda Official...
Need help?
Do you have a question about the MAGICIAN X2 and is the answer not in the manual?
Questions and answers