
Related Manuals for Mingda MD-A128


Summary of Contents for Mingda MD-A128
- Page 1 User Manual MD-A128 LED Letter 3D Printer Shenzhen MINGDA Technology Co., Ltd. V1.3...
-
Page 2: Table Of Contents
Contents 1. Equipment Information ------------------------------------------------------------------------------------------------------- 02 2. Equipment Parameters -------------------------------------------------------------------------------------------------------- 03 3. Package Contents ---------------------------------------------------------------------------------------------------------------- 03 4. Adjust the Voltage ---------------------------------------------------------------------------------------------------------- 04 5. Assemble ------------------------------------------------------------------------------------------------------------------------- 05 6. Install the filement ------------------------------------------------------------------------------------------------------------ 09 7. Printing the Test Files --------------------------------------------------------------------------------------------------------- 10 8. Support --------------------------------------------------------------------------------------------------------------------------- 11 9. - Page 3 FAQ manual. In the process of using the machine, if you encounter any questions or problems not included in this manual, you can fill in the after-sales list on the official website of MINGDA, and we will try our best to solve the problems. http://www.3dmingda.cc/single/request_after_sales_service.html...
-
Page 4: Equipment Information
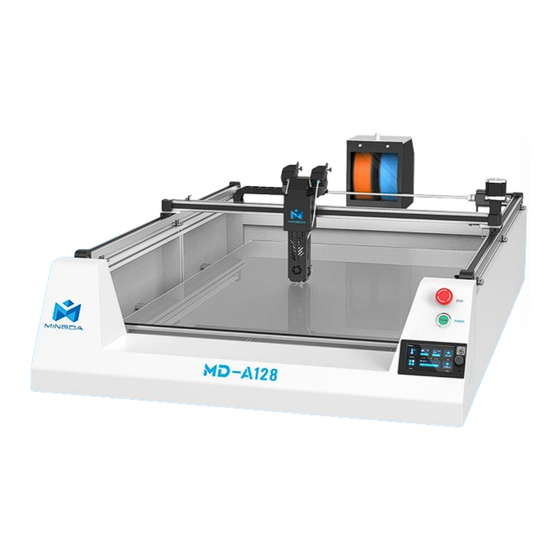
Equipment Information Air switch Filament house Emergency stop button Printing head Power Socket Left extruder 3D Touch SD card port Power switch Right extruder Platform Cooling fan Touching screen... -
Page 5: Equipment Parameters
Equipment Parameters Model name MD-A128 Technology FDM two in one out Machine size 1054*1613*490mm Printing size 800*1200*100mm Printing speed Recommend 60~100mm/s Layer height Recommend 0.2-0.3mm Printing accuracy ±0.2mm Nozzle size Standard 0.8mm nozzle Connection method SD Card,U Disk,Type-C Printing filament... -
Page 6: Adjust The Voltage
Adjust the Voltage Note: The power supply has been adjusted according to the local voltage. If you need to adjust the voltage, please follow the picture to operate it. 7pcs 110V 220V 110V 220V... -
Page 7: Assemble
Assemble 1 Installed the filament house Hang on the filament house and tight the screws Connect the cables... - Page 8 2 Power on Plug in the power cord Push air switch Turn on the emergency stop switch, press the green button to start...
- Page 9 3 Click the heating button , set the nozzle temperature to 220 °C and bed temperature to 60 °C. 4 Click Back-Leveling-start, Wait for the machine to complete the leveling procedure, save the data. (Note that if there is a collision during the leveling process, please press the emergency stop switch immediately;...
-
Page 10: Install The Filement
Install the filement 1. Place two rolls of filament and insert through the filament detector 2. Insert the two rolls of filament into the feed port of the left and right extruder... - Page 11 3. Click Meny-Extrude-Load. Keep clicking Load until the filament come out E0 to the left extruder, E1 to the right extruder . Click nozzle to exchange left and right extruder. Please Home the printer before switching the Nozzle. Because of two-in-one-out structure, when one filament needs to be load, the other material needs to be unload first.
-
Page 12: Printing The Test Files
4. Click the nozzle icon to switch to E1, and the right extruder is working at this time. Keep clicking Load until the filament come out. Printing the Test Files Click on the Print icon, choose a gcode file which you want to print. Tip: You can adjust the babystep according to the adhesion of the first layer of filament. -
Page 13: Support
128 MB graphics card memory MINGDA Limited Warranty Statement Besides limited warranty, within the maximum range allowed by law. MINGDA or any authorized dealer have not made any other statements or implied guarantee, including marketability and special-purpose applicability of implied warranties. MINGDA has not... -
Page 14: Quality Assurance
Quality Assurance 1. We provide a 12-month warranty on 3D printers (excluding the nozzle assembly,glass platform) purchased on or after June 1, 2019 and a 3-month warranty on the nozzle assembly. 2. The warranty period of each product starts from the date of production. - Page 15 6. We provide free remote technical support for every consumer during the service life of the product. You may request solutions from our after-sales team via phone or email within working hours. For any request submitted beyond the normal working hours, we will reply as soon as possible. 7.
- Page 16 Shenzhen MINGDA Technology Co., Ltd Tel: 0086-13530306290 Email: support@3dmingda.com www.3dmingda.com Address: 3 / F, No. 20, Dahe Industrial Zone, Longhua District, Shenzhen, 518110, Guangdong Province, China.
Need help?
Do you have a question about the MD-A128 and is the answer not in the manual?
Questions and answers