Table of Contents
Advertisement
Advertisement
Table of Contents

Related Manuals for FeiYu Tech SCORP 2


Summary of Contents for FeiYu Tech SCORP 2
- Page 1 Instructions V 1.0 Tutorial Videos...
-
Page 2: Table Of Contents
Catalogue 1. Overview ……………………………………………………………………………………………………… 1 2. Getting started ……………………………………………………………………………………………… 2 2.1 Charging ……………………………………………………………………………………………………………… 2 2.2 Adjust the gimbal to gimbal balancing position ……………………………………………………………… 2 2.3 Using support stand ……………………………………………………………………………………………… 3 3. Mounting the Camera ……………………………………………………………………………………… 3 3.1 Attach the quick release plate and camera backing base(Optional) ……………………………………… 3 3.2 Install lens holder (Optional) ………………………………………………………………………………………... - Page 3 Tutorial ·The tutorial videos can be watched at FeiyuTech official website or scan the QR code. https://www.feiyu-tech.com/play/ Download the App Scan the QR code to download the app, or search for "Feiyu SCORP" in the App Store or Google Play. * Requires iOS 11.0 or above, Android 6.0 or above.
-
Page 4: Overview
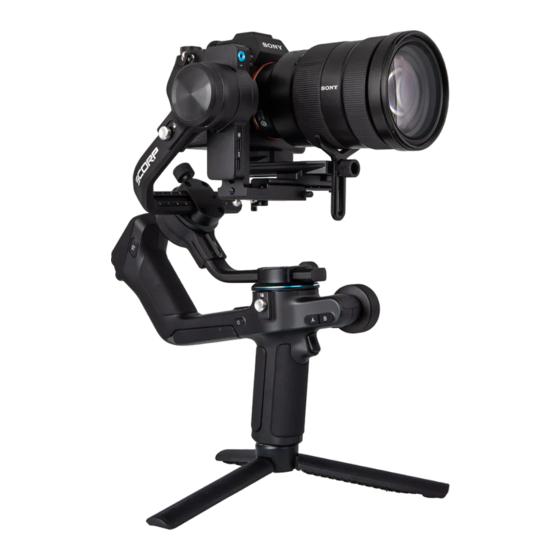
1. Overview * Not include camera. [32] [21] [33] [34] [31] [35] [17] [18] [19] [20] [30] [22] [23] [24] [29] [26] [12] [11] [27] [39] [16] [40] [10] [42] [43] [1] Power button [16] Vertical arm [31] Tilt axis [2] Touch screen [17] Anti-drop lock [32] Camera for tracking... -
Page 5: Getting Started
2. Getting started 2.1 Charging Please fully charge the battery before power on the gimbal for the first time. Charging with USB-C cable, supports quick charge which charging power ≤ 18W. 2.2 Adjust the gimbal to gimbal balancing position The gimbal is folded by default, please unlock all the three axes and adjust the gimbal to position, and then lock the three axes. -
Page 6: Using Support Stand
2.3 Using support stand Users can unfold the built-in kickstand or install tripod to place the gimbal on a flat surface. Unfold the built-in kickstand Unfold the tripod 3. Mounting the Camera Before mounting the camera, make sure the camera is ready for shooting (Install the camera lens, and the lens cover should be removed, the memory card and battery needs to be inserted to the camera, and battery is fully charged) , complete all the steps which mentioned in chapter "2. -
Page 7: Install Lens Holder (Optional)
Attach with quick release plate only Attach with camera backing base and quick release plate 3.2 Install lens holder (Optional) Install the lens holder on the quick release plate if needed, the rubber of the lens holder must be directly under the lens. It is recommended to use the lens holder when using a long or heavy lens. -
Page 8: Gimbal Balancing
It is recommended to push the camera against the tilt axis. Unlock ① to move the camera left or right according to camera's width to adjust, then lock ① 4. Gimbal Balancing Please balance the gimbal before shooting. Make sure the camera and lens are ready for shooting, and the gimbal is powered off or in sleep mode before balancing. -
Page 9: Balancing The Roll Axis
which the lens tilts to. c. If the lens tilts to one side, then the camera is that side heavy, move the slide ③ to the opposite direction, until the camera is steady pointing upward. d. Tighten the slide arm lock ②... -
Page 10: Balancing The Pan Axis
b. If the camera tilts to one side, then the camera is that side heavy, loosen the cross arm lock knob ② and then move the cross arm to the opposite direction, until the camera can stay still and horizontal to the ground. c. -
Page 11: Using The Memory Slider
4.4 Using the memory slider Feiyu SCORP come with the memory slider which can make balancing easier. After balancing the gimbal, move the memory slider to the hole in axis, and make the red dot on the memory slider exposing from the hole, in order to mark the current position. -
Page 12: Lock/Unlock Screen
5.2 Lock/Unlock screen Lock screen: Single tap F2 button to lock screen. Unlock screen: Single tap F2 button again to unlock the screen. Motor power Follow speed Motor power Follow speed Screen locked.Press F2 Screen unlock button to unlock Scenario Scenario Lock screen Unlock screen... -
Page 13: Follow Modes Introduction
6.1 Follow modes introduction ① (Default mode) Pan follow, only the pan axis follows the movement of user's hand. ② Pan and tilt follow, where both the pan and tilt axes follow the movement of user's hand, but roll axis does not. ③... -
Page 14: App Connecting
Auto rotation (Please refer to chapter 8.3.5) Camera will auto rotate to shoot according to the rotation speed and direction that set by users. It can be used to achieve the image rotating scene which been used frequently in movie Inception. Portrait mode (Please refer to chapter 8.3.7) Enter portrait mode for recording portrait video or live streaming. - Page 15 [11] Current device Current device FY-XXXXXXXX FY-XXXXXXXX Device battery Device battery 100% 100% Image Joystick [13] [12] Scenario Button transmission settings settings device [14] [17] Knob settings [15] [16] [18] Motor power Follow speed [19] [20] [25] Camera settings [10] [24] Horizon [21]...
- Page 16 [5] Knob settings Set the control object for multifunction knob, can be set as control axes, control electronic focus, control focus motor. Set damp, speed, smooth and sound for multifunction knob in "More". [6] Motor power settings Adjust tilt, roll, pan axes motor power manually or use auto tune function to tune the motor power automatically (Recommended).
- Page 17 axis inverted. [14] Recenter Tap to recenter the gimbal. [15] Flash follow(FFW) Tap to enter Flash follow. [16] Portrait mode Tap to enter portrait mode. [17] Selfie mode Tap to enter selfie mode. [18] Adjust horizontal angle Slide the slider to control roll axis to adjust the current horizontal angle. [19] Virtual joystick Use virtual joystick to control pan and tilt axis.
-
Page 18: Operation
[25] FPV Tap to enter FPV mode. [26] Motion sensing mode Tap to enter motion sensing mode which can control the pan and tilt axis to follow the movement of smartphone, can not switch follow modes in motion sensing mode (PF/PTF/FPV/Lock). - Page 19 8.1.3 Trigger button Double tap: Recenter Triple tap: Enter/Exit selfie mode (Pan axis turn 180° ) Press and hold: PTF (Release to exit) You can custom the function via App 8.1.4 Joystick Push: Control the movement of the tilt and pan axes.
- Page 20 8.1.8 F2 button(Home button) Single tap: (1) Lock/Unlock screen (In home page) (2) Return to home page (In other pages) Double tap: Enter FFW mode Long Press: Enter motor power auto tuning 8.1.9 A/B button Long press: Mark the current position as A/B Single tap: Return to the position A/B that you have marked Can be used to mark axes/focus position.
-
Page 21: Touch Screen Operation
8.1.12 Key Combinations Long press F1 button + F2 button: Clear Bluetooth *(1) Some features may require specific camera support. You can visit the official website to check the list of compatible devices: https://www.feiyu-tech.com/feiyu-scorp-2/ (2) We recommend using this product in conjunction with the Feiyu SCORP App. 8.2 Touch screen operation [2][3] Motor power... - Page 22 [5] Follow speed Users can select different gimbal follow speed profiles, or customize follow speed. [6] Follow mode Select gimbal follow mode. PF: Pan follow, only the pan axis follows the movement of user's hand. PTF: Pan and tilt follow, where both the pan and tilt axes follow the movement of user's hand, but roll axis does not.
- Page 23 Swipe from right to left Joystick settings Gimbal settings A/B settings - Joystick settings Set the joystick speed for controlling pan/tilt axis, provide joystick direction switch. - Gimbal settings Including disable selfie, manual lock, and horizon calibration settings. - A/B settings Set auto focus time and attitude change time.
-
Page 24: Function Operation
Swipe up Focus motor Tilt Roll Knob settings - Knob settings Set the control object for multifunction knob, can be set as control axes, control electronic focus, control focus motor. Set damp, speed, smooth and sound for multifunction knob in "Knob settings". Focus motor Electronic focus/focus motor control pane Axes control panel... - Page 25 Tips: If the gimbal is vibrating in high frequency, it means the motor power is too strong. If the gimbal is shaking in low frequency and large amplitude, it means the motor power is too weak. Auto tune the motor Auto tune power (Recommend)
- Page 26 Lock Motor power Follow speed Scenario Follow mode PF: Pan follow, only the pan axis follows the movement of user's hand. PTF: Pan and tilt follow, where both the pan and tilt axes follow the movement of user's hand, but roll axis does not. FPV: Pan, tilt and roll follow, where all 3 axes follow the movement of user's hand.
- Page 27 8.3.5 Auto rotation Can be used to achieve the image rotating scene which been used frequently in movie Inception. Select “Scenario” in home page, then select “Auto rotation”. The tilt axis will rotate 90° counterclockwise to make the camera pointing upward. Gimbal start to rotate after setting the rotation speed, direction, and rotational number.
- Page 28 8.3.7 Portrait mode Select “Scenario” in home page, then select “Portrait mode”. The tilt and pan axis will rotate 90° counterclockwise to make the camera pointing upward. Hold the handle to make the lens horizontal to the ground to shoot in portrait mode. Exit: Tap the icon at the bottom of the screen to exit.
- Page 29 8.3.9 Track video Select “Scenario” in home page, then select “Track video”, capture video with up to 10 waypoints. Add waypoints Waypoints Portrait mode Smoothness Motor power Follow speed Delete waypoints Selfie mode Horizon Vertical angle Horiz 0° Vert 0° angle Track video Preview...
- Page 30 8.3.10 Joystick settings Swipe from right to the left on the home page and select 'Joystick Settings'. Joystick Speed: Set the joystick speed for controlling pan/tilt axis. Joystick Direction: Enable/disable inverted control of pan/tilt axis. Joystick settings Joystick speed Pan lnverted Joystick direction Tilt lnverted Gimbal settings...
- Page 31 Gimbal Bluetooth name Joystick settings FY_SCORP_XXXXXX Camera Cor Gimbal settings Connect/Disconnect camera XXXXXXX Bluetooth setting Bluetooth Connect the smartphone Swipe from right to the left on the home page and select "Bluetooth Settings" to view the gimbal's Bluetooth name. Turn on your phone's Bluetooth, locate the gimbal's Bluetooth name for connecting.
- Page 32 8.3.14 AI Tracking Triple tap the F1 button can turn AI power on or off. Alternatively, swipe from right to the left on the home page of screen, select "More Settings" to toggle the "AI Power" switch on or off. Bluetooth setting AI Power AI Power...
-
Page 33: Control Ports
Spread palm (Left or right hand): Shutter When the smartphone is in photo/video mode: Take photo or start recording after a 3-second countdown with beep sound. After started the recording, do the gesture again to stop recording Double L-Shaped gestures: Custom framing Start framing, green light blinks fast. -
Page 34: Specifications
Connect camera with shutter cable 9. Specifications Product name Feiyu SCORP 3-Axis Camera Handheld Stabilizer Product model Feiyu F2 Tilt: +200° ~ -120° Rotatable Range Roll: +245° ~ -75° Pan: 360° Tilt: +180° ~ -51° Controllable Range Roll: +36° ~ -36° Pan: 360°... - Page 35 Accessories [1] USB 2.0 to USB-C Charging Cable [9] Tripod [2] USB-C to Micro Camera Control Cable [10] Fixed plate [3] USB-C to USB-C Camera Control Cable [11] Slider [4] USB-C to TRS2.5 Camera Control Cable [12] Quick release plate [5] USB-C to Multi Camera Control Cable [13] Camera backing base x1 [6] USB-C to 2.5mm Camera Control Cable...
- Page 36 This equipment generates uses and can radiate radio frequency energy and, if not installed and used in accordance with the instructions, may cause harmful interference to radio communications. However, there is no guarantee that interference will not occur in a particular installation. If this equipment does cause harmful interference to radio or television reception, which can be determined by turning the equipment off and on, the user is encouraged to try to correct the interference by one or more of the following measures: - Reorient or relocate the receiving antenna.
- Page 37 Manufactured by: Guilin Feiyu Technology Incorporated Company Website: www.feiyu-tech.com E-mail: support@feiyu-tech.com Tel: +86 773-2320865...
Need help?
Do you have a question about the SCORP 2 and is the answer not in the manual?
Questions and answers
Как переключить язык с китайского на английский, а лучше на Русский
COMO FAÇO PARA LER O PRODUTO EM PORTUGUÊS (BRASIL)