
Subscribe to Our Youtube Channel
Related Manuals for FeiYu Tech SCORP-C


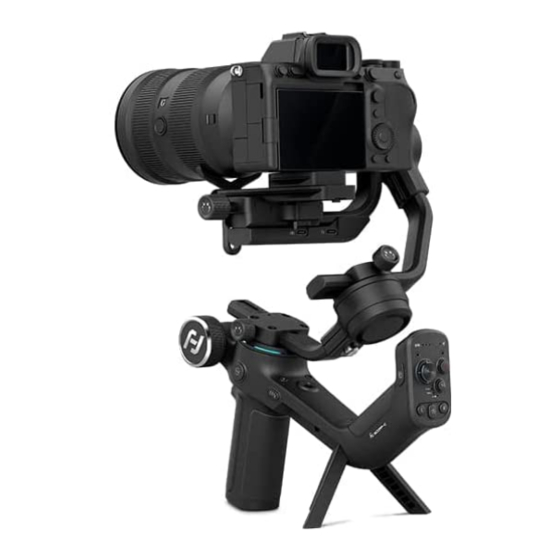
Summary of Contents for FeiYu Tech SCORP-C
- Page 1 Quick Start Guide 快速入门 Kurzanleitung Guide de Démarrage Rapide Guía de Inicio Rápido Inizio rapido V 1.1...
- Page 2 Quick Start Guide …………………………………… 快速入门 ……………………………………………… Kurzanleitung ……………………………………… Guide de Démarrage Rapide ……………………… Guía de Inicio Rápido ……………………………… Inizio rapido …………………………………………...
- Page 3 Quick Start Guide V 1.1 Tutorial Videos - 3 -...
-
Page 4: Download The App
1. Overview User manual * Not include camera. [25] Scan the QR code to get the latest user manual or download it from the official website. [24] [19] [20] https://www.feiyu-tech.com/feiyu-scorp-c/ User manua [23] [26] [22] [18] [21] Download the App... -
Page 5: Mounting The Camera
2.2 Adjust the gimbal position to gimbal balancing position 3.2 Install lens holder (Optional) The gimbal is folded by default, please unlock all the three axes and adjust the gimbal position Install the lens holder on the quick release plate if needed, the rubber of the lens holder must to gimbal balancing position, and then lock the three axes. -
Page 6: Gimbal Balancing
4. Gimbal Balancing 4.3 Balancing the pan axis a. Unlock the pan lock ① . Hold the tripod, Please balance the gimbal before shooting. Make sure the camera and and tilt the gimbal forward until it is lens are ready for shooting, and the gimbal is powered off or in sleep horizontal to the ground. - Page 7 Triple tap: Enter/Exit selfie mode the tilt and pan axes. *Need to connect with camera. Refer to the camera compatibility list on (Pan axis turn 180° ) https://www.feiyu-tech.com/feiyu-scorp-c/ Press and hold: PTF (Release to More button function introductions please refer to the user manual.
-
Page 8: Specification
6. Specification Product name Feiyu SCORP-C 3-Axis Camera Handheld Stabilizer Product model Feiyu-F2C Max. Tilt Range +120° ~ -201° Max. Roll Range +215° ~ -106° Max. Pan Range 360° Weight About 1200g Payload Capability About 2500g (Well-balanced) Battery life 13 Hours... - Page 9 快 速 入 门 V 1.1 教 学 视 频 - 9 -...
- Page 10 1. 产品概览 详细说明书 * 本产品不含相机 按以下步骤操作可快速体验产品的基本功能。更多功能 [25] 的使用请参阅详细说明书 https://www.feiyu-tech.cn/feiyu-scorp-c/ [24] 详细说明书 [19] [20] [23] [26] [22] 下载 App [18] [21] [27] 扫描二维码或在应用商店搜索“Feiyu SCORP”下载。 [14] * 系统要求 : iOS 9.0 或更高版本,Android 6.0 或更高版本 * Android 版本请使用浏览器扫描二维码下载 [28] Android [28] [29] [13] 2.
- Page 11 2.2 展开至平衡锁定状态 3.2 安装镜头支架(选装) 出厂时稳定器主体部分处于收纳锁定状态,请分别将三轴电机锁拨动至解锁位置,调整三轴的位 可根据需要选择将镜头支架安装固定在快装板,支架软胶顶住镜头,拧紧镜头支架固定旋钮。建 置至平衡锁定状态,再分别将三轴电机锁拨动至锁定位置,方便下一步操作。 议搭载较长、较重的镜头时安装该支架。 3.3 安装至稳定器 解锁快装版安全锁①,将快装板连同相机,按指示方向卡入安装卡槽②,前后调整相机至大致平 衡后锁紧安全锁①。安装时尽量将相机贴紧俯仰轴,可根据相机宽度,解锁滑块固定锁③,左右 移动滑块调整位置后锁紧固定锁③。 收纳锁定状态 平衡锁定状态 3. 安装相机 安装相机之前,确保相机已做好拍摄准备(已安装镜头,存储卡,安装电池并确保电量充足,取 下镜头盖) , 确保已完成 “2. 准备工作” 的步骤, 稳定器处于平衡锁定状态 并使稳定器关机或休眠。 , 3.1 安装快装板和增高块(选装) 将快装板安装至相机底部,拧紧相机固定螺丝。 可根据需要选择安装增高块(如搭配大镜头时使用),将增高块安装至相机底部,拧紧相机固定 螺丝,再用 2 颗固定螺丝固定在快装板上。 直接安装至快装板 选装增高块后安装至快装板 - 11 -...
- Page 12 4. 平衡调节 4.3 航向轴平衡调节 a. 打开航向轴电机锁①,握住稳定器三脚架, 拍摄前需对稳定器相机进行平衡调节。调节前确保相机及镜头已做好拍 使稳定器向前倾斜,使其与地面平行。 摄准备。调平时稳定器需关机或休眠。建议用手托住相机后再移动滑臂 / b. 如相机往一端倾斜, 则表明重心偏向倾斜端, 横臂 / 竖臂。 教 学 视 频 需拧松竖臂固定旋钮②,向倾斜的反方向移动 竖臂③,直至竖臂保持水平平衡,即已调平。 4.1 俯仰轴平衡调节 c. 拧紧竖臂固定旋钮②。 4.1.1 俯仰轴垂直平衡 若相机在水平角度保持静止不动,表示航向轴 已调节平衡。 a. 打开俯仰轴电机锁①,拧松滑臂固定旋钮②。 b. 使相机镜头垂直向上,观察相机倾斜方向。 c. 如相机镜头往一端倾斜, 则表明重心偏向倾斜端, 需向倾斜的反方向移动滑臂③,直至相机镜头保 5. 操作 持垂直向上,即已调平。...
- Page 13 随 / 全域跟随 / 闪随模式 (依次切换) 焦器) 双击:休眠 可通过长按旋钮功能切换键,设置当 五连击 : 水平校准 ( 完成后单击唤醒 ) 前可控制选项为 (1) 或 (2) 或 (3) * 需连接相机,可访问网站参阅可控相机列表: https://www.feiyu-tech.cn/feiyu-scorp-c/ 更多按键功能操作请参考详细版说明书。 扳机键 摇杆 双击 : 复位 推动:控制俯仰、航向轴转动 三连击 : 切换 / 退出 自拍 ( 航向轴 转 180° ) 按住...
- Page 14 6. 参数 产品名称 飞宇蝎子 -C 三轴相机手持稳定器 产品型号 Feiyu-F2C 俯仰角动作角度 +120° ~ -201° 横滚角动作角度 +215° ~ -106° 航向角动作角度 360° 产品重量 约 1200g 最大载重 约 2500g ( 重心平衡状态下 ) 理论续航时间 13 小时 电池容量 2500mAh 工作电压 6.8V-8.4V 适配相机 SONY、佳能、尼康、松下等相机 ( 具体适配相机及镜头请参阅详细版说明书 ) 配件 USB 2.0 to Type-C Type-C to Micro(A03) Type-C to Type-C (C02)
- Page 15 Kurzanleitung V 1.1 Tutorial-Videos - 15 -...
-
Page 16: Die App Herunterladen
Funktionen des Produkts vertraut zu machen. Für weitere Funktionen Bitte beachten Sie die ausführliche [24] Gebrauchsanweisung. [19] [20] Benutzerhandbuch [23] [26] https://www.feiyu-tech.com/feiyu-scorp-c/ [22] [18] [21] Die App herunterladen [27] [14] Scannen Sie den QR-Code oder suchen Sie im App- Shop nach "Feiyu... -
Page 17: Montage Der Kamera
2.2 Einstellen der kardanischen Position auf die kardanische 3.2 Objektivhalter installieren (optional) Ausgleichsposition Bringen Sie den Objektivhalter nach Bedarf an der Schnellwechselplatte an. Das Gummi des Objektivhalters muss sich direkt unter den Lehnen befinden. Es wird empfohlen, den Der Gimbal ist standardmäßig eingeklappt. Bitte entriegeln Sie alle drei Achsen und stellen Objektivhalter zu verwenden, wenn Sie ein langes oder schweres Objektiv verwenden Sie die Gimbal-Position auf die Gimbal-Ausgleichsposition ein, und sperren Sie dann die drei Achsen. -
Page 18: Betrieb
4. Gimbal-Ausgleich 4.2 Auswuchten der Rollachse a. Entriegeln Sie die Rollensperre ① , prüfen Sie die Bitte balancieren Sie den Gimbal vor der Aufnahme aus. Stellen Sie Richtung, in die das Objektiv gekippt ist. sich sicher, dass die Kamera und das Objektiv aufnahmebereit sind und der Gimbal ausgeschaltet oder im Ruhezustand ist, bevor Sie ihn b. - Page 19 Erneut klicken: (1) Diesen aufnehmen Modus verlassen (im ungedrehten *Muss mit der Kamera verbunden werden. Siehe die Kompatibilitätsliste der Kamera auf Zustand) (2) Die Drehung anhalten (Unter https://www.feiyu-tech.com/feiyu-scorp-c/ Drehung) Weitere Einführungen in die Tastenfunktionen finden Sie im Benutzerhandbuch. - 19 -...
-
Page 20: Spezifikation
Blaues Licht blinkt schnell Objektivhalter Objektivhalterschraube Befestigungsschrauben der ×1 ×1 Kamera ×3 6. Spezifikation Produktname Feiyu SCORP-C 3-Axis Camera Handheld Stabilizer Produktsmodell Feiyu-F2C Neigungswinkel der Wirkung +120° ~ -201° Rollwinkel der Wirkung: +215° ~ -106° Richtungswinkel der Wirkung 360° Produktgewicht ca. -
Page 21: Guide De Démarrage Rapide
Guide de Démarrage Rapide V 1.1 Vidéos de tutoriel - 21 -... -
Page 22: Aperçu Du Produit
* Caméra non incluse. Suivez les étapes ci-dessous pour découvrir rapidement les [25] fonctions de base du produit. Pour plus de fonctionnalités, veuillez vous référer au manuel d'utilisateur. [24] [19] [20] https://www.feiyu-tech.com/feiyu-scorp-c/ Manuel d' utilisateur [23] [26] [22] Télécharger l'application [18]... -
Page 23: Montage De La Caméra
2.2 Ajuster la position du cardan jusqu' à ce que l'équilibrage du cardan 3.2 Installez le porte-objectif (option) soit réalisé et verrouillé Montez et fixez le porte-objectif sur la plaque de dégagement rapide selon vos besoins, le caoutchouc du porte-objectif doit être directement sous l'objectif et la vis du porte-objectif serrée. Le cardan est plié... -
Page 24: Opération
4. Equilibrage du cardan 4.2 Equilibrage de l'axe de roulis a. Déverrouillez le verrou de roulement ① pour vérifier Veuillez équilibrer le cardan avant de filmer. Assurez-vous que la le sens dans lequel la caméra s' incline. caméra et l'objectif sont prêts pour la prise de vue. Le cardan doit être b. - Page 25 ! S'il s' agit de la première utilisation, ou après le remplacement d' une caméra ou d' un Bouton d'obturateur* Touche de rotation objectif, veuillez d' abord régler la puissance du moteur après la mise sous tension. automatique Appuyez partiellement : Mise Appuyez longuement sur le bouton d'alimentation et relâchez-le pour allumer/éteindre au point Simple clic: Passer au mode de...
- Page 26 Bouton FPV Touche A/B Simple clic : Entrer/quitter le Appui long : Repérer la position Désignation du produit Feiyu SCORP-C 3-Axis Camera Handheld Stabilizer mode FPV actuelle comme point A/B Modèle de produit Feiyu-F2C Simple clic : Revenir au point A/B déjà...
-
Page 27: Guía De Inicio Rápido
Guía de Inicio Rápido V 1.1 Vídeos Tutoriales - 27 -... -
Page 28: Información General
Manual de Usuario * No incluye cámara. Escanee el código QR para obtener el último [25] manual de usuario o descárguelo del sitio web oficial. [24] [19] [20] https://www.feiyu-tech.com/feiyu-scorp-c/ Manual de Usuario [23] [26] Descargar la App [22] [18] [21] Escanee el código QR para descargar la App o busque... - Page 29 3.2 Instale el soporte de la lente (opcional) ajuste la posición del cardán a la posición de equilibrio del cardán, y luego cambie los tres bloqueos a la posición de bloqueo. Instale el soporte de la lente en la placa de liberación rápida según sea necesario, la goma del soporte de la lente debe estar directamente debajo de las inclinaciones.
-
Page 30: Operación
4. Equilibrio del Cardán 4.2 Ajustar el equilibrio del eje de balanceo a. Desbloquee el bloqueo de balanceo ① , compruebe Equilibre el cardán antes de fotografiar. Asegúrese de que la cámara y la dirección en la que se inclina la lente. la lente estén listas para fotografiar y que el cardán esté... - Page 31 (En el estado no giratorio) *Necesita conectarse con la cámara. Consulte la lista de compatibilidad de cámaras (2) Pausar la rotación (En el estado https://www.feiyu-tech.com/feiyu-scorp-c/ de rotación) Más introducciones de funciones de botones, consulte el manual de usuario. - 31 -...
-
Page 32: Luz Indicadora
Soporte de lente Tornillo del soporte de la lente Tornillo de fijación de cámara ×1 ×1 ×3 Nombre del producto Feiyu SCORP-C 3-Axis Camera Handheld Stabilizer Modelo Feiyu-F2C Max. Rango de inclinación +120° ~ -201° Max. Rango de balanceo +215° ~ -106°... -
Page 33: Inizio Rapido
Inizio rapido V 1.1 Video Didattico - 33 -... -
Page 34: Panoramica Del Prodotto
* Questo prodotto non contiene una telecamera. Seguite questi passi per sperimentare rapidamente le funzioni [25] di base del prodotto. Più funzionale si prega di fare riferimento alle istruzioni dettagliate per l'uso. [24] [19] [20] https://www.feiyu-tech.com/feiyu-scorp-c/ Istruzioni dettagliate [23] [26] Scaricare App [22] [18]... - Page 35 3.2 Montaggio del supporto della lente (opzionale) motore a tre assi nella posizione di blocco per facilitare l'operazione successiva. Puoi scegliere di installare e fissare il supporto dell'obiettivo sulla piastra di montaggio rapido secondo le tue esigenze, tenere l'obiettivo con la gomma morbida del supporto e stringere la manopola di fissaggio del supporto dell'obiettivo.
-
Page 36: Regolare Il Bilanciamento
4. Regolare il bilanciamento 4.2 Regolazione dell'equilibrio del rullo a. Aprire il blocco del motore a rulli ① e osservare la Bilanciare la fotocamera prima di scattare. Assicurarsi che la direzione di inclinazione della telecamera. fotocamera e l'obiettivo siano pronti per lo scatto prima della b. -
Page 37: Funzionamento Dei Tasti
*Per collegare la telecamera, è possibile visitare il sito web e fare riferimento alla lista delle telecamere (2) Mettere in pausa la rotazione completa): Scattare foto controllabili: https://www.feiyu-tech.com/feiyu-scorp-c/ (Sotto stato del rotazione) Per ulteriori funzioni chiave, si prega di fare riferimento al manuale dettagliato. - Page 38 5.3 Introduzione per la modalità di seguire PF: Heading following, solo heading following, non pitching e rolling directions Product name Feiyu SCORP-C 3-Axis Camera Handheld Stabilizer PTF: la rotta e il passo seguono, la direzione del rollio non segue. Product model Feiyu-F2C FPV: follow completo nelle direzioni di prua, beccheggio e rollio.
- Page 39 存储和保养 Lagerung und Wartung 1. 请将本产品存放在儿童及宠物接触不到的地方。 1. Bewahren Sie das Produkt außerhalb der Notice Nota 2. 禁止将本产品放在靠近热源(火炉或加热器等) Reichweite von Kindern und Haustieren auf. 1. Make sure motor spinning is not blocked by 1. Asegúrese de que el motor no esté bloqueado 2.
- Page 40 FCC regulatory conformance: indietro per un nuovo debugging. Tutte le spese che ne derivano sono a carico del cliente. This device complies with Part 15 of the FCC Rules. 4. Il funzionamento continuo per lungo tempo Operation is subject to the following two può...
- Page 41 Warranty Card / 售后服务卡 Product Model 产品型号 Serial Number 序列号 Purchase Date Facebook Youtube Twitter Website/ 官网 购买日期 Customer Name 客户姓名 Customer Tel 客户电话 Customer Email 客户邮箱 Warranty: lnstagram WeChat/ 微信 Weibo/ 微博 Tik Tok/ 抖音 1. Within one year from the date of selling, the product is malfunctioning under normal due to non-artificial reasons.
- Page 44 This document is subject to change without notice. If you have any questions about this document, please contact us by the following ways. 说明书内容如有更新,恕不另行通知。如对本内容有任何疑问或建议,可通过以下方式 联系我们。 Dieses Dokument kann ohne vorherige Ankündigung geändert werden. Wenn Sie Fragen zu dies. Le contenu du manuel peut être modifié sans préavis. Si vous avez des questions sur ce manuel, veuillez nous contacter.
Need help?
Do you have a question about the SCORP-C and is the answer not in the manual?
Questions and answers
как понять что идёт зарядка стаба