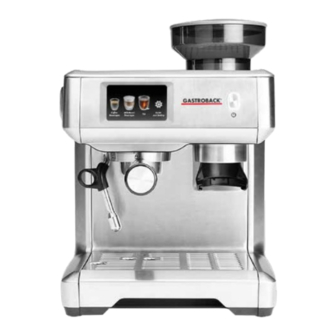
Gastroback DESIGN ESPRESSO BARISTA PRO Operating Instructions Manual

Gastroback DESIGN ESPRESSO BARISTA PRO Operating Instructions Manual

Hide thumbs Also See for DESIGN ESPRESSO BARISTA PRO:
Table of Contents

Advertisement

Quick Links

DESIGN ESPRESSO
BARISTA PRO
OPERATING INSTRUCTIONS
Art.- No. 42623 » Design Espresso Barista Touch «
Deutsch
READ AND OBSERVE INSTRUCTIONS
English
FOR USE! FOLLOW INSTRUCTIONS!
www.gastroback.de
Model and attachments are subject to change!

Advertisement

Table of Contents
loading
Need help?

Need help?

Do you have a question about the DESIGN ESPRESSO BARISTA PRO and is the answer not in the manual?

Questions and answers

Subscribe to Our Youtube Channel

Summary of Contents for Gastroback DESIGN ESPRESSO BARISTA PRO

  • Page 1 DESIGN ESPRESSO BARISTA PRO OPERATING INSTRUCTIONS Art.- No. 42623 » Design Espresso Barista Touch « Deutsch READ AND OBSERVE INSTRUCTIONS English FOR USE! FOLLOW INSTRUCTIONS! www.gastroback.de Model and attachments are subject to change!
  • Page 2: Table Of Contents

    We attach a certain importance to your safety. Thus, we ask you to read all provided instructions and information in this booklet carefully and completely, before you start Installing the Water Filter .............. 24 running the appliance. This will help you to know all functions and properties of your Flushing the Water System ..............
  • Page 3 Activating or Deactivating the Acoustic Signals ........ 53 If you have any questions about GASTROBACK® products, if your unit is not wor- Setting Up the Internal Clock ............53 king properly straight away or if you need any accessories or spare parts for your Changing the Setting of the Water Hardness ........
  • Page 4: Important Safeguards

    Please contact your vendor. If there are any uncertainties or additional information is required, please feel free to contact the GASTROBACK Customer Care Center (phone: +49 (0)4165/22 25-0 / e-mail: info@gastroback.de). GENERAL SAFETY INSTRUCTIONS •...
  • Page 5 king, or has been subject to inadmissible strain (e.g. overheating, • For operation, only fill cold, clear tap water or low-mineral, non-car- mechanical or electric shock). The appliance or its parts are likely to bonated bottled water into the water tank. During operation, always be damaged, if the appliance is not working properly.
  • Page 6: Important Safeguards For Electrical Appliances

    IMPORTANT SAFEGUARDS FOR ELECTRICAL APPLIANCES power cord, or power plug in water or other liquids. Do not overfill the water tank (max. 2.5 litres; MAX marking) to avoid overflow. Place the appliance near a suitable wall power outlet. Connect the appli- ance directly to a protected mains power supply with protective conduc- •...
  • Page 7: Notes And Instructions In This Booklet

    not use glasses or plastic vessels, because even heat-resistant glass or • Any texts displayed on the screen are set in double quotation marks plastic could crack or melt due to extreme local heating during textu- (e.g. “Turning the machine on”). ring.
  • Page 8: Knowing Your Espresso Machine

    KNOWING YOUR ESPRESSO MACHINE PROPERTIES OF YOUR ESPRESSO MACHINE The Design Espresso Barista Touch can make espressi for a broad variety of coffee drinks. For special milk-based coffee drinks, milk can be textured (frothed) via the steam function. Additionally, the required hot water for various types of tea and other hot drinks is provided.
  • Page 9: Required Water Quality

    REQUIRED WATER QUALITY ADJUSTABLE BREWING TEMPERATURE The water hardness and the frequency of usage determine the frequency of desca- You can pre-select the brewing temperature for your coffee drinks. This way, even ling. As a rule of thumb, descale the appliance after approx. 2 weeks or, at the special coffee preferences are enabled (see: ‘Entering Your Own Settings / Chan- latest, when the descaling message is shown (see: ‘Descaling the Water System’).
  • Page 10: Touchscreen

    • The complete descaling procedure is programmed in the “Descaling cycle”. You Type of Tea Temperature will need a heat-resistant vessel for at least 2.5 litres and the GASTROBACK Pre- White Tea approx. 65°C (149 °F) mium Descaler. Green Tea approx.
  • Page 11: The Coffee Powder

    THE COFFEE POWDER pre-ground coffee powder. Leave at least 3 mm of free space between the tamped coffee powder and the rim of the espresso filter. We recommend to use the measuring Store coffee (whole beans, espresso pods or coffee powder) on a cool, dry, and spoon at the handle of the provided tamper for getting the correct amount.
  • Page 12: Preparations After Purchasing

    2. Clean the water tank, filter holder, espresso filters, milk jug, tamper, and hop- Measuring and Entering the Water Hardness per lid (see: ‘Care and Cleaning’). Ensure that the hopper lid is completely dry The water hardness detemines the intervals for descaling that have to be met for before closing the bean hopper with the hopper lid.
  • Page 13: Installing The Water Filter

    5. Fill the water tank up to the MAX filling level with fresh, cold drinking water and NOTE wipe dry the exterior. Then let the water tank slide vertically down at the rear of If you wish to use another water quality later on, you should check and enter the the appliance.
  • Page 14: Design Of The Screen-Based Control

    WARNING NOTE – During the starting cycle of the machine, hot water is given off the group head. Keep your hands away, while the message “Turning on the Before entering the drink page of a drink that requires coffee, in most cases an machine”...
  • Page 15: Home Page

    HOME PAGE The following beverages are pre-programmed: When the machine is switched on an automatic start procedure prepares the machi- Espresso, Espresso Pod, Cafè Crema, Americano, Espresso Macchiato ne for operation first. An appropriate message is shown (“Turning on the machine”) Coffee is the main ingredient for making these beverages.
  • Page 16: Beverages Made With Coffee

    THE SETTING PAGES IMPORTANT - The machine functions for grinding and brewing (coffee or tea) stop automatically. However, in most cases, you must stop the steam function (jug When touching a gear icon of the control areas on the drink page, the assigned icon) for texturing (frothing) milk manually, as soon as the desired temperature and setting page appears for adjusting the selected value.
  • Page 17: Making Your Drinks

    WARNING - RISK OF ELECTRIC SHOCK! Subject page Content – Do not let any liquid run onto or under the appliance. Wipe off spilled liquids immediately. The appli- Grinding The option “Adjusting grinding” gives an instruction for setting the grind size. ance drains surplus water automatically into the drip tray.
  • Page 18: Filling The Bean Hopper

    the drip tray is installed, the three wide holes in the metal grid must face to the NOTE left rear side of the machine. Ensure that the metal grid is lying stably. You may use a sufficient caraffe for filling the water tank, while the water tank is 4.
  • Page 19: Selecting Your Drink

    The operating elements on the screen pages are explained in chapter ‘Design of the filter for the selected drink. You get back to the selected drink page via the arrow Screen-Based Control’. You should get familiar with this features first. in the navigation bar.
  • Page 20: Filling The Espresso Filter Manually

    2. Push the espresso pod into the Pod filter and press the rim of the espresso pod NOTE onto the side walls of the Pod filter. The espresso pod must be well centred inside When using the grinder for the first time, the correct amount may not be given the Pod filter.
  • Page 21: Making Espresso

    2. Rotate the handle of the filter holder to the right until it sticks out at the front of the After the Extraction machine in approx. right angle (closed lock icon). Ensure that the filter holder is WARNING – Before removing the filter holder at the end of the extraction locked securely to the group head.
  • Page 22: Texturing Milk

    group head drip into the filter holder for removing residues of coffee powder NOTE and coffee oils from the espresso filter. Hot water may be obtained via the steam If you wish to use the textured milk for coffee or other hot drinks, you should brew wand as well (see: ‘Tea and Hot Water’).
  • Page 23: Making Tea Or Other Hot Drinks

    12. Pour the hot milk below the froth in your drink and spoon the milk froth on it. WARNING – Always stop the steam function, before removing or inserting Consume textured milk immediately, because milk froth collapses after a short the steam wand.
  • Page 24: Entering Your Own Settings

    You can reset all your individual settings to the factory settings of the machine (see: NOTE ‘Resetting the Machine to Factory Settings’). The only exception is the grind size. The selected setting will be kept until you shut off and/or unplug the machine. If This value is changed via a mechanically operated dial at the right side panel of you wish to keep your setting permanently, touch the plus sign on the navigation the machine.
  • Page 25: Selecting The Grinding Amount

    Selecting the Grinding Amount NOTE You can adapt the grinding amount for your espresso to your likings. For this 2 Avoid saving the setting “Manual” as default, because the amount given off until methods are possible. automatic shut off is too large for the espresso filters. Only use this setting for manu- ally controlling the grinder (see: ‘Controlling the Grinder Manually’).
  • Page 26: Changing The Volume

    The water temperature: The brewing temperature for all espresso functions can 1. Select the command “Guide and Setting / Settings / Coffee temperature”. • be selected on a dedicated page. This value affects all drinks with coffee as 2. Touch the buttons “+” or “–” for selecting a higher or lower temperature level. well and is always kept in memory until you change it again (see: ‘Changing the Coffee Temperature’).
  • Page 27: Saving A New Drink

    Saving a New Drink 1. Switch on the appliance and wait until the home page is shown. 1. On the selection page of the memory function, select the option “Save as MyPro- 2. Select the commands “Guide and Setting / Settings / Language”. The flags file”.
  • Page 28: Changing The Setting Of The Water Hardness

    2. If required, touch “+” or “–” in the appropriate control area for changing the RECALLING THE FACTORY SETTINGS hours and minutes. IMPORTANT - Recalling the factory settings will delete all changes and individual 3. In the navigation bar touch the arrow for switching back to the settings page. settings you made: operating data, customized default values and ALL your own Alternatively, touch the home icon for returning directly to the home page.
  • Page 29: Thoroughly Cleaning The Steam Wand

    Do not use any cleaning pads or corrosive or abrasive cleaners (e.g. metal scouring NOTE pads, disinfectants, bleach or unsuited descalers) for cleaning the appliance or any Via the arrow in the navigation bar, you can switch back to the previous page. part of it.
  • Page 30: Cleaning The Water Tank

    5. Place a large mug under the group head and (WITHOUT filter holder!) start the 8. Hold the water tank by the tank lid and let the water tank slide down at the rear brewing function via the cup icon. Let the brewing function operate until it is finis- of the machine (see: ‘Making Your Drinks / Filling the Water Tank’).
  • Page 31: Thorough Cleaning

    Then start a coffee brewing function for rinsing the espresso filter with water (e.g. 3. Place the cover at one side onto the rear chamber of the drip tray and push the “Coffee Beverages / Espresso / 2 cups”). cover down until it clicks into place. Place the filling indicator onto the post in the drip tray and turn it until it slides down.
  • Page 32: Flushing The Water System

    Select “Coffee Beverages / Espresso / 1 cup”. GASTROBACK Descaler (Art.-Nr.: 98175). Do NOT use vinegar. There is no Start the grinder via the bean icon. While the grinder is operating, turn the grind liability claim of the purchaser for any damage caused by excessive lime depo- size dial to the desired setting.
  • Page 33: Flushing

    SOLVING PROBLEMS When any problems occur during operation, you find solutions in the following table. CAUTION – When the descaling cycle has not been finished correctly, it is crucial to start the descaling cycle again from the beginning, before using Problem Possible Reason The Easy Solution...
  • Page 34 Problem Possible Reason The Easy Solution Problem Possible Reason The Easy Solution The water filter is damaged. Replace the water filter (see: ‘Before First Use / Prepara- Scale deposits clog the Descale the water system (see: ‘Descaling the Water tion after Purchase’). splash shield in the group System’).
  • Page 35 Problem Possible Reason The Easy Solution Problem Possible Reason The Easy Solution The espresso filter is Cancel the extraction cycle (touch the “Stop” button) The filter holder loosens at The filter holder is not Ensure that the filter holder is rotated to the stop and it is and wait approx.
  • Page 36 Problem Possible Reason The Easy Solution Problem Possible Reason The Easy Solution No or too little steam or The water tank is empty. Fill the water tank. Water accumulates under The water tank is over- Do not overfill the water tank. Observe the MAX marking hot water.
  • Page 37: Storage

    2. Wipe dry all parts of the machine completely—even the interior of the water tank For technical support, please contact GASTROBACK Customer Care Center by phone: and drip tray. Leave the parts dry naturally for at least 1 hour. For this, leave the hopper lid and tank lid open.
  • Page 38: Warranty

    NOTE Customers of Germany and Austria: For repair and service, please send: GASTROBACK GmbH, Gewerbestr. 20, D - 21279 Hollenstedt, Germany. Customers of other countries: Please, contact your vendor. Restricted use of this appliance in commercial, trade, or industrial environments is possible.
  • Page 39 GASTROBACK GmbH Gewerbestraße 20 21279 Hollenstedt / Germany • Telefon + 49 (0) 41 65 / 22 25 - 0 Telefax + 49 (0) 41 65 / 22 25 -29 • info@gastroback.de www.gastroback.de •...

This manual is also suitable for:

42623

Table of Contents