
Subscribe to Our Youtube Channel
Related Manuals for Alfa Laval Unique DV-ST UltraPure


Summary of Contents for Alfa Laval Unique DV-ST UltraPure
- Page 1 Instruction Manual Unique DV-ST UltraPure - Manual: for valve sizes DN8 to DN100 (¼” to 4”) ESE01752-EN12 2022-10 Original manual...
-
Page 3: Table Of Contents
Table of contents The information herein is correct at the time of issue but may be subject to change without prior notice 1. General information ................. 1.1. Valve design ..................2. Safety ..................2.1. Important information ................2.2. Warning signs ..................2.3. -
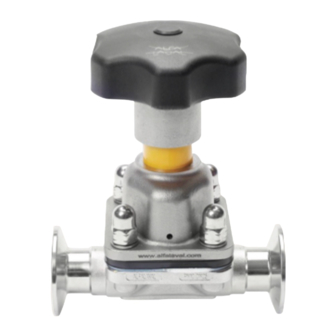
Page 4: General Information
1 General information 1.1 Valve design Countersink screw Handwheel Coupling Position nut Spindle Nuts Washers Yoke Thrust washer* Diaphragm holder Compressor Diaphragm Valve body Fasteners *) Remember to insert "thrust washer" (9) during installation of the diaphragm holder onto the spindle... -
Page 5: Safety
2 Safety Unsafe practices and other important information are indicated in this manual. Warnings are emphasised by means of special signs. 2.1 Important information Always Always Always r r r ead ead this this this manual manual befor manual befor before e e using using using the... -
Page 6: Safety Precautions
2 Safety All warnings in this manual are summarised on this page. Pay special attention to the instructions below so that serious personal injury and/or damage to the valve are avoided. 2.3 Safety precautions Installation: Installation: Installation: Never touch the valve or the pipelines when processing hot liquids or when sterilising Never Never Never... -
Page 7: Installation
The valve is assembled before delivery, if it is supplied with fittings. 3.1 Unpacking/delivery Step Step Step 1 1 1 CAUTION CAUTION CAUTION Alfa Laval cannot be held responsible for incorrect unpacking. Check Check Check the the delivery delivery delivery for: for: for: 1. -
Page 8: Drainability
3 Installation Study the instructions carefully and pay special attention to the warnings! 3.3 Installation angle on self-draining position T T T able able able 1. 1. 1. Drain Drain Drain angle angle x x x angle Port Port size Port size size... -
Page 9: Recycling Information
- At end of use, the equipment must be recycled according to relevant, local regulations. Besides the equipment itself, any hazardous residues from the process liquid must be taken into consideration and dealt with in a proper manner. When in doubt, or in the absence of local regulations, please contact your local Alfa Laval sales company... -
Page 10: Maintenance
Note: The diaphragm can be replaced without removing the valve body. Step 1 1 1 Step Step Only use Alfa Laval diaphragms. Step Step Step 2 2 2 Actuate the valve to the ”open“ position by rotating the handwheel counter-clockwise until the valve is fully opened. - Page 11 4 Maintenance Study the instructions carefully and pay special attention to the warnings! Step Step Step 8 8 8 Ensure that the bonnet compressor matches the connection of the diaphragm. Should this not be the case, replace the compressor. Step Step Step 9 9 9 With the bonnet in the "closed"...
- Page 12 4 Maintenance Study the instructions carefully and pay special attention to the warnings! Step Step Step 12 Actuate the valve to an almost closed position. Fully closing the valve can damage the diaphragm position, so that the diaphragm does not properly fit to the weir, see step 4. Tighten the body fasteners cross-wise using a wrench. NOTE! Proper assembly extends the life of the diaphragm.
-
Page 13: Travel Stop Adjustment
4 Maintenance Study the instructions carefully and pay special attention to the warnings! 4.4 Travel stop adjustment Please Please note Please note note: not valid for sizes DN8 and DN10 (1/8" and 3/8") Section 5.3 is not Step 1 1 1 Step Step CAUTION... - Page 14 4 Maintenance Study the instructions carefully and pay special attention to the warnings! Step Step Step 6 6 6 Remove screw, handwheel and coupling. Step Step Step 7 7 7 Screw down spindle by wrench, until valve is closed.. Step Step Step 8 8 8 Use two wrenches to loosen the position nut and lock nut.
- Page 15 4 Maintenance Study the instructions carefully and pay special attention to the warnings! Step Step Step 9 9 9 Adjust the position of position nut. Step Step Step 10 Put coupling on, and see the gap between Yoke and coupling is adequate(~0.5mm). Step 11 Step Step...
-
Page 16: Technical Data
130°C/266°F PTFE/EPDM -5°C/23°F 175°C/347°F 150°C/302°F TFM/EPDM -5°C/23°F 175°C/347°F 150°C/302°F Continuous temperature 40 min. steam sterilisation Chemical compatibility: Please contact Alfa Laval for information. Diaphragm Diaphragm Diaphragm service service service lifetime lifetime lifetime Max. r r r ecommended ecommended service service Max. - Page 18 © Alfa Laval Corporate AB This document and its contents is owned by Alfa Laval Corporate AB and protected by laws governing intellectual property and thereto related rights. It is the responsibility of the user of this document to comply with all applicable intellectual property laws. Without limiting any rights related to this document, no part of this document may be copied, reproduced or transmitted in any form or by any means (electronic, mechanical, photocopying, recording, or otherwise), or for any purpose, without the expressed permission of Alfa Laval Corporate AB.
Need help?
Do you have a question about the Unique DV-ST UltraPure and is the answer not in the manual?
Questions and answers