Advertisement
Quick Links
Technical Support and E-Warranty Certificate www.vevor.com/support
4-JAW SELF-CENTERING WOOD CHUCK
MODEL:KP2-3/4, KP96, KP965
We continue to be committed to provide you tools with competitive price.
"Save Half", "Half Price" or any other similar expressions used by us only represents an
estimate of savings you might benefit from buying certain tools with us compared to the major
top brands and doses not necessarily mean to cover all categories of tools offered by us. You
are kindly reminded to verify carefully when you are placing an order with us if you are
actually saving half in comparison with the top major brands.
Advertisement

Related Manuals for VEVOR KP2-3/4


Summary of Contents for VEVOR KP2-3/4
- Page 1 Technical Support and E-Warranty Certificate www.vevor.com/support 4-JAW SELF-CENTERING WOOD CHUCK MODEL:KP2-3/4, KP96, KP965 We continue to be committed to provide you tools with competitive price. "Save Half", "Half Price" or any other similar expressions used by us only represents an estimate of savings you might benefit from buying certain tools with us compared to the major top brands and doses not necessarily mean to cover all categories of tools offered by us.
- Page 2 CustomerService@vevor.com This is the original instruction, please read all manual instructions carefully before operating. VEVOR reserves a clear interpretation of our user manual. The appearance of the product shall be subject to the product you received. Please forgive us that we won't inform you again if there are any technology or software updates on our product.
- Page 3 Geometry accuracy (mm) Chuck Diameter Diagram of test Test item a.Radial run-out a:0.005 b.axial run-out b:0.005 Radial ≤0.15 ≤0.15 run-out of chuck Axial ≤0.15 ≤0.15 run-out of chuck Radial α≤0.4 α≤0.4 run-out of test L=50 L=50(75) - 2 -...
-
Page 4: Packing List
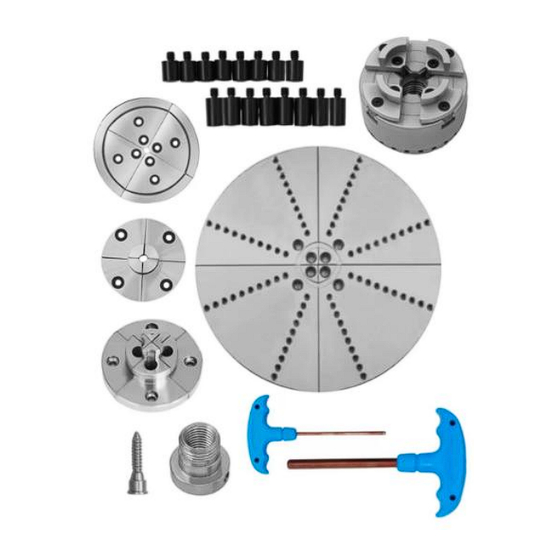
Manufactured from,this gives the chucks a higher durability ensuring a longer life and high quality finish which is less. PACKING LIST (KP2-3/4, KP96) 1.4-Jaw Self-Centering Chuck……………1pcs 2.Accessory Wooden Screw ………………………… 1pcs T-bar Allen Key …………………………... -
Page 5: Safety Precautions
(KP965) 1.4-Jaw Self-Centering Chuck …………1pcs 2.Accessory Wooden Screw………………………….1pcs T-bar Allen Key ……………………...… 1pcs Key chuck ……………………………… 1pcs Adapter … ……………………………… 1pcs Big Round Jaw (4 pieces) …………… 1sets Pin Jaw (4 pieces) ………………… 1sets Step Jaw (4 pieces)…………………1sets Flat Jaw (4 pieces) …………………1sets Stud……………………………………16pcs 3. - Page 6 permitted speed. 10.Disconnect machine from power source before making repairs or adjustments. 11.Do not operate while under influence of drugs,alcohol or medication. 12.Remove the tool rest before sanding or polishing. It is beyond the scope of this manual to describe all of the turning techniques that are possible with the 4-Jaw Chuck.
- Page 7 THE SCREW POINT The Screw Chuck is used to mount small, cross-grained pieces. 4-Jaw Self-Centering Chuck 25MM JAWS These jaws are used for expansion into small recesses and for firm holding of fine spindle work, such as earrings, chess pieces, etc.. To turn very small articles, the jaws can be unscrewed and the backing jaws only can be used.
- Page 8 KEY CHUCK The 4-Jaw Chucks provide one-hand tightening along with tremendous griping power provided by the 6 to 1 ratio of the scroll. The totally enclosed back assures consistent, smooth action by preventing dust and debris from getting into scroll of the Chuck. Key chuck cannot be beaten when it comes to holding power.
-
Page 9: Expansion Mode
EXPANSION MODE For this application arecess is turned into thework piece. The depth ofthe recess depends on the actual size of the workpiece as well as the type oftimber used. The minimum depth should be 5mm to 10mm. MAINTENANCE The chuck is engineered to close tolerances and may initially be stiff to operate. - Page 10 3.Choose appropriate speed before you start the lathe. 4.Screw the work piece hard against the jaws. 5.Heavy or unbalanced work pieces should not be fastened directly to the screw chuck. Use the faceplate rings instead. Address:Baoshanqu Shuangchenglu 803long 11hao 1602A-1609shi Shanghai Imported to AUS: SIHAO PTY LTD, 1 ROKEVA STREETEASTWOOD NSW 2122 Australia...
- Page 11 Place, Rancho Cucamonga, CA 91730 Pooledas Group Ltd Unit 5 Albert Edward House, The Pavilions Preston, United Kingdom SHUNSHUN GmbH Römeräcker 9 Z2021, 76351 Linkenheim-Hochstetten, Germany Made In China - 10 -...
- Page 12 Technical Support and E-Warranty Certificate www.vevor.com/support...
Need help?
Do you have a question about the KP2-3/4 and is the answer not in the manual?
Questions and answers