Table of Contents
Advertisement
Quick Links
Material: 80 GSM Bond Paper or 50# Bond Paper White
Ink: Black
Resolution: 150 DPI or above
Printing method: Offset Printing
Binding: Saddle Stitch
Folded size: 210 x 285 mm (W x H)
This drawing contains proprietary information and trade secrets of The Furrion Company, Inc.
METRIC
[INCH]
METRIC [INCH]
CRITICAL DIMENSION
CHECKING IS COMPULSORY
3
VOLUME
cm
MASS
grams
3
DENSITY
g/cm
GENERAL TOLERANCES
EXCEPT AS NOTED
0 TO 6mm = ±0.1
>6 TO 30mm = ±0.2
>30 TO 80mm = ±0.3
>80 TO 180mm = ±0.4
>180mm = ±0.5
ANGULAR = ± 3°
DO NOT PRINT THIS PAGE
Printing Notes:
Unauthorized use or copying is prohibited.
V1.0
18-Oct-22
REV.
DATE
MATERIAL:
FINISH SPEC:
SCALE:
DATE:
18-Oct-22
NAME:
IM for Low Cost Trim Kit Rooftop Air Conditioner - Electronic
NEW
MODIFICATIONS
COMPOSITE-NO
DRAWN BY:
APPROVED BY:
Grace Sun
Program: Indesign CC
Black
Grace Sun
NAME
Furrion Property Holding Ltd
SHEET 1 OF 1
Mandy Tse
PART NO.
IM-FHA00125
XX
ECN NO.
REVISION
1.0
Advertisement
Table of Contents

Subscribe to Our Youtube Channel
Related Manuals for Furrion FACB09HM


Summary of Contents for Furrion FACB09HM
- Page 1 Resolution: 150 DPI or above Printing method: Offset Printing Binding: Saddle Stitch Folded size: 210 x 285 mm (W x H) This drawing contains proprietary information and trade secrets of The Furrion Company, Inc. Unauthorized use or copying is prohibited. METRIC [INCH]...
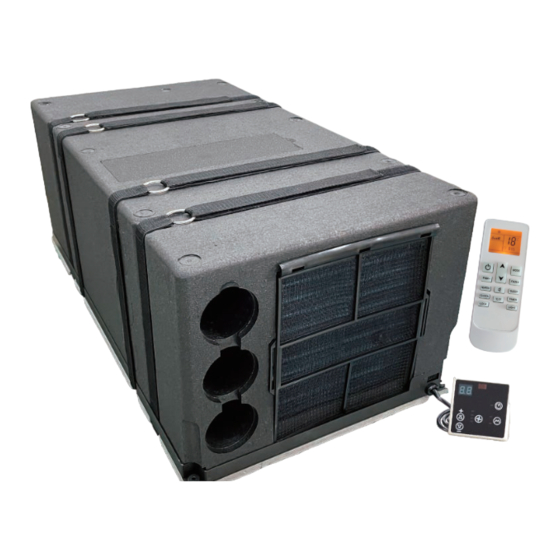
- Page 2 9K BTU UNDER-BENCH AIR CONDITIONER FACB09HM[2022011806] USER MANUAL * Picture shown here is for reference only.
-
Page 3: Table Of Contents
This manual has safety information and instructions to help WARNING you eliminate or reduce the risk of accidents and injuries. Always respect all safety warnings identified with these Indicates a potentially hazardous situation which, if not symbols. A signal word will identify safety messages and avoided, could result in death or serious injury. -
Page 4: General Information
GENERAL INFORMATION Scope of the manual Description of the controls This manual contains important information to guarantee Press the “MODE” button to toggle between the various correct use of the device. Include this manual when you pass operating modes - Auto, Cooling, Drying, Fan and Heating. on the device to another person. - Page 5 Remote control functions Heating mode Press the button to turn on the air conditioner. Press the MODE button to select heating mode. Press UP or DOWN button to set the desired temperature. MODE Press the button to set FAN+ FAN- the fan speed: MODE FAN-...
- Page 6 Dry mode Sleep mode The sleep mode regulates the temperature so as to keep you comfortable through the different stages of your sleep. In Press the button to turn on the air conditioner. sleep mode, the air conditioner unit will regulate the ambient temperature automatically so that you don’t feel too cold and Press the MODE button to select consume too much power.
-
Page 7: Install/Replace The Remote Control Batteries
Timer Function Timer ON When the air conditioner is switched off, press the TIMER button to turn on the air conditioner automatically at the set time. Press the button to set the hour and press the button to set the minute. -
Page 8: Installation
INSTALLATION Installation and repair of the air conditioner must only be Choice of installation location carried out by qualified personnel who are familiar with To accomplish uniform climate control in a vehicle, the air- the risks involved and the relevant regulations. Inadequate conditioner must be installed in the center of coach (as much repairs may cause serious hazards. - Page 9 Option 1: Use 4 screws(ST4.0*35mm) to bolt unit to the floor using the built in grommets and spacers. ● To install the unit it is necessary to create openings in the floor. The openings in the floor of the vehicle must be accessible and, therefore, must not be covered by parts of the chassis frame behind or the like.
-
Page 10: Fitting The Wall Control Unit
Option 3: Mount the belts with 4 supplied washers and 4 screws(ST4.0*35mm) . Fasten belts afterwards. Optional Installation Method: To improve the performance of the air-conditioner, an additional hole at the side can be added. Refer to steps below: Open the side cover foam, and keep the foam around the air inlet. -
Page 11: Compartment Opening And Electrical Hook-Up
Air ducting Make the air ducting with flexible hoses (not supplied). It is recommended to use cardboard pipe for air conditioning with an aluminium core and external covering of PVC with an inside nominal diameter of 2 9/25”(60 mm). This pipe has an outside diameter of 2 1/2”(64mm). -
Page 12: Troubleshooting, Maintenance And Recycling
TROUBLESHOOTING, MAINTENANCE AND RECYCLING Trouble, causes, remedies CAUSE SOLUTION The temperature is lower than 18℃ Check the set point temperature Defective thermal protection Wrong mode has been selected The machine does not cool Low gas charge Damaged compressor Dirty heat exchange coils Defective external fans Installation error of return air The temperature is higher than 30℃... -
Page 13: Maintenance
Maintenance Routine maintenance 2. Checking: Do it periodically, making sure that: 1. Cleaning: Do it periodically, removing the dust with a The condensation drain holes are not obstructed. – moist cloth. If necessary,use a non-aggressive detergent. The openings in the floor are not obstructed. –... - Page 17 ● 4/F, Flat C & D, The Grid, 133 Wai Yip Street, Kwun Tong, Kowloon, Hong Kong ● Toll free:+1-432-547-7378 ● Email: support@furrion.com ©2007-2022 Furrion Ltd. Furrion® and the Furrion logo are trademarks licensed for use by Furrion Ltd. and registered in the U.S. and other countries.
Need help?
Do you have a question about the FACB09HM and is the answer not in the manual?
Questions and answers