Table of Contents
Advertisement
Quick Links
Advertisement
Table of Contents

Related Manuals for Monoprice Blackbird 43624


Summary of Contents for Monoprice Blackbird 43624
- Page 1 Blackbird™ H.265 HDMI® over IP Kit P/N 43624, 43625 User's Manual...
-
Page 2: Safety Warnings And Guidelines
SAFETY WARNINGS AND GUIDELINES Please read this entire manual before using this device, paying extra attention to these safety warnings and guidelines. Please keep this manual in a safe place for future reference. This device is intended for indoor use only. •... - Page 3 Before plugging the unit into a power outlet, ensure that • the outlet provides the same type and level of power required by the device. Unplug this device from the power source when not in use. • Take care to prevent damage to the power cord. Do not •...
- Page 4 INTRODUCTION The Blackbird™ H.265 HDMI® over IP Kit allows you to distribute an HDMI video signal to distances up to 492feet (1 50 meters) over a single Cat5e/6 Ethernet cable. In addition to a normal connection between the Encoder/Transmitter and Decoder/Receiver, the Encoder can be connected directly to a computer and the signal can be decoded using the VLC®...
-
Page 5: Customer Service
If you have any problem with your order, please give us an opportunity to make it right. You can contact a Monoprice Customer Service representative through the Live Chat link on our website www.monoprice.com or via email at support@monoprice.com. Check the website for support times and links. -
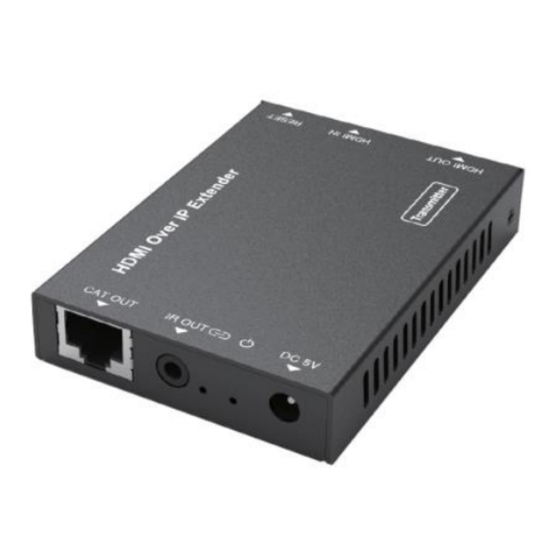
Page 6: Product Overview
PRODUCT OVERVIEW Encoder/Transmitter HDMI OUT: HDMI® pass-through connector for connecting a local display. 2. HDMI IN: HDMI input for connecting the video source device. RESET: Press the button to reset the Encoder to the factory default values, including the IP address, encoding information, and the default EDID®... - Page 7 Decoder/Receiver HDMI OUT: HDMI® connector for connecting an HDMI display. 2. RESET: Momentarily press the button to reset the Encoder to the factory default values, including the IP address, encoding information, and the default EDID® of 1920x1080p@60Hz. Press and hold the button for 3 seconds to copy the EDID®...
-
Page 8: Standard Connection
STANDARD CONNECTION The standard method of using the kit is to connect the Encoder to the Decoder using a Cat5e or Cat6 Ethernet cable, as shown in the sample connection diagram above. -
Page 9: Network Connection
NETWORK CONNECTION... -
Page 10: Direct Connection
You can also connect the Encoder to an Ethernet switch, which allows you to connect multiple Decoders to the switch to distribute the video signal to multiple displays, as shown in the sample connection diagram above. DIRECT CONNECTION Physical Installation The third connection method is to connect the Encoder directly to a PC. - Page 11 2. Using a High Speed HDMI® Cable (not included), plug one end into the HDMI IN port on the Encoder, then plug the other end into the HDMI out port on your video source device (e.g., Blu-ray Disc™ player). (Optional) Using a High Speed HDMI Cable (not included), plug one end into the HDMI in port on a local display, then plug the other end into the HDMI OUT port on the Encoder.
- Page 12 Double-click the Internet Protocol Version 4 (TCP/IPv4) entry.
- Page 13 4. Select the Use the following IP address option. 5. Input 192.168.10.200 in the IP address field and 255.255.255.0 as the Subnet mask. 6. Click the OK button twice to save the settings and close the dialogs. Note that your PC and the Encoder must be in the same network segment.
- Page 14 Encoder GUI Once your PC is connected to the Encoder and configured, you can access the Encoder's built-in Graphical User Interface (GUI), which allows you to change the Encoder's default settings. To access the GUI, open a web browser on your computer and type 192.168.10.10 in the address bar.
- Page 15 Resolution: Use the drop-down list to select the video • resolution for each of the two streams. The MainStream can use 1920x1080 or 1280x720. The SubStream can use 720x576, 640x480, or 352x288. Bitrate: Type the desired bitrate into the Bitrate field, then •...
- Page 16 This screen allows you to change the network settings of the Encoder. DHCP: When set to ON, the Encoder will automatically • obtain its IP address, Subnet, and Gateway. When set to OFF, you can change the network settings. The IP address and the Gateway must use the same network segment, with the first three numbers in the address having the same value and the last number should be different.
- Page 17 Note that we recommend using the default network settings. Press the Reset button on the Encoder to reset the network settings to their default values. Update Tab In the event of a firmware update being released, you can use this screen to flash the firmware on the Encoder. Once you have downloaded the firmware update file, click in the field to select the file, then click the Upgrade button to begin the update.
- Page 18 remove power or press the Reset button until the upgrade process is 100% complete. VLC Media Player Perform the following steps to configure the VLC media player® for use with the Encoder. Download and install the VLC media player, then double- click the desktop icon to launch the program.
- Page 19 Input the network URL of the desired stream. The MainStream URL is: rtsp://192.168.10.10/live/main/av_stream The SubStream URL is: rtsp://192.168.10.10/live/sub/av_stream 4. Click the Play button to start watching the video stream.
- Page 20 Click Tools > Codec information in VLC®, then click the Codec tab to display the current codec and resolution. Click the Statistics tab to display the current bitrate. Note that the bitrate can fluctuate on the display. This is normal. Note that you can change the codec and resolution on the Video tab of the built-in GUI.
-
Page 21: Technical Support
Check the website for support times and links. To download the latest drivers, firmware, manuals, etc., go to www.monoprice.com and type the P/N into the search bar. If available, support files are linked at the bottom of the product page. -
Page 22: Specifications
SPECIFICATIONS Full Kit: 43624 Decoder Only: 43625 Maximum Resolution 1920x1200@60Hz Video Bandwidth 10.2 Gbps Supported HDMI® Audio LPCM 2.0CH, 48kHz Format HDMI Version 1.4b HDCP™ Version RGB, YCbCr 4:4:4, Color Spaces YCbCr 4:2:0 Color Depth 8-bit IR Frequency 20 ~ 60 kHz Compression Technology H.264 and H.265 Input Power... -
Page 23: Regulatory Compliance
(2) this device must accept any interference received, including interference that may cause undesired operation. Modifying the equipment without Monoprice's authorization may result in the equipment no longer complying with FCC requirements for Class B digital devices. In that event, your right... - Page 24 may be required to correct any interference to radio or television communications at your own expense. This equipment has been tested and found to comply with the limits for a Class B digital device, pursuant to Part 15 of the FCC Rules.
- Page 25 This Class B digital apparatus complies with Canadian ICES-003. Cet appareil numérique de la classe B est conforme à la norme NMB-003 du Canada. Monoprice™, Blackbird™, the Blackbird logo, and all Monoprice logos are trademarks of Monoprice Inc. HDMI®, the HDMI Logo, and High-Definition Multimedia Interface are trademarks or registered trademarks of HDMI Licensing LLC in the United States and other countries.
Need help?
Do you have a question about the Blackbird 43624 and is the answer not in the manual?
Questions and answers