
Related Manuals for FRENCH FITNESS FF-FSR70


Summary of Contents for FRENCH FITNESS FF-FSR70
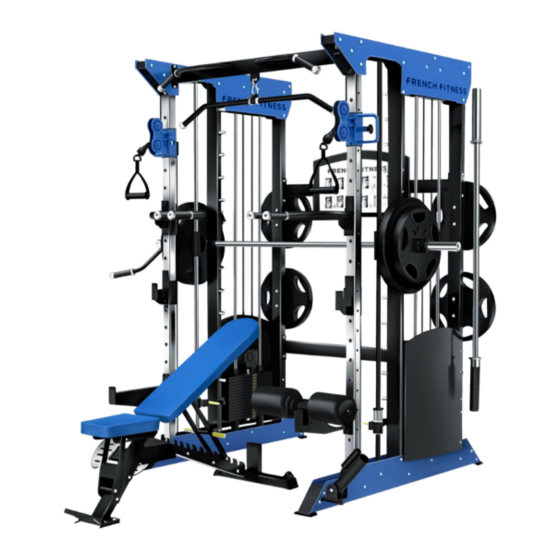
- Page 1 Product Code: FF-FSR70 Dual Cable Smith & Half Rack System (New) ASSEMBLY MANUAL Bench and Olympic Plates are optional. Everything else in the pics is included...
- Page 2 ...
- Page 3 FSR70 1.9" X 1.9" X 0.08" Stainless Square Tube 3.15" X 1.57" X 0.08" Rectangular Steel Tube 1.9" X 1.9" X 0.08" Stainless Square Tube 1.57" X 1.57" X 0.08" Φ1.9" X 0.08" Stainless Square Tube Stainless Round Steel Tube...
- Page 4 Parts list-1 (individual packaging) Rear riser assembly*2 Center column assembly* NO 1 Base welding sets*2pcs NO 2 NO 3 2pcs Optical axis fixing Middle connection NO 4 Top component*2pcs NO 5 NO 6 group*2pcs components*1pcs 200 lb Version 286 lb Version Upper beam assembly*1 Lower connection Functional trainer right...
- Page 5 Parts list-2 (individual packaging) Right parallel bar welding Lifting welding NO 19 NO 20 NO 21 Low pull welding group*1pcs group*1pcs group*1pcs Lat Pulldown welding Left Smith Insurance Right Smith Insurance NO 22 NO 23 NO 24 *1pcs Group *1pcs Group*1pcs Pully and weight stack NO 25...
- Page 6 Parts list-3 (assembly parts) NO 30 Right upper cover *2pcs NO 31 Left upper cover*2pcs NO 32 Right lower cover *2pcs NO 33 Left lower cover*2pcs NO 34 Cover for stack*2pcs NO 35 sticker plate *1pcs Olympic Chrome Stainless steel conduit NO 36 NO 37 NO 38...
- Page 7 Parts list-4 (assembly parts) NO 48 Chain 0.35m*2pcs NO 49 T bolt*1pcs NO 50 Locker *2pcs Weight stack NO 51 Tricep Dip rope*1pcs NO 52 NO 53 Weight stack rubber*4pcs bushing*76pcs Weight stack guide Weight stack - NO 54 NO 55 NO 56 Cable*2pcs sleeve *4pcs...
- Page 8 Blister pack screw schedule-5 (standard parts) Hexagon flat head screw Hexagon flat head Hexagon flat head screw M10*95*34pcs screw M10*70*4pcs M10*60*18pcs Hexagon flat head screw cross recess pan head Locknut M10*70pcs M10*20*19pcs screw M5*10*8cs Hexagon flat head Flat washer Ø10*70pcs screw M10*100*12pcs...
- Page 9 CL E AN G U I D E ROD S Step must be completed prior to installing. Failure to do so can leave residue from packaging and other sources stuck in the bushings Guide rods need to make sure they are cleaned prior to installation otherwise this will cause the top plate to get...
- Page 10 Assembly steps Step NO Item NO Name Quantity Item NO Name Quantity NO 1 Base welding group Tools Put two Base welding group on the ground,keep in same direction and 1.2m distence...
- Page 11 Assembly steps Step NO Item NO Name Item NO Name NO 2 Rear riser assembly Hexagon flat head screw M10*60 Flat washer Ø10 Locknut M10 Tools No.6 hexagon socket screw driver,wrench If you tighten every bolt firmly at first, it may result in the distortion of the finished product.To avoid this, tighten bolts lightly until the main frame is assembled and leveled then fasten the all bolts firmly.
- Page 12 Assembly steps Step NO Item NO Name Item NO Name Middle connection NO 6 components Hexagon flat head screw M10*100 Flat washer Ø10 Locknut M10 Tools No.6 hexagon socket screw driver,wrench If you tighten every bolt firmly at first, it may result in the distortion of the finished product.To avoid this, tighten bolts lightly until the main frame is assembled and leveled then fasten the all bolts firmly.
- Page 13 Assembly steps Step NO Item NO Name Item NO Name Lower connection NO 8 component Hexagon flat head screw M10*100 Flat washer Ø10 Locknut M10 Tools No.6 hexagon socket screw driver,wrench If you tighten every bolt firmly at first, it may result in the distortion of the finished product.To avoid this, tighten bolts lightly until the main frame is assembled and leveled then fasten the all bolts firmly.
- Page 14 Assembly steps Step NO Item NO Name Item NO Name NO 3 Center column assembly Hexagon flat head screw M10*20 Tools No.6 hexagon socket screw driver If you tighten every bolt firmly at first, it may result in the distortion of the finished product.To avoid this, tighten bolts lightly until the main frame is assembled and leveled then fasten the all bolts firmly.
- Page 15 Assembly steps Step NO Item NO Name Item NO Name NO 4 Top component Locknut M10 Hexagon flat head screw M10*60 Hexagon flat head screw M10*20 Flat washer Ø10 Tools No.6 hexagon socket screw driver,wrench If you tighten every bolt firmly at first, it may result in the distortion of the finished product.To avoid this, tighten bolts lightly until the main frame is assembled and leveled then fasten the all bolts firmly.
- Page 16 W A R N I N G Please DO NOT proceed with assembly if the floor is not level or the frame doesn't measure as described on page 12. If the inner frame width does not measure 46 7/8" +/- 1/8" (as shown in the picture on page 12), please loosen frame bolts and push or pull the frame.
- Page 17 Assembly steps Step NO Item NO Name Item NO Name NO 5 Optical axis fixing group NO 55 Weight stack -350 NO 39 cover optical axi NO 53 Weight stack rubber Weight stack guide Hexagon flat head NO 54 sleeve screw M10*60 Pully and weight stack NO 25...
- Page 18 Assembly steps Step NO Item NO Name Item NO Name Optical shaft sleeve Right Smith NO 64 NO 24 welding group Insurance Group NO 38 Smith optical axis NO 45 Bottom nylon sleeve NO 47 Protection guide sleeve Left Smith Insurance NO 23 Group Tools...
- Page 19 Assembly steps Step NO Item NO Name Item NO Name Functional trainer right NO 61 Flat washer Ø10 pully Functional trainer left NO 62 Locknut M10 pully NO 37 Stainless steel conduit Hexagon flat head screw M10*70 Tools No.6 hexagon socket screw driver,wrench The lettering surfaces of the regulating tube are installed facing inwards, the lettering sequence is from bottom to top, and the left and right adjustment groups are assembled in the same way.
- Page 20 Assembly steps Step NO Item NO Name Item NO Name Push combination NO 63 assembly Hexagon flat head screw M10*20 Locknut M10 Flat washer Ø10 Tools No.6 hexagon socket screw driver,wrench Install the push bar as shown in the picture...
- Page 21 Assembly steps Step NO Item NO Name Item NO Name NO 56 cable NO 59 Rubber column NO 40 Safety hook NO 41 Low pull bar NO 58 lock sleeve Tools No.4 hexagon socket screw driver,wrench 220lb Weight Stack Option: 2x #56= 364" (1 small metal ball end and 1 hole end) 286lb Weight Stack Option: 2x #56= 356"...
- Page 22 Assembly steps Step NO Item NO Name Item NO Name NO 30 Right upper cover Locknut M10 NO 31 Left upper cover Hexagon flat head screw M10*100 Flat washer Ø10 Tools No.6 hexagon socket screw driver,wrench As shown in the picture, please note that no screws are installed in the two holes marked, which are reserved for the next installation of the beam.
- Page 23 Assembly steps Step NO Item NO Name Item NO Name NO 7 Upper beam assembly Hexagon flat head screw M10*100 Flat washer Ø10 Locknut M10 Tools No.6 hexagon socket screw driver,wrench As shown in the picture, install Upper beam parts...
- Page 24 Assembly steps Step NO Item NO Name Item NO Name NO 34 Cover for stack NO 35 sticker plate Hexagon flat head screw M10*20 cross recess pan head screw M5*10 Tools No.6 hexagon socket screw driver,wrench Note that the hook of the sticker plate is installed inward.
- Page 25 Assembly steps Step NO Item NO Name Item NO Name NO 12 Barbell bar welding group NO 46 Protective ring NO 50 Locker Hexagon flat head screw M10*20 Tools No.6 hexagon socket screw driver,wrench As shown in the figure, after install the barbell welding, then put the locker on it...
- Page 26 Assembly steps Step NO Item NO Name Item NO Name Left parallel bar NO 14 Left hook welding group NO 18 welding group Right hook welding Right parallel bar NO 15 NO 19 group welding group NO 16 Left safety welding set NO 17 Right safety welding set Tools...
- Page 27 Assembly steps Step NO Item NO Name Item NO Name NO 32 Right lower cover Locknut M10 NO 33 Left lower cover Hexagon flat head screw M10*100 Flat washer Ø10 Tools Pay attention to distinguish the left and right guard plates, as shown in the picture, the large hole guard plate is on the outside.
- Page 28 Assembly steps Step NO Item NO Name Item NO Name Hexagon flat head NO 26 Landmine Group screw M10*60 Hexagon flat head NO 28 Foot rack group screw M10*20 NO 29 Low pull pedal group NO 49 T Bolt Tools No.6 hexagon socket screw driver,wrench As shown in the picture, install the other components.
- Page 29 Assembly steps Step NO Item NO Name Item NO Name NO 20 Lifting welding group NO 40 Safety hook NO 21 Low pull welding group NO 22 Lat Pulldown welding NO 27 Push bar welding Tools As shown in the figure, part of the unassembled parts and parts that are not used in the movement are hung on the label board to complete all assembly.
Need help?
Do you have a question about the FF-FSR70 and is the answer not in the manual?
Questions and answers