Table of Contents
Advertisement
Quick Links
BMG 2200RC
Huskvarna, 2023-07-21
Operator's manual, EN
Dear customer,
Thank you for choosing a Husqvarna quality product. We hope that you will
genuinely enjoy it.
Please note that the enclosed manual contains BMG 2200RC references.
The Husqvarna Group is vouching for the quality of this product.
If you have any questions, please do not hesitate to contact our local sales or
service point, or visit www.husqvarnacp.com.
Husqvarna AB
SE-561 82 Huskvarna, Sweden
Advertisement
Table of Contents

Related Manuals for Husqvarna Blastrac BMG 2200RC


Summary of Contents for Husqvarna Blastrac BMG 2200RC
- Page 1 Huskvarna, 2023-07-21 Operator’s manual, EN Dear customer, Thank you for choosing a Husqvarna quality product. We hope that you will genuinely enjoy it. Please note that the enclosed manual contains BMG 2200RC references. The Husqvarna Group is vouching for the quality of this product.
- Page 2 Inspection comments Inspection before initial operation on: __________________________________________ __________________________________________ Date of initial operation: __________________________________________ Serial number & Year of manufacture: __________________________ _____________ Recurring inspections / maintenance log Date / Hour counter Findings Repairs / Cleaning Test on *Competent person 21.07.2023...
-
Page 3: Table Of Contents
Table of contents 1. Introduction ..........................5 Product liability ........................5 2. Machine description ........................5 3. Safety ............................7 General Safety Rules ......................7 Work area safety ......................... 7 Electrical safety ........................8 Grounded product instructions ....................9 Extension cables ......................... 9 Personal safety ........................ - Page 4 Wet grinding (option) ......................27 5.10 Pre-separator and dust collector ..................28 5.12 Pulse cleaning system ....................... 30 5.13 Battery monitoring ......................30 5.14 Remote control operation ....................32 6. Maintenance ..........................33 Buffers ..........................35 Main air tank ........................36 Compressor ........................
-
Page 5: Introduction
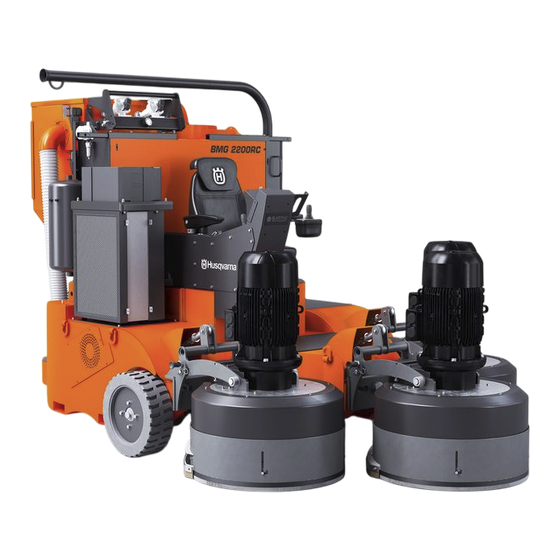
This machine is not intended for use by persons (including children) with reduced physical, sensory or mental capabilities, or lack of experience and knowledge. Husqvarna offers a course on the use of the machine in order to make the operating and maintenance personnel familiar with all elements of the machine. - Page 6 BMG 2200RC Dust collector Water spray nozzle (optional) Pre-separator Front camera (optional) Longopack bagging system Head light Remote control system (optional) 15 kW grinding motor Ergonomic seat with joystick in armrest Control panel Drive wheels Display of camera system (optional) Grinding head HEPA 14 filter Rubber rear seal...
-
Page 7: Safety
• Maintenance work that goes beyond the scope described in this manual must only be performed by qualified Husqvarna technicians. • Do not operate the product unless you receive training before use. Make sure that all operators receive training. -
Page 8: Electrical Safety
Any damage to the electric cables and/or electrical components is not permitted. • If a cable or plug is damaged, it must be replaced immediately. Only use original Husqvarna parts. • The voltage on the identification plate must comply with the power supply. -
Page 9: Grounded Product Instructions
• Do not do modifications to the power plug from its factory specification. If the power plug or power cord is damaged or must be replaced, speak to your Husqvarna service agent. Obey local regulations and laws. •... -
Page 10: Noise Safety
If the length of the brushes is (due to wear) less than 5 mm or they are extremely deformed, the brushes have to be replaced. Refer to the Service Manual for the order numbers. • All repair work has to be done by qualified Husqvarna personnel, this guarantees a safe and reliable machine. •... -
Page 11: Safety For Dust Collector And Pre-Separator
• Prevent premature wear to keep the machine as dust free as possible. Clean the machine regularly with a dust collector and non-aggressive materials, especially the upper drive. Never use a high pressure water cleaner to clean the machine. • It is advisable to stock all spare parts or wear parts that cannot be supplied quickly. -
Page 12: Grinding Safety
• The compartments that are not dust-tight must be opened with suitable tools and thoroughly cleaned. • Operators should observe all safety regulations appropriate to the materials being handled. • Never expose the filter cartridges to moisture! 3.13 Grinding safety •... - Page 13 Transport mode modemodemode Maximum incline 8% 21.07.2023...
-
Page 14: Symbols On The Product
Symbols on the product Always use an approved breathing mask class FFP3 or Electrical shock. Danger Hazardous higher. voltage in motor even when solid state controller is OFF. Disconnect main power Use approved hearing before servicing motor, controller or protection. associated wiring. -
Page 15: Initial Operations
4. Initial operations Examine the machine before the operation. Do a check of the below points to make sure that you can safely operate the machine. Electrical safety • Use only extension cables for extending the main cable that have size and marks in accordance with the overall power consumption of the machine. -
Page 16: To Replace The Wings / Discs / Pads
To replace the wings / discs / pads Warning: Always put on a personal protective equipment! The dust can be hazardous to the health! Wear a dust mask! Wear protective gloves! The wings can get hot! Don’t risk burning your hands! •... -
Page 17: Before Start-Up
To remove the diamond wings 1. Refer to chapter 3. Safety and put on a personal protective equipment. 2. Make sure that all moving parts of the machine are completely standstill before replace the wings. 3. Secure the grinding heads in the UP position with the quick release pins. There is one on each side of each grind head. -
Page 18: Seat And Seatbelt
Seat and seatbelt Adjust the seat as needed and sit up straight and well back in the seat. Seatbelt Seat switch, the machine works only if a person is detected. Adjustment front/back Weight adjustment To fasten your seat belt, pull the webbing (1) out of the retractor and insert the metal tongue into the buckle (3). -
Page 19: Operation
5. Operation Joystick (left-hand) for driving forward / reverse Cruise control button Grinding speed Remote control ON / OFF Lights ON / OFF Start grinding Compressor ON / OFF Stop grinding Joystick (right-hand) for left and right movement button on top for 360° turning Dust collector ON / OFF Drive speed adjustment (during cruise control) -
Page 20: Touchscreen
Touchscreen System menu Error warning Cruise control activated notification Ampere grinding head LEFT (1) Amount of Volts received from power supply 380Vac is warning, 355 Vac is alarm RPM grinding head LEFT (1) Amount of Volts received from Accu’s 47 V will give a warning, 45V will give Pop-up alarm 43 V Stop pop-up, ps the machine. - Page 21 Error warning menu The check-box for error / warning Acknowledged error / warning (yellow) Description of error / warning Back to main menu Date and time of error / warning Acknowledge selected errors / warnings Value of error / warning Check / Uncheck All errors / warnings Current state of the error / warning To remove errors / warnings...
-
Page 22: Operation Mode
Settings menu Settings menu Alarm history menu Description of machine item Active alarms , Error warning menu Turning speed Maintenance menu Current of machine Screen dimmer, brightness of the touch screen Torque Grind heads turning counterclockwise ON/OFF (OFF is normal turning direction of grind heads = clockwise) Fault Selection for dry or wet grinding... -
Page 23: Battery Drive Transport To Work Area
When the battery reaches 45 V an red pop-up is shown, you must stop the machine and load the battery. If you do not stop the machine, the damage of the battery can occur. When the voltage reaches 43 V the machine stops. The machine has a battery monitor at the rear. -
Page 24: Start Grinding
Start grinding Refer to fig. in chapter Operation on page 19. 1. Sit down in the control seat and fasten the seatbelt. • The seat is equipped with a sensor that will detect if a person is present in the control seat. 2. -
Page 25: Restart After A Power-Loss Or Em-Stop
Speak to Husqvarna experts for the correct application of the different tools and their related working speeds. Do a grinding on parallel tracks in such way that the electric cable does not become twisted. -
Page 26: Grinding With 1, 2, Or 3 Heads
5.8.2 Grinding with 1, 2, or 3 heads The 3 grinding heads can be used independently. You can use 1, 2 or 3 grinding heads in every combination. Raise the grinding head(s) you do not use and secure in the UP position with the quick release pins. Turn the particular grinding head(s) off (12, 13 and/or 14) in the SYSTEM MENU: 5.8.3... -
Page 27: Swivelling Mode
5.8.6 Swivelling mode If the surface is very flat after several steps of grinding, the grind heads can be set to the less swivelling mode. The less swivelling mode could help to get a perfect finish for the polishing process. (1) Quick release pins for swivelling mode. -
Page 28: Pre-Separator And Dust Collector
10. Disconnect the electrical cable of the Dwyer Magnesense (11). 11. Loosen pin to disconnect the pre-separator (8). 12. Clean the system wth the air pistol (9). 13. Observe the air pressure gauge (10). 14. Use a crane or other lifting device to lift the pre-separator off of the hinges and put it on its side to prevent damages. - Page 29 5.11 Longopack cassette replacement Wear a dust mask of at least FFP3 and gloves. 1. Make sure that the compressor and dust collector are OFF. 2. Close the butterfly valves (1). 3. Remove the Longopack holder (2). 4. Position the new Longopack bag (5) in the support. 5.
-
Page 30: Pulse Cleaning System
5.12 Pulse cleaning system The M-class filters inside the dust collector are automatically cleaned with the pulse cleaning system. The compressor builds up pressure in the main air tank. From the main air tank the air passes through a spitter-type water separator and a control valve which is set at 7 bar. The pulse tank has 2 pulse-valves which are alternately activated every 15 seconds. - Page 31 You can read from the display the parameters as follow: Press the “+” button to set the screen to on. Press the “+”and “-“ buttons again to scroll through display to see the state of charge. Battery Voltage (V) Amperage (A) that is flowing out of the battery (negative sign) or into the battery (no sign) Estimated time (h) of how long the battery can support the present load until it needs recharging...
-
Page 32: Remote Control Operation
5.14 Remote control operation ON/OFF button of the remote control Joystick for FORWARD / BACKWARDS driving Pairing indicator Dustcollector ON/OFF button Battery indicator Cruise control Joystick for steering LEFT/RIGHT Start grinding button FreeFlow ON/OFF button Grind heads UP Pairing button RPM speed of the grind heads Scroll page on the remote control screen* Stop grinding button... -
Page 33: Maintenance
Warning: sure that all drives stop and the machine is cooled down. Maintenance activities which are not specified in this manual can only be performed by qualified Husqvarna personnel. Speak to your Husqvarna dealer if machine requires servicing. Before you do any maintenance work you must read and understand the safety chapter. - Page 34 Follow additional operating and maintenance instructions of Original Equipment Manufacturers if included during your service and maintenance work. All repair work must to be done by qualified Husqvarna personnel, this to guarantee a safe and reliable machine. Any guarantee on the machine is automatically void when: •...
-
Page 35: Buffers
Buffers Do a weekly check if the diamond plates have too much space in the buffers. If the diamond plate has too much space, replace complete buffer plate. Standard the buffer plates are delivered with 4 shock absorbers. You can add 4 more absorbers to have 8 absorbers at all. -
Page 36: Main Air Tank
Main air tank The main air tank (10) is filled by the compressor from point (6) and through water separator (5). On top of the main air tank is a safety valve and at the bottom a control valve. The control valve (11) is set at 8.5 bar and the safety valve (8) is set at 10 bar. -
Page 37: Compressor
Compressor The compressor (16) is driven by 1.5 kW electromotor (15). Refer to fig. on page 36. Clean the air filter (17) of the compressor every month. Only use air to clean the air filter. Replace the air filter at least once every year or 3000 working hours (whichever comes first). Do a check of the cooler (18) of the compressor and clean it at least once every year or 3000 working hours (whichever comes first). -
Page 38: Pulse System
(8) must be re-adjusted! Only a skilled Husqvarna technician performs this action, speak to Husqvarna for help. If the pressure of 7 bar is not reached, there can be a leakage in the pneumatic circuit. It can be also dirt in the filter of the water separator or in the air filter of the compressor. -
Page 39: Water Separator
Water separator The water separator (5, refer to fig. on page 36) filters dirt particles, oil and water from the air. It is recommended to replace the filter after every 450 operating hours. Never remove the water separator from the pulse system. The water separator keeps the pulse system from clogging up with oil, dirt and water. - Page 40 2. Turn the cap to set the pressure. 3. Press cap (6) down. The pressure regulator is now fixed. Note: Never change the pressure settings unless you have explicit permission from the Husqvarna technician. The safety hooks must be completely retracted if reset the pressure. 21.07.2023...
-
Page 41: Filters Maintenance
Filters maintenance Observe the pressure difference gauge. When the pressure difference gauge is above 1.9 kPa (20 cm H O), the filters are probably clogged. If the dust collector loses suction power, do the steps as follow: 1. Do a check of all dust hoses and connections for damages and obstructions. 2. -
Page 42: Filter Replacement
Filter replacement Warning: Always put on a personal protective equipment, the dust can be hazardous to the health! • Make sure that the machine is turned off. • Always put on gloves and a dust mask of at least class FFP3. •... -
Page 43: Blower Motor
Blower motor The dust collector has the powerful 13.8 kW blower motor (1). The inlet is equipped with a limit valve (2) to safe the blower motor. If you change the settings of this limit valve, it will void any warranty. From the inlet of the blower motor a dust hose goes to the upper part of the dust collector where the air goes through the filters. -
Page 44: Drive System
Drive system The BMG 2200RC is driven by 2 Heinzmann High Torque Wheel Hub Drives. It has two electronic controllers that are operated with the joystick and buttons from the control or remote panel. The motors are equipped with a holding brake and manual release so that the wheels can rotate freely without the brake. - Page 45 The driving of the machine cannot be operated from the controls when the wheels are released. The function of the holding brakes is mechanically by-passed. To move up or put on ramp the machine, speak to outside company that have appropriate experience. 1.
-
Page 46: Maintenance Of The Battery Charger Green 6 48/50
Keep the battery charger as dust free as possible. • To reduce risk or injury, only charge Husqvarna approved batteries. Do not charge other types of rechargeable or non-rechargeable batteries as they can explode and cause damage or injury. •... - Page 47 Display LCD The battery charger has 3 monitor menus. Use the P2 button to navigate between the menus. MONITOR2 MONITOR1 MONITOR3 Next is a summary of the information reported respectively in the 3 MONITOR displays. MONITOR1 Example Description Pb 1Pb ST 48V /35A Technology of the battery, type of curve, size of the battery charger 43.3 V 35A Battery voltage and current...
-
Page 48: Battery Maintenance
During normal operation batteries do not release any harmful gasses and there is no leakage of acidic electrolyte into the environment. Only use Husqvarna approved batteries. Husqvarna cannot guarantee the safety of the machine when other batteries are used. - Page 49 The temperature of work is important for batteries. Optimum range is from -10⁰C to 45⁰C. Do not keep the batteries in a minimum temperature for a long period of time. The batteries can freeze in low temperature. Never charge a frozen battery. More characteristics are shown in the table below. NONSPILLABLE 21.07.2023...
-
Page 50: Remote Control Maintenance
6.13 Remote control maintenance Always refer to the safety, service and maintenance instructions from the manufacturer of the remote control for all information. To keep availability and operational safety, a regular maintenance is necessary on the system. Daily maintenance Before each use of the transmitter, do a check of the below parts for faults or damages: •... -
Page 51: Maintenance Screen
6.14 Maintenance screen Air pulse settings Back to settings menu Description of machine item Override wheel brakes Hour counter of section Override head, rotates the selected head slowly when raised for maintenance purposes Minute counter of section Time settings Reset button of the time counters per section 21.07.2023... -
Page 52: Input / Output Screen
6.15 Input / Output screen In the Input / Output screens you can do a check if buttons, joysticks, sensors etc. works properly. Push the button of a applicable function and it lights up in the screen. 6.16 Remote Input / Output screen 21.07.2023... -
Page 53: Troubleshooting
Troubleshooting Failure Possible cause Action Excessive vibration Imbalance due to worn or broken Replace all worn or broken parts. or/and unusual noises grinding tools. Worn out buffers or buffer rubbers. Replace all worn or broken parts. The bearing is damaged. Do a check of the bearings on the axle of the wheel shaft and the axle of the drive-motor shaft. - Page 54 Failure Cause Check Action Product does not No power supply. Do a check if the supply cable Connect the cable. start is connected in the wall Set the main switch to on socket/generator. (when applicable). Incorrect voltage. Do a check of the main switch Do a check of voltage (when applicable).
-
Page 55: Technical Data
The electrical diagrams of the electrical system are placed inside of the control panel. Design and specifications are subject to change without notice by Husqvarna BV. If the grinding machine has power from a generator, the generator must be operated in accordance with the current EN-VDE directives (this applies to the protective ground conductor in particular) in order to make sure that all safety devices operate correctly and to eliminate possible damage to electrical components. - Page 56 It is not permitted to dispose this product as normal household waste. Obey the local recycling requirements and applicable regulations. Despite the fact that this guide is made with care, Husqvarna takes no liability for errors in the manual and the possible consequences.
- Page 57 EU Declaration of Conformity We, Husqvarna AB, SE-561 82 Huskvarna, Sweden, tel: +46- 36-146500, declare on our sole responsibility that the product: Description Floor grinder Brand Husqvarna Type/Model BMG 1500 RC, BMG 2200 RC Identification Serial numbers dating from 2023 and onwards...
- Page 58 UK Declaration of Conformity We, Husqvarna AB, SE-561 82 Huskvarna, Sweden, tel: +46- 36-146500, declare on our sole responsibility that the product: Description Floor grinder Brand Husqvarna Type/Model BMG 1500 RC, BMG 2200 RC Identification Serial numbers dating from 2023 and onwards...
- Page 60 www.husqvarnaconstruction.com Original instructions 1143615-26 2023-07-21...
Need help?
Do you have a question about the Blastrac BMG 2200RC and is the answer not in the manual?
Questions and answers